Saturday, 24 June 2017

Jenny Gillies Enchanted Garden Exhibition

For anyone in Christchurch, New Zealand there is a wonderful exhibition of Jenny Gillies floral art to wear at the Botanic Gardens Kiosk Gallery until the end of June 2017. So if you hurry you can still see it.

Jenny Gillies has bought floral creations to life with her 'Enchanted Garden' exhibition. The Seasonal collections of these acclaimed botanical “works of art” are inspired by the beautiful surroundings of the Christchurch Botanic Gardens. A must see attraction, which has been featured both nationally and internationally in exhibitions and live performances promoting our beautiful Garden City. Beauty, humour and an abundance of colour are showcased in this enchanting exhibition which will “grow” and fascinate the senses seasonally.

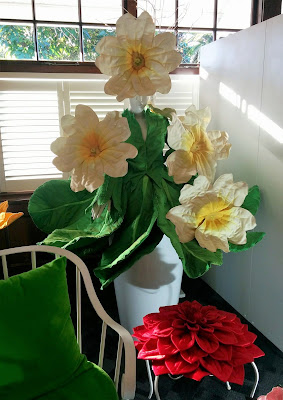
I think even I could keep this vase of flowers alive.

Jenny Gillies Enchanted Garden Exhibition

Many hours could have been spent at the exhibition watching the video of Jenny's garments in stage performances. I miss seeing her performances at the Christchurch Cathedral as part of the Flower Festival. The garments were often worn by ballet dancers and they provided grace of movement that really suited the flowers.

The sunflower in the picture below was the first costume Jenny created and led to her over twenty year career in designing these floral garments.

Jenny Gillies Enchanted Garden Exhibition

It is a true visual feast with these garments featured in the exhibition.

Jenny Gillies Enchanted Garden Exhibition

The kiosk isn't very big but the round shape really suits how the garments are displayed. I took lots of photos here are three to give a feel for the exhibition.

Jenny Gillies Enchanted Garden Exhibition

Jenny Gillies Enchanted Garden Exhibition

Jenny Gillies Enchanted Garden Exhibition

Just love the Banana Passionfruit it really demonstrates Jenny's quirky risque sense of humour with the placement of the dangling bananas.

Jenny Gillies Enchanted Garden Exhibition

Saturday, 17 June 2017

TSW Odette Top Pattern Alterations

When I made The Sewing Workshop Odette top I made the size small straight out of the envelope with the only change being to the side seams which I stitched at 3/8 inch instead of 5/8. Whilst this top is wearable (and perfectly acceptable if it was RTW) there are a number of changes that I felt were necessary to the pattern to get a good fit for me.

I have seen other versions of this top on the internet with the same problems, particularly in the bust area, so I thought it would be useful to include pictures of the alterations to better explain the process. Having a wearable muslin makes it easier to identify the changes that need to be made.

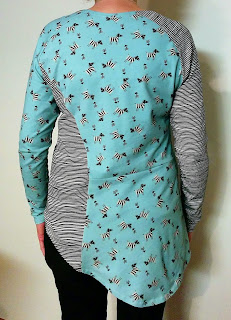
This post has been updated to add pictures of the zebra top the second version of the TSW Odette, including the alterations. The fit is still not perfect but is improved, although looking at the pictures side by side the improvements aren't that visible.

My thoughts on the Odette Zebra top can be found here, and on the Tundra top (the original version) here.

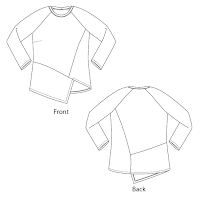
The pattern line drawing

The Sewing Workshop Odette Top Line Drawing

The full bust adjustment


Creates Sew Slow: TSW Odette Tundra Top Creates Sew Slow: TSW Odette Tundra Top

Creates Sew Slow: TSW Odette Zebra TopCreates Sew Slow: TSW Odette Zebra Top

Creates Sew Slow: TSW Odette Zebra Top

I have enough circumference around the bust but have the horizontal drag lines indicating I need more depth for my full bust. In the pictures the lines are more pronounced on the princess seam side but in real life both sides are equally bad and need fixing.

For the left front princess seam I removed 1 inch at the raglan sleeve end tapering to nothing at the bust curve.  This was achieved by removing 1/2 inch on each pattern piece. The photograph below shows the alteration made to the princess seam. With my altered pattern piece on top of the original.

Creates Sew Slow: TSW Odette Top Pattern Alterations

For the right front the bust dart needed to be made larger but the problem appeared as gapping at the arm hole.  I created a 1 inch dart on the right front into the raglan armhole then pivoted it into the side seam enlarging the existing dart, shown in the photographs below.  I marked the bust point on the pattern piece as I thought the dart was a bit low.  I found the bust point by measuring down 8 inches from the neck edge point on this pattern piece and in four inches from centre front.  Once I knew the bust point I raised the end of the dart up half an inch - could possibly have raised it 1 inch but felt a bit funny about all my alterations being 1 inch. Stupid I know but pattern alteration is not instinctive and for me there is always a degree of second guessing myself.

Creates Sew Slow: TSW Odette Top Pattern Alterations

Creates Sew Slow: TSW Odette Top Pattern Alterations

Creates Sew Slow: TSW Odette Top Pattern Alterations

The raglan sleeve

At the front of the garment I seemed to have excess fabric in the raglan sleeve.  Normally when I do a full bust adjustment I redraw the shape of the armhole back to the original size and don't alter the sleeve pattern piece.  For the raglan sleeve I actually removed the same 1 inch as the front pattern pieces by creating a 1 inch dart in the front raglan sleeve tapering to nothing at the back. I then redrew the front seam line. This is the one aspect of the pattern alterations that I am unsure about - was the fabric really extra or have I just altered (ruined) the shape of the neckline?

For some reason I also forgot to alter the top when I originally made it for my forward shoulder so I moved the shoulder dart point towards the front 5/8 inch. This meant that I had to re-shape the dart edge so when the dart was closed the fabric is level. The top wasn't too uncomfortable to wear without the forward shoulder adjustment but I still noticed it.

Creates Sew Slow: TSW Odette Top Pattern Alterations


Creates Sew Slow: TSW Odette Top Pattern Alterations

The sway back

Once again a normal alteration I completely failed to do. Even though the seam in the back is not at centre back I just removed 1 inch at the nearly centre back seam line tapering to nothing at the side seam.

Creates Sew Slow: TSW Odette Tundra Top Creates Sew Slow: TSW Odette Zebra Top

Creates Sew Slow: TSW Odette Top Pattern Alterations

The style changes

I don't like the fact that it is relatively straight across the back and would also like it to cover more of my bottom so I have changed the back pattern pieces to have more of a shirt tail. The changed pattern piece is at the top of the photograph with the original underneath for comparison.

Creates Sew Slow: TSW Odette top pattern alterations

Something else I'm thinking about is increasing the peplum circumference at the hem by slashing and spreading the pattern piece. I'll save that idea for another time.

So now I have altered the pattern I just need to make another one to see if the changes were completely successful in correcting the fit or if more are needed. As well as seeing if the shirt tail idea is as great as I think it will be.

Saturday, 10 June 2017

TSW Odette Tundra Top

I have been intending to sew The Sewing Workshop Odette top for some time, as I just love anything asymmetrical. The pattern has been lurking around the sewing room ever since it was purchased it just took a while  to reach the top of the making queue.

The finished garment

As I haven't found my size or standard alterations yet in TSW patterns I decided to make the top in fabric I wouldn't mind sacrificing to a wadder. The finished garment is good enough from a RTW perspective but when you sew for yourself you expect a higher standard so I consider this a wearable muslin.

Despite my general ambivalence about the colour/pattern and fit of this top it will be put into wardrobe circulation.  How often it is worn will determine its lifespan in the wardrobe versus the charity shop bag.

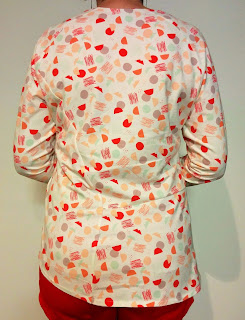
Creates Sew Slow: TSW Odette Tundra Top

Creates Sew Slow: TSW Odette Tundra Top

Creates Sew Slow: TSW Odette Tundra Top


The fabric

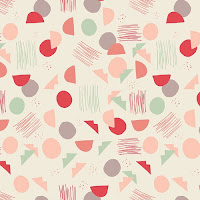
Creates Sew Slow: AGF Village Tundra fabric

Another AGF cotton jersey this one from their first organic cotton collection Hello, Ollie by Bonnie Christine. It is called Village Tundra in colourway sprout, a 95% cotton 5% spandex knit. A nice weight at 260 gsm and lovely and soft. It came from Stonemountain and Daughter earlier this year.

When I purchased the fabric I really loved it and could see it clearly fitting into my wardrobe. But that strange phenomena happened during its journey across the Pacific ocean, so that by the time it reached New Zealand it was less ideal, the pattern less attractive, even though it will absolutely fit into my wardrobe aesthetic. Why does the excitement of fabric buying sometimes overcome discernment?

The pattern

Creates Sew Slow: TSW Odette & Ivy topsCreates Sew Slow: TSW Odette line drawing

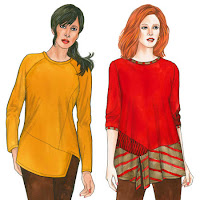
This is The Sewing Workshop Odette and Ivy top pattern. I used Odette in a size small.  Odette is described as a pieced top with right front dart and left princess seam, side front and back panels, tapered peplum. Long sleeves have shoulder darts. Neck binding and stitched hems.

The pattern alterations

None - well I cut a size small and used 3/8 inch side seams rather than the required 5/8 inch giving me an extra 1 inch through the body. I also didn't use the neck binding.

To choose my size I looked at the finished garment measurements and considered how much ease I wanted.  I thought the size small might be just a titch too clingy and am happy with my choice to include that extra inch.

So what alterations should I have done? Quite a few.  I have noticed other versions on the web have some of the same challenges. Maybe I will do another post detailing the changes I should have made to this pattern as it would probably be helpful for my aging memory to make the pattern changes whilst they are still fresh in my mind.

The sewing

The top was sewn together on the overlocker as normal apart from the hems and neckline which were sewn on the Featherweight with a straight stitch. I was careful to only sew the side seams with a 3/8 inch seam allowance but all other seams were sewn at 5/8 inch. I mitred the corner then hemmed the peplum piece on the two sides before I attached it to the body of the garment as per the instructions which made it easier to handle.

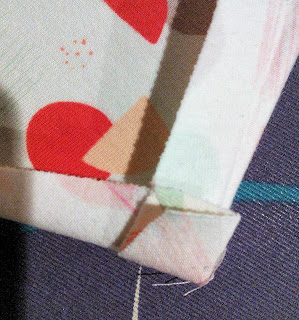
Being a bit OCD I love getting the perfect mitred corner. The instructions had you trim the seam allowances but I think that gives you a lumpy mitred corner.  Instead I fold the seam allowance open which makes the little square you see in the picture below to give a really flat sharp mitred point a la Louise Cutting.

Creates Sew Slow: TSW Odette mitred cornerCreates Sew Slow: TSW Odette mitred corner

The styling

No real styling. Here it is after a day at work and the flight home with my red Andrea Moore cropped zip leg pants and United Nude Step Mobius ankle booties

Creates Sew Slow: TSW Odette Tundra Top

Creates Sew Slow: UN Step Mobius Ankle Boots

Saturday, 3 June 2017

Machine Embroidery in the Wild


A few weeks ago The Quilt Show shared a link to a YouTube video of Harriet Riddell an intrepid machine embroiderer. I bookmarked it because I didn't have time to watch it, only to promptly forget about it. Having rediscovered it and watched it I just had to share Harriet in India.


Harriet describes herself as a performing machine embroiderer and she travels with her trusty sewing machine which has been converted to operate from a battery or the sun or a bicycle. Harriet sketches what is around her using a sewing machine and what she produces is amazing. Here is Harriet in Kenya.


Love machine embroidery and to see it being done out in the wild by someone so passionate is inspiring.