Wednesday 27 February 2019

Papercut Fjord Elongated Red Cardi

Every collection of clothes in my wardrobe has to have a cardigan, I used to have a red cardigan which I don't remember purging from the wardrobe but it wasn't there last time I went to wear it. So a cardigan was an essential need for my Minnie Mouse jeans wardrobe.  This isn't the planned cardigan, that is Vogue 8653 a Marcy Tilton pattern that will eventually appear in a lovely fleecy red Merino. The Papercut Patterns Fjord cardi shot to the top of the list however because of the fabric and the Pattern Review Sewing Bee round one challenge.

For a nano second I considered sewing the cardigan for the PR Sewing Bee. Living Coral in its literal sense as the colour of the year Pantone 16-1546 was a non-starter. Coral is not a colour that features large in either my wardrobe or fabric stash. However I found the words used to describe Living Coral very evocative.

"Vibrant, yet mellow PANTONE 16-1546 Living Coral embraces us with warmth and nourishment to provide comfort and buoyancy in our continually shifting environment.  Living Coral emits the desired, familiar, and energising aspects of colour found in nature. In its glorious, yet unfortunately more elusive, display beneath the sea, this vivifying and effervescent colour mesmerises the eye and mind. Lying at the centre of our naturally vivid and chromatic ecosystem, Living Coral is evocative of how coral reefs provide shelter to a diverse kaleidoscope of colour."

I saw my chosen fabric as vibrant and buoyant, embracing me with warmth and comfort, and together these are extremely nourishing and energising for me. Watching the image of the fish swimming amongst the coral I could clearly see this gorgeous vibrant red amongst the colourful kaleidoscope. I also saw my choice of red as conveying the danger living coral is facing from mankind with tourism, global warming and local pollution causing the diminution of coral reefs.

Even the fabric cooperated it was waiting for me at home on Thursday, was washed on Friday and I had until 6pm on Saturday (19 January) to finish my entry (sewing, photos, review etc) which would have been a challenge but not completely unachievable. So why no sewing bee entry (aside from the sheer terror at the thought of progressing to the next round)?

(Un)fortunately the rules did not suit my vision for pattern and fabric, which was for a mid-calf length cardigan not one between waist and knee length. After a momentary pause I decided  compromising that vision for Sewing Bee wasn't an option. That choice wasn't at all influenced by the terror! Once Sewing Bee faded from my mind so did the urgency to get this finished or even started.

The finished garment
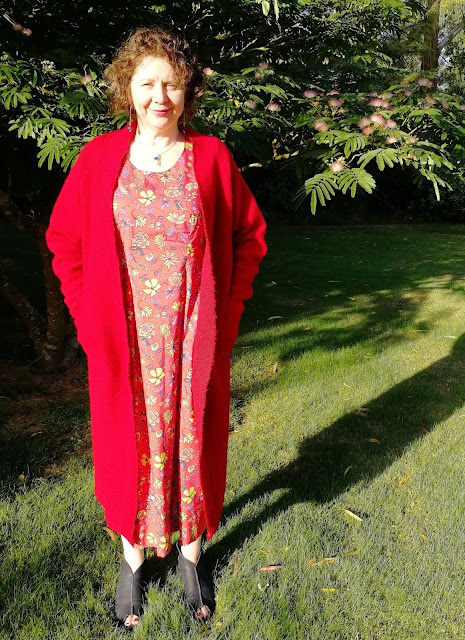
For some reason this cardigan was quite hard to photograph. This could have been because of the temperature (low 30°C) with bright sunshine.

Creates Sew Slow: Papercut Fjord Elongated Red Cardi
Posing in front of our gorgeous (if somewhat stunted*) silk tree
Creates Sew Slow: Papercut Fjord Elongated Red Cardi

Creates Sew Slow: Papercut Fjord Elongated Red Cardi

Delicate silk tree flowers
*the silk tree is stunted because a much larger pine tree fell on it in its formative years and whilst it has finally developed the canopy of the silk tree it will never regain its lost inches in height.

The fabric

This fabric was a recent purchase from Elliott Berman Textiles specifically for a lengthened Fjord cardi and is described as a darkened high risk red. It is 100% wool, 60" wide and imported from Italy. "This deep colour boiled wool is ideal for a Fall/Winter jacket or coat. It has a nice fuzzy finish and soft drape."

Creates Sew Slow: Papercut Fjord Elongated Red Cardi

What is not mentioned in the description is the course texture with that most despised of wool properties scratchiness.  If I had been able to feel this fabric before purchase I would not have bought it. It did soften slightly after its gentle woolly wash with wool wash liquid. Since making I have washed it in two cups of white vinegar which didn't really alter the softness much either. Maybe my disappointment with this wool is because of the easy access I have to high quality New Zealand merino which is always baby soft. In hindsight I should have bought merino and boil washed it myself.

I was in too minds about using this wool for its intended purpose but decided I had nothing to loose. Otherwise the fabric would have been consigned to the stash never to see the light of day until it was finally disposed of. As the pattern had never been used before I was more than happy to sacrifice this wool if it turned out not to be a wearable muslin. Of course if I had my brain engaged when I made this it would have been underlined to protect me from the wool but I didn't so it isn't.

The pattern


Creates Sew Slow: Papercut Fjord Elongated Red Cardi

This pattern is described as "Cosy at it’s finest! This super comfy cardigan features angled side pockets, a wide neckband and two length options. Inspired by a Fjord, a long narrow deep inlet."

Recommended fabrics are: medium weight jersey knits.

The pattern alterations

For style preference, to achieve a 44" long coat cardigan, I lengthened the back (3), and front band (5) pattern pieces by 23½" (including a 1" hem as the hem band wasn't used). The side front (2) and centre front (1) pattern pieces were lengthened by 2" because I wanted a deeper pocket. Then a new pattern piece was created to attach to the bottom of the side and centre front pieces, 12⅝" wide by 22¼" long. I also lengthened the sleeves by 4" plus a 2" hem instead of using the sleeve cuff.

The height of the front band at the back of the neck was reduced by 1", and re-shaped to blend back into the original band width at the notch.  I did this to remove the rolled edge of the shawl collar as I felt it was too small to get a really full shawl collar so would rather have a stand-up collar.

I used the size small for the bust and waist grading out to the size large at the hips. Measuring over the dress I was wearing at the time this gave me 1" of ease at the bust, 3" at the waist and 3" at the hip. I kept the ease at the waist and hips the same to try and give the illusion of a waist through a little bit of shaping.

The only alteration I made for fit was a 1½" sway back adjustment. As the pattern has raglan sleeves I didn't do my normal forward shoulder adjustment.

For the future the length of the front band needs to be reduced by 2" so that the collar snugs into the back of the neck.  Not quite sure how to tackle this change on the front band pattern piece as it is cut double width and folded in half. Maybe it is as easy as reducing the overall length of the pattern piece by 2" and stretching it more around the neck. Think this will be a trial and error experiment next time I make this cardigan.

Creates Sew Slow: Papercut Fjord Elongated Red Cardi
Top left: protruding back collar; top right; collar hugging back of neck
Bottom left: dart created in neckband; bottom right the wedge removed from the neckband
I was able to alter this in the finished garment because the selvedge of the wool fabric was used at the outer edge rather than folding the band in half. At the centre back seam a 2" dart was made by sewing 1" further in at the selvedge tapering to nothing at the neck edge.

The sewing

This was sewn on the overlocker with red thread rather than black to emphasise the lines of the cardigan. Even though it is only visible on the inside I was still slightly fixated on the whole coral imagery, and as I was making it I saw the seam lines as a nod to the coral branches. Now it is made and I have taken pictures of the inside it looks nothing like branches.

Creates Sew Slow: Papercut Fjord Elongated Red Cardi
Inside the Fjord elongated red cardigan
Amazingly I even followed the instructions as I made this. They were good apart from only sometimes mentioning to press the seams. On the positive side when they did mention pressing the seam they told you which direction to press it, very useful for beginner sewers.

Outfit of the day

It isn't really the weather for this as an outfit of the day. I have carried it to Wellington on a couple of occasions and wore it more indoors than out. Our building is super air conditioned to the point of freezing the occupants and here in NZ we are not used to the concept of taking a layer off to go outside.

Instead of an outfit of the day here are my beloved and I at the end of a very arduous photo shoot. The difficulty was I kept shutting my eyes as I squinted at the sun and beloved couldn't see the screen of my phone very well when taking the pictures. Those pictures where I had my eyes open often had strange shadows across my face and outfit which made it difficult to see the lines of the cardigan. Many photos later we had enough to use for the blog so a very big thank you to my other half for his patience and perseverance.

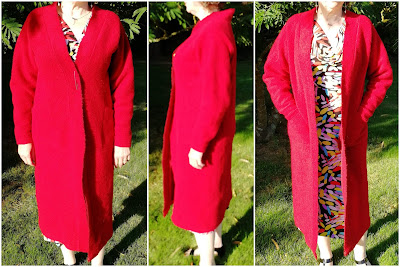
Creates Sew Slow: Papercut Fjord Elongated Red Cardi

Sunday 17 February 2019

The Minnie Mouse Wardrobe and Silhouette Patterns Lana's Jeans

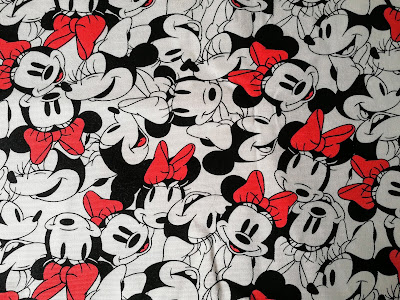
So off I go again down the rabbit hole of collecting more fabric than I can ever use to create a wardrobe based on a particular colour theme. The star of the show is the Minnie Mouse fabric used to make a pair of jeans using Silhouette Patterns #3300 Lana's jeans.

In the PBS programme Fit to Stitch series six episode one, Peggy Sagers the host is given "homework" to create an inspiration mood board - a collage of ideas that can be used to put a fashion collection together. I find that I don't need a mood board just a piece of fabric to generate ideas for a collection. This is true for my quilting as well, where the quilt is generally based on a print fabric with the other fabrics chosen to compliment and boost the feature fabric.

The wardrobe

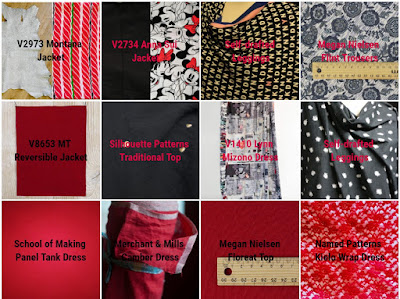
So I started off with the Vivienne Files classic four by four template and as usual got carried away and produced a four by three grid as well. Some of these fabrics have been long standing members of my stash and others recent purchases specifically for the Minnie Mouse Collection.

I can see this red/black/winter white collection being my theme for 2019. I do have a couple of other collection ideas - one based around another piece of fabric and the other inspired by a pair of shoes. These other ideas are germinating and may become an entry for two Pattern Review contests, otherwise it is going to be a red, white and black year.

Creates Sew Slow: The Minnie Mouse Wardrobe and Silhouette Patterns Lana's Jeans
Row 1: Victory Patterns Ulysses trench; Sew Chic Phantom jacket;
Silhouette Patterns Lana's jeans; Megan Nielsen Flint trousers
Row 2: Papercut Patterns Fjord Cardi; Style Arc Maris top; Silhouettes Patterns Lana's jeans
Row 3: Alabama Chanin School of Making Panel Tank top; Oki Style Sine top;
How to do Fashion Kastrup top; V1415 Tom & Linda Platt tunic A
Row 4: Named Patterns Mintto Swing top; V9112 Marcy Tilton Cirque dress;
V1563 Issey Miyake dress; Named Patterns Kielo Wrap dress
Creates Sew Slow: The Minnie Mouse Wardrobe and Silhouette Patterns Lana's Jeans
Row 1: V2973 Montana jacket; V2734 Anna Sui jacket; Self-drafted leggings;
Megan Nielsen Flint trousers

Row 2: V8653 Marcy Tilton Reversible jacket; Silhouette Patterns Traditional top;
V1410 Lynn Mizono dress; Self-drafted leggings

Row 3: Alabama Chanin School of Making Panel Tank dress;
Merchant & Mills Camber Set dress; Megan Nielsen Floreat top;
Named Patterns Kielo Wrap dress
So far I have made Silhouette Patterns #3300 Lana's Minnie Mouse jeans; the black and white Victory Patterns Ulysses trench coat; the Papercut Patterns red Fjord cardi and Silhouette Patterns #400 Traditional Top (now sadly out of print). I also have Vogue 2973 the Montana leather jacket cut out but haven't quite achieved the confidence level necessary to stick the needle into it! Not a very good start to my wardrobe given that I like to think I can produce a garment a week, had two weeks off over Christmas and February is well underway.

The finished garment

I just love my Minnie Mouse jeans. They were made in a Liberty print for my UK travel wardrobe and I thought they fit well but not as well as these ones after a bit of expert Peggy fitting.

Creates Sew Slow: The Minnie Mouse Wardrobe and Silhouette Patterns Lana's Jeans
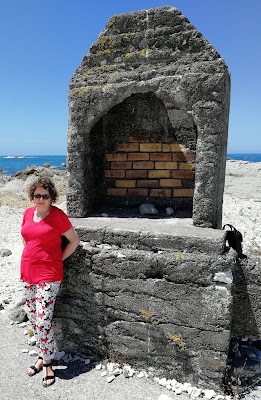
Minnie Mouse jeans on the Kaikoura shoreline
(where you expect to find the chimney breast from a long departed house)
Creates Sew Slow: The Minnie Mouse Wardrobe and Silhouette Patterns Lana's Jeans
Icebreaker butterfly merino tee with Minnie Mouse jeans and United Nude Kiko shoes
Creates Sew Slow: The Minnie Mouse Wardrobe and Silhouette Patterns Lana's Jeans

Creates Sew Slow: The Minnie Mouse Wardrobe and Silhouette Patterns Lana's Jeans

The fabric

This is a firm cotton fabric found in the home dec section of Fabric Vision. The fabric positively yelled to become a pair of jeans and so it did within a couple of weeks of purchase. Minnie Mouse was washed in Coca-Cola (only the original version works) before use and the fabric softened quite a bit. The washing in Coca-Cola to soften jeans fabric is a Peggy tip so quite apt it was needed for this fabric.

Creates Sew Slow: The Minnie Mouse Wardrobe and Silhouette Patterns Lana's Jeans

After much debate with myself I decided not to make any attempt at pattern matching the tossed Minnie Mouse heads. Having been caught out before I spent ages trying to determine if the fabric had a stripe because I would have tried to match that across my legs.  I couldn't find one so just treated the fabric as if it had a nap and laid all the pattern pieces in the same direction.

The pattern

This is a great pattern for a pair of non-stretch jeans, which when made to measure are surprisingly comfortable to wear.

Creates Sew Slow: The Minnie Mouse Wardrobe and Silhouette Patterns Lana's Jeans

The pattern alterations

The pictures are all of my Silhouette Patterns #3600 Ralph's Pant muslin produced in the class with Peggy. I was very naughty and despite seeing the benefits of making a muslin of Ralph's Pant I didn't make one for Lana's Jean I just used the end result of the changes to Ralph's Pant and replicated them in my Lana's Jean pattern.

I was going to try and write a long explanation about the fundamentals of Peggy's fitting technique but I don't need to because Peggy has just published a piece on the Silhouette Patterns' website Understanding Fit working through LCD (length, circumference and depth). This is also covered in the webcasts (all of the webcasts are listed here). The webcasts Peggy did with Lora are really helpful, EF The Great Eight shows the pants roughly about 50 minutes in. There is also a Fit to Stitch episode (number 108) about jeans which includes the Coca Cola tip and fitting.

If crotch depth is too long there are wrinkles right underneath the buttocks this is removed by pinching out a dart at hip level at centre back tapering to nothing at the back side seam. This may or may not need to be repeated on the front depending on if you have excess fabric gathering around the crotch.

If there are diagonal wrinkles from below the outseam just below the hip pointing to the inseam this requires a dart at the inseam at the top of the leg tapering to nothing at the back side seam. Because the front and back of the legs are joined at the inseam whatever dart is taken in the back needs to be carried around to the front tapering to nothing at the front side seam.

Creates Sew Slow: The Minnie Mouse Wardrobe and Silhouette Patterns Lana's Jeans
Trousers Front
Reduce crotch depth ⅞" at centre front tapering to nothing at the outseam (side seam).
Remove inseam length by ¾" at the top of the thigh tapering to nothing at the outseam
Creates Sew Slow: The Minnie Mouse Wardrobe and Silhouette Patterns Lana's Jeans
Trousers Back
Reduce crotch depth by ⅝" at centre back tapering to nothing at the outseam
Remove inseam length by ⅞" at the top of the thigh tapering to nothing at the outseam
Creates Sew Slow: The Minnie Mouse Wardrobe and Silhouette Patterns Lana's Jeans
Adding ⅜" seam allowance to outseam stitching line and removing excess fabric
Creates Sew Slow: The Minnie Mouse Wardrobe and Silhouette Patterns Lana's Jeans
Original Lana's Caesar Jeans versus Minnie Mouse version

The sewing

As I had used the trouser muslin to make alterations to my jeans pattern, which are more closely fitted cupping the buttocks rather than falling straight down, I wasn't entirely sure how well the alterations would work. So I put the jeans together slightly differently and basted them in many places so I could check fit before sewing permanently.

All seams were sewn at ⅜" on the sewing machine and then the seam overlocked. In order to not have to keep changing thread I set up my Singer Featherweight for the top stitching, with red Gutermann topstitch thread, and a slightly tighter top tension at 4.5 rather than the normal 4.

Creates Sew Slow: The Minnie Mouse Wardrobe and Silhouette Patterns Lana's Jeans
Top stitching the inseam
Sewing order:
  • Pockets were sewn to the back and I am really proud of the pattern matching I achieved.
  • Back and back yoke pieces were sewn together at the centre back seam and overlocked, then the back yoke was sewn to the back.
  • Front pockets, fly front and zipper were inserted as per the instructions (Peggy's instructions are excellent and the finished product looks very professional). 
  • Centre front seam was top stitched before the inseam was sewn (the centre back seam was not top stitched until later).
  • Inseam was sewn, overlocked and topstitched.
  • Outseams were overlocked then basted together.
  • After trying the trousers on I had to alter the back yoke by removing ½" at the top of the centre back seam tapering to nothing where it met the back of the trousers. As well as removing ⅝" from the back yoke piece at each side seam tapering to nothing where it met the back of the trousers.
  • Side seam is top stitched from the top of the back yoke to just below the bottom of the pocket bag.
  • Waistband attached, buttonhole made (not without its challenges) and button sewn on.
  • Last but not least the trousers were hemmed.
Creates Sew Slow: The Minnie Mouse Wardrobe and Silhouette Patterns Lana's Jeans
Superb pattern matching on the back pockets

Outfit of the day

The Minnie Mouse jeans went on a day trip to Kaikoura over the Christmas holidays. This is the first time we had been to Kaikoura since the earthquake in 2016. It was very interesting to see how far the sea bed had risen and the distance to the sea in some places.  Kaikoura is suffering from the same fate as Christchurch in that it takes time to replace the damaged buildings but as much as you can tell from a day trip it does seem to have retained its soul.

Creates Sew Slow: The Minnie Mouse Wardrobe and Silhouette Patterns Lana's Jeans
Silhouette Patterns #312 Giorgio's red top with #3300 Lana's Minnie Mouse jeans and Hōgl sandals
Creates Sew Slow: The Minnie Mouse Wardrobe and Silhouette Patterns Lana's Jeans

Wednesday 13 February 2019

Sewing with Peggy Sagers of Silhouette Patterns

In the interests of open disclosure I am a Peggy fan girl. Long long ago one of the blogs I read mentioned this pattern company that produced inspiration / how to videos for their patterns (Silhouette Patterns) which came in B, C and D cup sizing. Whilst I can't credit the blog for the introduction, as my memory has faded, I do thank them from the bottom of my heart for introducing me to Peggy. Once I started watching the videos and bought a couple of patterns I was hooked. Don't be put off by the photographs on the front of the patterns look at the line drawings. The pattern styles suit me and I appreciate them being well drafted.

I have learnt so much from Peggy Sagers and her video tutorials (both free and on DVD). I have all of the DVDs as well as the Fit 2 Stitch PBS series one to six. Many of the patterns I sew are based on the fit I have achieved with a Silhouette Pattern. My sewing is much less hit and miss than it used to be as I know how much ease I like in a garment, have sleeves and their matching armhole templates which I generally use rather than the one in the pattern and so much more.

When organising my trip to the United States for the International Quilt Festival in Houston I planned to spend two nights in San Francisco as I wanted time to go to both Britex Fabrics and Stonemountain and Daughter Fabrics as well as doing a bit of sight-seeing. Then towards the end of August I discovered that Peggy was holding a two-day workshop in Portland, Oregon the Friday and Saturday I would be in San Francisco. Fortunately I hadn't booked my internal flight and even better I could fly San Francisco to Portland to Houston for pretty much the same price as flying San Francisco to Houston. The logistics weren't ideal but it could be done and I was off to Portland.

The finished garment

Over the Christmas holidays I made another pair of Lana's jeans using the fitting knowledge gained in class. After making the Minnie Mouse jeans I sent Peggy the below photo. The before picture is my Lana's Caesar jeans made in April 2018. I was really happy with the fit when I made them but you can really see the difference the pattern changes made to the overall look of the jeans. Peggy responded to the photo with some advice to remove more inseam length to eliminate the wrinkling at the top of my thighs. I have a piece of fabric already selected to make another pair refining the fit further.

Creates Sew Slow: Sewing with Peggy Sagers of Silhouette Patterns

I was quite excited to notice in the after photo that I actually have a thigh gap. I will sleep much better at night now!!! Although I suspect it is an optical illusion.

There will be a blog post about the making of the Minnie Mouse jeans including the pattern alterations. I did intend to include the making in this post, but it was getting a bit long so thought it best to separate them.

The pre-class instructions

About a month before the class Peggy emailed information to help us get the most out of our two-days with her. Essentially her goal is to make it about what you need, be it fitting, sewing skill, pattern work, fabric choices, or something else. If what you are looking for is help with fitting there is information on the instruction page of the website for muslin preparation for each type of garment (blouse, skirt, dress, jacket, or pant). My initial intention was to make three muslins (woven top, jacket and trousers) with the trousers being my priority. This was well within the five muslin limit set for each student, to allow Peggy time to support everyone through the fitting process.

Unfortunately I was sick with a heavy cold the weekend before I left for America and none of my plans happened. So given that trousers were what I wanted help with most I just took pattern #3600 Ralph's Pant with me as well as the bits and pieces needed to make the muslin. This was an excellent plan because it really enabled me to get the most I was capable of out of the class.

Creates Sew Slow: Sewing with Peggy Sagers of Silhouette Patterns
Silhouette Patterns #3600 Ralph's Pant
The cold travelled with me to the States and I continued being sick all the way through the trip and the first week back in NZ. The cold probably lasted that long because I didn't give my body enough time to rest.

Making the muslin

If you really want to maximise your time with Peggy I wouldn't recommend my approach of tracing the pattern, cutting the calico, and basting the seams at the beginning of the class because it obviously limits the opportunity for fitting and learning. However, as my brain had limited capacity for learning it didn't really make a difference.

The trouser muslin was made with 1" seam allowances (normal ⅜" + ⅝" extra for fitting purposes) on outseams and inseams. I only had the normal ⅜" seam allowance for the front and back crotch and waist even though Peggy recommends all of these should have the extra seam allowance. The pattern has slant side pockets which for the muslin I just incorporated into the trouser front, as instructed.

The muslin was sewn together, leaving the opening to get the trousers on and off in the back crotch seam. The crotch curve was clipped so that it didn't alter the fit of the trousers.

Now we are ready to fit. Peggy tweaks the muslin, you sew the alterations then Peggy tweaks the pattern some more if necessary. If you make lots of alterations it can be better to make a second muslin. Lucky for me the number of changes weren't that great and I could stick with just making the one muslin, especially as it took me two days to achieve what you see here.

Creates Sew Slow: Sewing with Peggy Sagers of Silhouette Patterns

Creates Sew Slow: Sewing with Peggy Sagers of Silhouette Patterns

The tutor

As I have already said I am a fan girl. The class was very professionally run and Peggy was very organised. She even brought a sewing machine from Dallas for me to use in class, which was super helpful.

Peggy's training is not that of the home sewer so sometimes there are misunderstandings due to terminology and the home sewing wisdom we have learnt over the years. As a pattern maker who has worked in industry and uses mainly industry techniques in her sewing she finds some of our home sewing doctrines strange. For example, the FBA which she had never heard of and thinks is fundamentally wrong as you are altering length, circumference and depth to fix a depth fitting issue. I got the impression that many of the people in this class had done classes with Peggy previously and we all seemed to be in tune, familiar with each others sewing language.

I found Peggy to be a really knowledgeable, patient and giving tutor. She was able to manage the different needs of her students and was fair in sharing her time with us all. For the fitting stage we all got a turn at the beginning of class and then we wrote our names on a list as we were ready to be fitted again. Many of the class had brought multiple muslins for fitting and some had brought finished garments for critiquing and advice. It really was as interesting to see what Peggy was doing with other people's muslins as having her fit mine. I would do another class with Peggy in a heartbeat but hopefully next time I won't be sick.

The class

No photography is allowed in class to protect the privacy of the students. Given that we were wandering around in our muslins and not necessarily camera ready this was a very sensible approach. I did mean to take a picture of the classroom but photos for the blog are not something I think about when taking a class so I forgot. The class was held at the Portland Airport at Cascade Station Residence Inn by Marriott. The hotel staff were pleasant and it was a nice comfortable bed to rest in after a hard days sewing.

The details are a bit hazy but the class size was small (10 or 12 of us) which gave Peggy the opportunity to give plenty of attention to each of us. This class, driven by the attendees, was all about fitting but Peggy did give us other sewing tips and insights during our two days.

The class room was a good size to work in comfortably without encroaching on each other's space. The tables were a bit small if you wanted to cut out any fabric but we all managed it when necessary. Even though the room had a wall of windows I can't comment on how good it was for natural light as we kept the curtains closed so we could wander around partly clothed for the fitting sessions.

Despite taking what I thought I needed for the class I ended up using Jennifer's cotton calico for my muslin. Jennifer (my table mate) had purchased a whole roll of it from an Ikea in Europe a few years previously and was more than happy to share.

My fellow class mates were great, chatty but not too noisy and focused on what they wanted to achieve in class. I confess to not interacting a great deal with everyone, as I was trying to limit the spread of my foreign germs, which is a shame because it is always so interesting to meet others that share the same interest.

So if you ever have the opportunity to take a class with Peggy I would highly recommend it, or as a starting point watch her free videos on YouTube (the Silhouette Patterns website also has a place where past webcasts are listed). If you find you can't get enough then there is also a closed Silhouette Patterns Enthusiasts! Facebook group you can join to ask questions / seek advice or model your Silhouette Patterns creations.

Post class entertainment

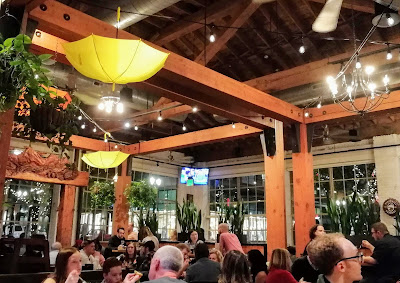
Jennifer and her husband took me into Portland on Friday night for dinner at Deschutes Brewery. This was after some quality time spent at Powell's Books. A whole city block of books which of course meant I had to buy one (or two). Deschutes was the only place I took photographs during my two day visit. I'm really not a natural born picture taker.


Creates Sew Slow: Sewing with Peggy Sagers of Silhouette Patterns
Deschutes Brewery, with brightly coloured umbrellas hanging from the ceiling.
We travelled into the Pearl District from Cascade Station on the Metro. As an ad hoc social observation both the Metro in Portland and the Bart in San Francisco seem much more widely used by all levels of society than the bus in Houston. Cath and I really stand out on the bus in Houston. Yet Houston bus drivers are extremely courteous and helpful, the buses themselves are tidy and we certainly don't feel in any danger from our fellow passengers. I suppose when the whole city is geared around the car there is no impetus to use public transport.