There are many other pieces of fabric in my collection that could be made into these jeans so don't be surprised if this pattern appears again soon.
The finished garment
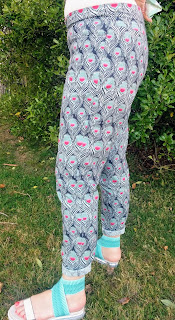
These jeans were made the week before we left on our five week trip to England and were on my list of must sew items for the travel wardrobe. Funny how the must sew items always end up being completed in a mild state of panic at the last minute.The finished jeans are not perfect but for the first pair made from a never before sewn pattern they are a miracle.
Here they are worn with another garment from my travel wardrobe the StyleArc Besharl Tee which has not yet made it into a blog post but will do one day.
 |
| The front - bit of excess fabric around the knee |
 |
| The side - caught up a bit around the calf |
 |
| The back - complete with under bottom wrinkles |
The fabric
This is a Liberty cotton twill originally produced for a collaboration with Clarks shoes. The pattern is called Caesar. I wasn't sure how this non-stretch twill would work for a pair of trousers but the colours were so fabulous for my travel wardrobe that I bought some any way.The fabric does soften with washing especially if you use the trick with Coca-Cola. Peggy Sagers of Silhouette Patterns introduced Coca-Cola as a fabric softener to many of us through her YouTube videos. I have a front loading washing machine so you put the Coca-Cola in the soap dispenser instead of soap and wash the fabric - don't add any fabric softener just use the Coca-Cola on its own. The fabric softening effect can only be achieved with Coca-Cola original and not with any other brand. I personally can't tolerate the taste so the only place you will find Coca-Cola in our house is in the laundry.
As my jeans were not perfect I bought some more of this fabric on-line from The Fabric Store whilst we were away. With the benefit of distance from the production of these they will stay in my wardrobe and I will squirrel away the extra fabric for the future. When this pair of jeans wear out the fabric is on hand for another pair!
If you want some of this fabric too it is still available in The Fabric Store's online shop.
The pattern
As is often the case with a Silhouette Pattern the image on the front cover is not that inspiring. However the bones of these patterns are always good. They are well drafted for me and I haven't had a disaster with any of the patterns used so far. Often I prefer to start off with a Silhouette Pattern and alter the style to get the outcome I want rather than use another brand of pattern that looks to be just what I want but often fits badly. So whilst I wanted skinny jeans (within the limits of using a non-stretch fabric) I started with these straight leg jeans.I also feel that given all the free videos and information Peggy provides to enhance my sewing skills I should at least support her company.
The pattern alterations
I traced my pattern onto lightweight sew-in interfacing tracing a mixture of size 8 and 12, based on the finished garment measurements. Size 8 for the waist and size 12 for the hips.As I wanted the legs to be more of a skinny fit than a straight leg I measured a pair of RTW non-stretch trousers. My RTW trousers are slightly uncomfortable around the knee so I added a bit of extra circumference in the pattern. They are also extremely low rise so I made sure that this pair of jeans fitted to just below my belly button, which seems to be where I like my trousers to sit.
I measured incorrectly for the hem circumference and the tapering from knee to ankle was a bit extreme making them tight around the calf area. The jeans require some jiggling to fall back into place after sitting down. The leg hem opening is also only just big enough to get my foot through.
When narrowing the leg the extra width was removed equally from all four seams (front and back inseam plus front and back side seam). This ensures that the grain line arrow on the pattern continues to represent the fabric straight of grain. Trousers are one of the most important garment to cut on the straight of grain, because of the leg length. Trouser legs that twist are a sign that the pattern was not cut out on the fabric straight of grain. The longer the pattern piece the further off grain you are from the top to the bottom of the pattern piece, if you don't take care with the fabric grain when cutting out.
For the next iteration I am going to increase the crotch depth and the hem circumference, then modify the transition from knee to ankle at the side seam. I may decrease the crotch length very slightly but I am not finally decided on that yet.
After wearing the jeans for a while I have found that the front pocket isn't quite big enough and I am thinking of using the pocket pieces from another pattern as a guide to enlarge the front pockets in these jeans.
When I make my next pair of these jeans I will take photos of my pattern pieces versus the original so that you can see the changes made to my version.
The sewing
As this fabric is essentially stripes that go around the leg it was important when the jeans were cut out for the stripes to visually flow across both legs. I was very careful both when cutting out and sewing to achieve this effect.The sewing wasn't difficult, however I did use two sewing machines and the overlocker in the making of these jeans. All seams were first sewn on the sewing machine (my old Bernina 180) and then overlocked. All of the top stitching was done on my 1953 Singer Featherweight using two strands of Guterman sewing thread, threaded through the eye of a single needle. I wanted to echo the light sea green colour in the trousers in the colour of the top-stitching and I couldn't find a top stitching thread in this colour so had to improvise.
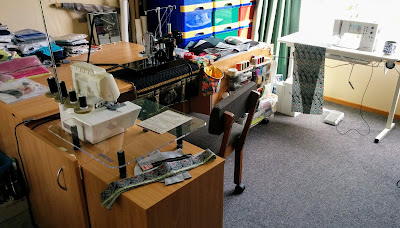
Luckily for me the sewing room is big enough to set up my portable sewing table and use it for the Bernina 180. I bought this table for my Wellington sewing machine, as that is the one I generally take to classes, but my 180 and the Singer Featherweight both fit in. In Winter I have been known to set the portable table up in the living room so I don't have to stray away from the cosy log burner.
I shouldn't really describe my Bernina 180 as old as it was only purchased in December 2000 but it has been replaced by my Bernina 830. The 830 was still at the doctors undergoing diagnostic tests for an on-going illness. I do have it back now (after its two months away) but haven't used it to see if its lingering illness has been cured.
 |
| The sewing room with the overlocker front left, the Singer Featherweight middle left and the Bernina 180 back right. |
For the front pockets I used a quilting cotton and under-stitched the pocket lining to the jeans to make sure the curved seam lay nicely and the pocket lining didn't peak out.
 |
| Under-stitched pocket lining |
 |
| Excuse the large picture of my bottom - it is necessary to show the pattern matched pockets! |
Outfit of the day
I liked this outfit so much I took a photo of myself in the bathroom mirror at the Christchurch domestic airport Koru Lounge on my way to work. I am wearing my Sable and Minx hot pink cashmere cardigan, a Moochi top and Lana's Caesar jeans.Here is a very flattering picture courtesy of my beloved, taken for reasons best know to himself. I am wearing a favourite Sass and Bide striped merino jersey with my Lana's Caesar Jeans whilst lounging on the sofa on a lazy Sunday afternoon - reading blogs!!
And a photo collage of the jeans in action on our recent trip to England.


A very successful pair of jeans particularly as it was the first try at the pattern. Superb pattern matching, the back pockets are practically invisible. I would never have guessed it was that Silhouette pattern - it's much better without the bootleg.
ReplyDeleteThanks Cath - It really is worthwhile to look past the pattern picture including the style and decide if they have the bones of what you wanted. In this case designed for a non-stretch fabric was the most important factor for these jeans.
ReplyDelete