Showing posts with label SewingWorkshop. Show all posts

Monday, 28 October 2024

A Capsule Wardrobe: Pattern Review 2024 Mini Wardrobe Contest

Two posts in the same week after a three year hiatus. I must be procrastinating, or maybe I feel the need to record my capsule wardrobe ideas to share with my friend Stephanie. As usual in life it is a combination of the two. October has also been a month for catching up and sorting out.

I have been away from my sewing machine for five months doing family things in the UK and despite a great deal of enthusiasm it's proving hard to press the sewing start button. The enthusiasm was ignited by the Sewing Workshop's Sew Confident project for October which is a colour blocked Hong Kong vest. It spawned a whole outfit concept. I needed four colours of wool viscose and I was lucky enough to find the colours I wanted fuchsia, orange, teal/petrol and chartreuse. The chartreuse was easy as I had scraps left over from a previous project. The other three colours I found at New Zealand shops. The only problem is that the teal colour bled and I had put it in a wool wash with the orange and fuchsia fabrics. The fuchsia survived but the orange was damaged irreparably. This accident wasn't a disaster as the orange was a much lighter fabric than the others so now the hunt is on for a similar weight orange fabric which fingers crossed I have found. Just waiting for it to arrive in the post. I've also washed the teal fabric a few more times and even soaked it in a white vinegar and salt solution to try and set the dye. I will wash it once more to double check there is minimal colour bleeding before I use it in the vest.

I am blaming the colour run hiccup on why I haven't started sewing but maybe it was serendipity because I discovered Pattern Review are doing a mini wardrobe contest starting 1 November. I may just be ready on time, although a month later than my planned start for the capsule wardrobe.

The ideas

My sewing friend Stephanie suggested the idea of a capsule wardrobe sewalong and of course anything that gets me down that rabbit hole of planning outfits is a fabulous idea. The plan was to start in October when my sewing machine and I were reunited. I put together a collage of the nine fabrics for my capsule wardrobe in August. At that stage I hadn't decided on which patterns to use but the middle fabric was going to be trousers and set the tone for the capsule.

From top to bottom left to right are a blouse, t-shirt, blouse, Sewing Workshop Eureka top (made), trousers, quilted jacket, blouse, trousers and Sewing Workshop Hong Kong vest.

During my sojourn in the UK I missed the creativity of sewing and bought the Pride and Bloom Liberty organic tana lawn on a visit to Guthrie and Ghani with the intention of hand sewing a Sewing Workshop Eureka top. I did hand sew the bust darts and one shoulder seam then spent a weekend with my friend Cath who also sews and magically the top was sewn on her machine with just the hems to hand sew. One garment down only eight left to sew.

Then I saw a picture of a pair of trousers with different coloured fabric used for each leg, which I thought was a fabulous idea. As I already had doubts about the silk matka fabric being suitable for the focus trousers even though I really want that fabric as trousers my thoughts swiveled in a completely different direction. This alternate direction was cemented by my idea for the colour blocked Hong Kong vest.

The capsule will be based on the four colours in my Hong Kong vest with the emphasis on pink and orange.

The rules

The Pattern Review mini wardrobe contest rules are pretty simple and more importantly I can bend my ideas to fit the rules. The first rule is for all work on the garments to be done between 1 November to 5  December 2024, ie five weeks. Secondly five garments need to be sewn, which have to make at least six distinct outfits with no additional garments added. The wardrobe can be for anybody and any combination of patterns can be used.

I believe I can make at least seven outfits from my five garments maybe even nine but we'll see.

The five garments

1.  Sewing Workshop Hong Kong vest in four wool viscose fabrics


2.  Sewing Workshop Picasso pants in two linen fabrics.


3.  Sewing Workshop Getaway jeans in four cotton drill fabrics

I couldn't find the inspiration picture for the two coloured trousers and ended up doing an internet search which led me to an amazing pair of colour blocked jeans by Loewe from 2022.

These could be tricky because I couldn't find chartreuse cotton drill so I have bought some yellow with the intention of dyeing it using a Dylon Dye pod in olive but maybe forest green. I am hoping the yellow base fabric and a green dye give me a chartreuse colour - good in theory but we'll see how it turns out. I also have to do the pattern work to make the Getaway a wider leg jean and then create the smaller inset leg pieces.


4. Sewing Workshop eTee adapted to a tiered midi dress in a stretch mesh 

I have made a dress like this before but using a non-stretch fabric and the Sewing Workshop Maison top as my starting point with four tiers, each 1½ times wider than the one before and eight inches finished length. The stretch mesh is allegedly a Diane Von Furstenberg fabric.


5. Sewing Workshop Origami blouse in a merino poly blend knit


As you can see the five ideas for my PR mini wardrobe bear no resemblance to my original nine piece capsule wardrobe so let's see if I can complete these five without changing my mind again.

After the five...

Once I have made the five garments for the contest I have many more ideas to add to my capsule wardrobe! I don't feel any pressure to have these made by early December it will be an ongoing project over the next few months (or maybe they will be my second capsule of five!!!).

My original Hong Kong vest outfit concept included this Gardenia blouse in a check cotton shirting which I am thinking of cutting on the bias if there is enough fabric.


Whilst searching through fabric options I found this Kaffe Fassett quilting cotton called Koi Polloi which now wants to become a Sewing Workshop Origami skirt and I think will be great with the Gardenia blouse.


Then as you always need more tops than bottoms there is the eTee in an orange viscose rib knit and the Vogue 2814 Issey Miyake blouse in a cotton knit.


And did I mention that I want to make a Sewing Workshop Tosca dress in a Liberty tana lawn print called Ziggy because I have quite a few RTW mesh blouses that I could wear underneath.


Plus for when the weather gets colder I am knitting a variation on the Martin Storey Reed cardigan from Rowan magazine issue 74. I started, three times before I was happy, knitting whilst in the UK and I am not that far from the finish line.


Sunday, 8 August 2021

How I do love thee The Sewing Workshop Maison top

I have long considered joining The Sewing Workshop's yearly skill building course "Sew Confident".  In 2020 with no in person learning opportunities I finally leapt in. I thoroughly enjoyed the monthly magazine, quarterly new pattern and the focus on adapting that pattern throughout the quarter. Needless to say as with most things last year I leapt in but didn't make a single thing from any of the four patterns just leafed through the pages of the eye candy magazine and enjoyed Linda's Facebook Live shows.

This year is different I feel motivated, unfortunately by sewing not blog writing but I will try to do better. I joined Sew Confident Series 10 and have now sewn month one's pattern (Maison Top) six times. Even though I bought one of the Maison kits (not used yet) none of the versions sewn is as per the pattern. For all of the versions sewn so far I threw caution to the winds and used a woven fabric rather than the recommended knit.
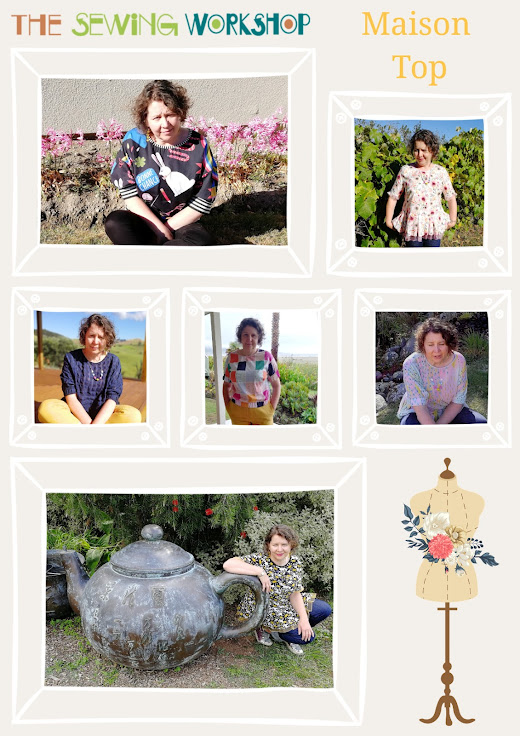
Creates Sew Slow: How I do love thee The Sewing Workshop Maison top

Sew Confident Series 10

The 2021 version of Sew Confident is quite different to previous years. Linda Lee and her team at The Sewing Workshop mastered modern technology during 2020 offering a Facebook Live session every week which whilst a bit of a sales pitch for all things Sewing Workshop I enjoyed. Now that Linda is confident in front of the camera the 2021 membership focuses on a different sewing pattern each month, supported by a Facebook Live sewing class and a question and answer live Zoom session. Both of these can be watched on YouTube after the event.

For the sewing class Linda steps you through all the stages of sewing the pattern successfully, with her tips and tricks. Not always the way I would go about doing things or have been taught in the past but it is always useful to learn new tricks and see alternative approaches.

Month two focused on the Maison joggers - not something I am likely to make anytime soon (although I did see a really nice pair of Trelise Cooper trousers with a rib cuff hem finish so maybe...).

Month three is a new version of the Ikina jacket. I have the old Ikina pattern and maybe I will make it sometime but it didn't happen in March as part of the sew along.

Month four is the Charlie bomber - which has already sparked a number of ideas. Not sewn in April...sigh.   But you never know by the end of the year I may actually truly join in with the whole concept of the sew along. The earmarked fabric is ready and waiting, even ventured out to The Fabric Store to buy the lining fabric so hopefully something to show soon.

Month five is the Whistles shirt which I bought the kit for (Kit A in blue, turquoise and brown) as I just loved the panel print by artist Noelle Phares who paints images contrasting nature with modern structures. I don't like shirts however and haven't worked out how to alter the pattern to keep the placket wedges when there won't be a placket.

Month six is the Hibiscus shirt. Cute but I can't see myself bothering to alter the pattern into a non shirt style.

Month seven is the Gardenia dress and blouse. There was a fabric kit I really fancied which sold out very quickly but I have now bought the pattern so something else you might see by the end of the year.

Month eight is the pieced Eureka top and I immediately leapt in and bought the Havana kit an assortment of six fabrics in tones of teal, bordeaux, black/brown, cream and fuchsia. It was a tough choice between the Havana and Belize colourways. The Havana colourway will be a good match for the black and white striped ponte I am about to make into The Sewing Workshop Pencil pants.

So here we are in month eight and I am just blogging about the January pattern.

Maison Blue Check Linen top

The inspiration for this top came from The Assembly Line Cuff top pattern. I don't have the pattern and am not really interested in purchasing a simple kimono sleeve top pattern however I am constantly attracted to the cuff detailing which I thought would be well suited to controlling the flare of the Maison top sleeve. I have since bought the dress version of the Cuff top, something else to sew this year! With ruffles being all the rage at the moment I replaced the hem band with a pleated flounce which I prefer as a means of creating fullness rather than gathers.

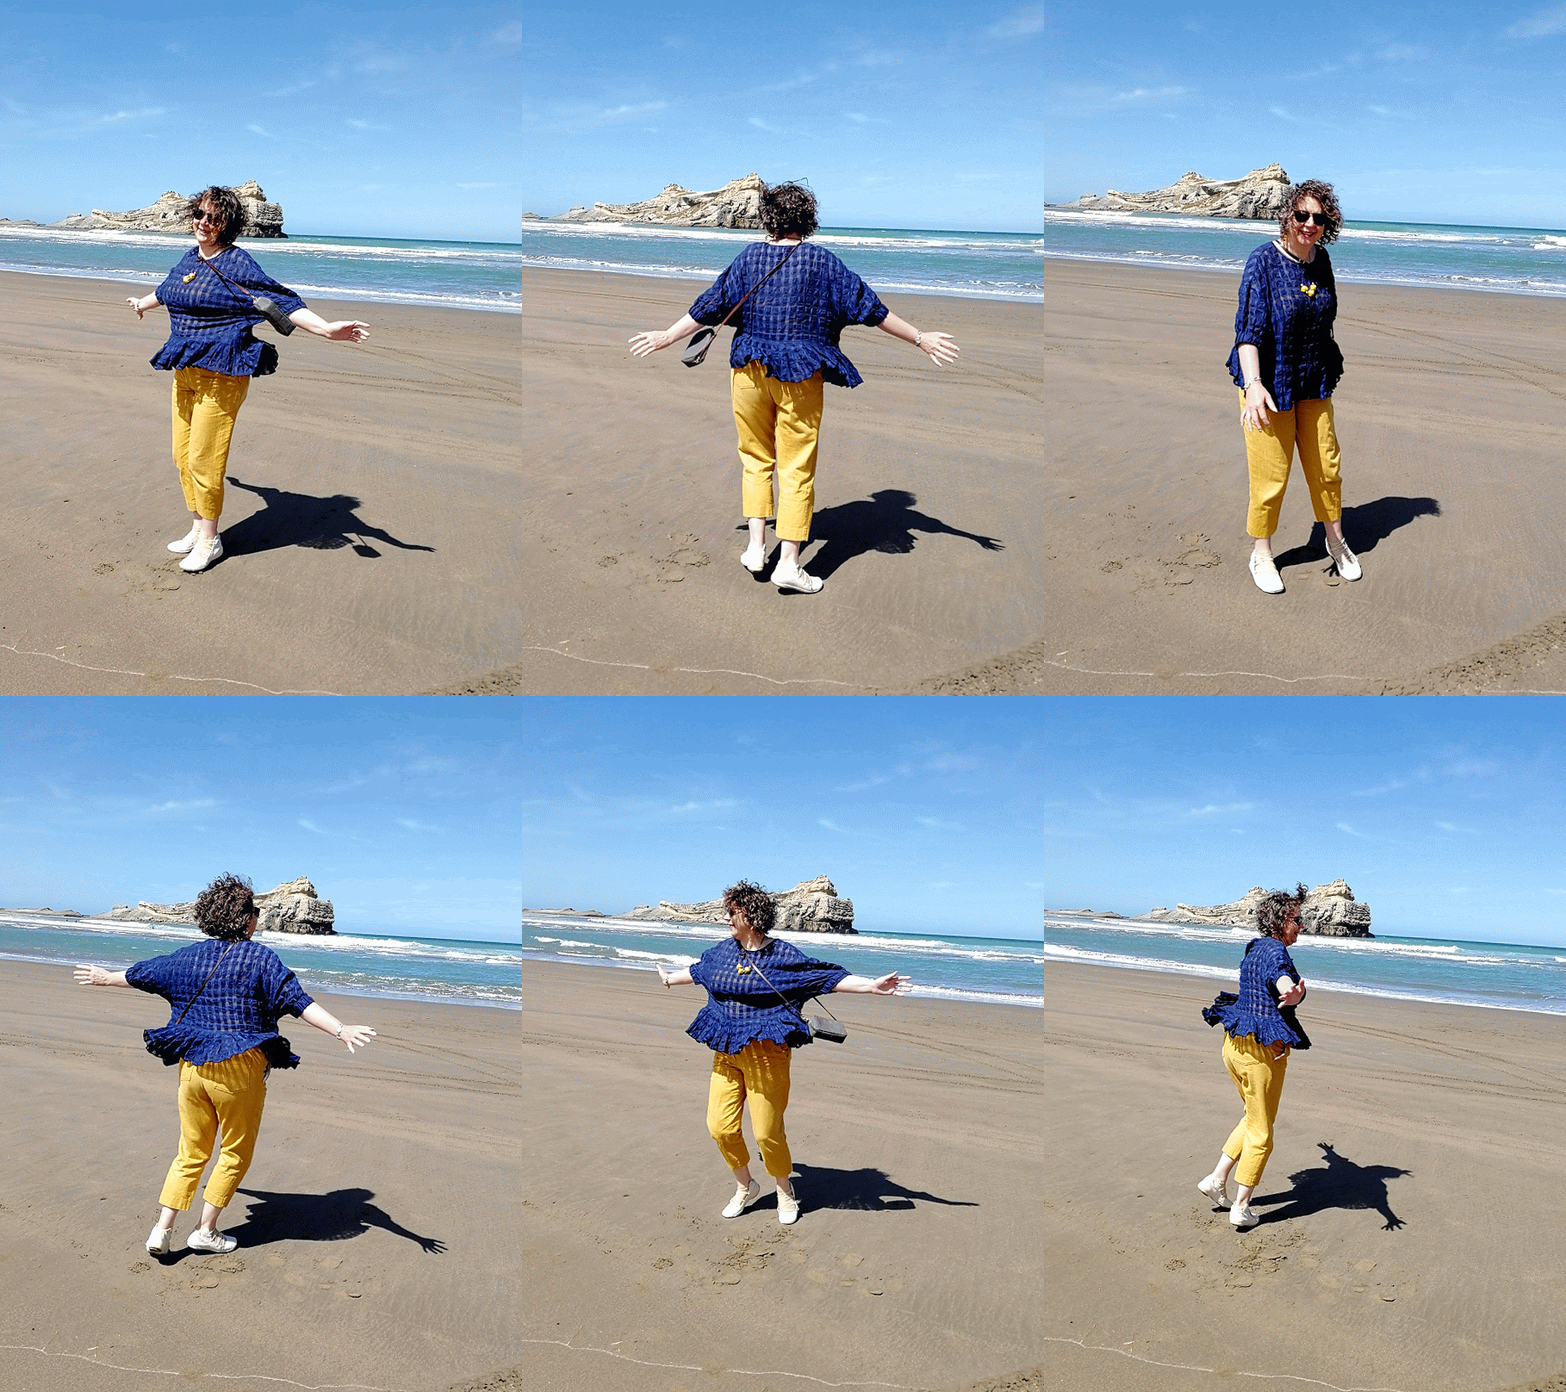
This top is a real favourite. The semi opaque texture achieved with the gingham weave appealed the minute I saw the fabric at Fabric Vision in Christchurch. It has the added bonus of the texture being enhanced when it is not ironed - no worrying about wrinkly linen with this top. Sewing success like this deserves a twirl on the beach on a hot summer's day.

Creates Sew Slow: How I do love thee The Sewing Workshop Maison top

Creates Sew Slow: How I do love thee The Sewing Workshop Maison top

Common wisdom is to sew the first garment as it is straight out of the envelope but that would be too simple. The first thing I did was to make two pattern alterations for fit: a ½" forward shoulder adjustment; and added a French dart. These two fit alterations are common across all my Maison tops. 

On one of the TSW sample garments worn by Erin the diagonal fold of fabric pointing to the bust was clearly visible and this was easily eliminated with the addition of the French dart to provide the necessary depth for my full bust. I chose the size medium tapering from the medium at the waist to the large at the hem.

Specific alterations for this version were to remove 6" from the bottom of the bodice and add a 7" pleated flounce with a rolled hem edge. The 1¼" pleats were made using a dinner fork (instructions can be found in the V&A Mary Quant Georgie dress pattern instructions). One inch was added to the sleeve hem to allow for a 2" hem with 1¾" elastic inserted. I measured the hem of a knit sleeve to determine how long to cut the elastic.

This top was constructed on the overlocker, with only the neck binding and sleeve hem sewn on the sewing machine. Fold over elastic was used to bind the neck edge.

Maison Pastel Dots top

The Sewing Workshop describe this semi-sheer chiffon crepe polyester fabric as "soothing colours blend together like tiny fish swimming in a pastel reef. Seafoam green, mustard, and light pink are the foundation for blue and black bubble-like dots floating on the surface. This flowing fabric is suitable for many different garments; shirts, skirts, dresses, and even flowy pants."

Creates Sew Slow: How I do love thee The Sewing Workshop Maison top

This top was just wonderful to make, using exactly the same pattern alterations as the Blue Check linen version. I can wear different camisoles underneath and it gives the fabric a slightly different look.

Maison Bonne Chance top

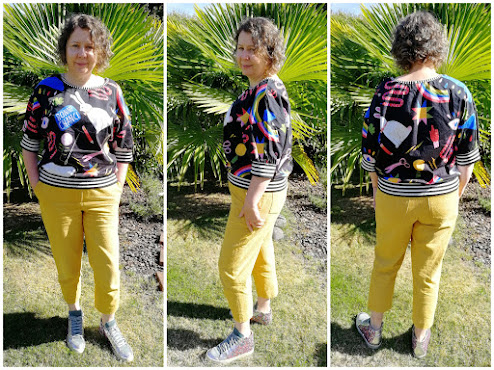
As soon as I saw this black and white striped lurex ribbing I knew I had to have some. Then all I needed was the fabric and pattern to pair it with.
Creates Sew Slow: How I do love thee The Sewing Workshop Maison top

Both the Bonne Chance cotton sateen (a design by Lisa Congdon for Nerida Hanson Fabrics) and the black and white lurex ribbing came from Miss Maude in Greytown. The ribbing was the icing on the cake for the bright colourful Bonne Chance fabric.

The alterations for this version were to remove 2" from the bottom of the bodice and 2½" from the bottom of the sleeve. The neck edge was lowered at centre front by ⅝" tapering back to the original width at the shoulder seam using a french curve.

Unfortunately the top is a little short. I thought the 7cm ribbing would more than compensate for the 2" removed from the bottom of the bodice but it doesn't have enough length to blouse over the ribbing. It also shows skin if the arms are raised with just normal arm movements. I haven't quite worked out how I'm going to fix this yet or even if it will be fixed. One option is to add the black and white striped cotton jersey I used for the neck binding as a yoke front and back. Or I could change it to a set in sleeve like the Spotted Gingham top version.

The top was sewn with french seams, with the neck binding and ribbing attached using the overlocker. The neck binding was then folded over, stitched in the ditch from the right side and trimmed.

Maison Pink Pastorale Floral Raw Emotion top

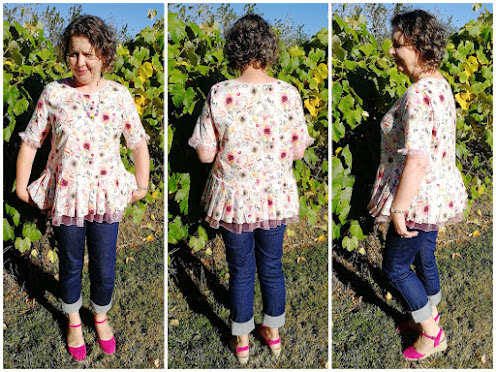
This sewing adventure was inspired by Trelise Cooper's Raw Emotion top for AW21. Love the fabric and top design the price not so much. As the Maison top had been twisted and tweaked quite successfully already this was the natural pattern choice to be adapted into the Raw Emotion top style.
Creates Sew Slow: How I do love thee The Sewing Workshop Maison top

The pink pastorale cotton woven fabric from Fabric Vision was irresistible and well matched with the pink nylon organza. In the original Trelise Cooper top the organza is a flat piece under the pleated flounce fabric. For my version I decided to pleat the cotton and organza together for the flounce. The rolled hem on the cotton and organza was done after the pleating when an organised person would have done it before. The rolled hem came away in places on the organza layer and the top is awaiting some remedial work to replace the organza in the bottom frill.

As with the blue check linen version 6" was removed from the bottom of the bodice with a 7" cotton and 8" nylon organza pleated flounce added. The pleats were once again made with the dinner fork and are 1¼" deep.

The sleeves just have the pleated organza added to the hem. I also forgot to roll hem the organza for the sleeve before I pleated it and once it was pleated the organza strip was too narrow to roll hem so a few threads were pulled for a frayed edge. The frayed edge was stopped from unravelling further with the addition of a small amount of fray check.

The inspiration top had set in sleeves and I wanted to replicate this in my version. The set in sleeve was achieved by measuring across the back pattern piece and marking the shoulder point plus seam allowance. Using my favourite woven back armhole template it was matched at the shoulder and swung out to meet the side seam. The back shoulder seam was then matched to the front and the front armhole template used in the same way.

Creates Sew Slow: How I do love thee The Sewing Workshop Maison top

Here is the new front pattern piece overlaying the original Maison top front pattern with the armhole template on top.

Sewing was done on the overlocker with only the fold over elastic used for the neck binding sewn on with the sewing machine.

Maison Daisy Raw Emotion top

I was so pleased with myself and the outcome I achieved for the Pink Pastorale version this black white and mustard daisy fabric was purchased from Fabric Vision with a gold nylon organza to become my second Raw Emotion top, this time more appropriate for the imminent Autumn season (it was sewn back in March).

Creates Sew Slow: How I do love thee The Sewing Workshop Maison top

The original Trelise Cooper Raw Emotion top has a high low hem which I replicated for this top by adding 2" to the length at centre back curved to the original side seam using a french curve. This was after I had shortened the bodice by 6". The flounce rayon layer is 7" deep and 8" with the organza. The organza flounce on the sleeve is 1" with ½" deep pleats.

The top was sewn with french seams. Both the bodice and sleeve flounce were attached using the overlocker. Black velvet fold over elastic finished the neck edge.

Creates Sew Slow: How I do love thee The Sewing Workshop Maison top

With the problem I had with the rolled hem pulling away on the organza of the Pastorale top I added a 1" strip of fusible washaway stabiliser to the hem edge of the organza before sewing the rolled hem. The settings on my Bernina 800DL overlocker for the three-thread rolled hem were: right needle 4; upper looper 5; lower looper 7; stitch length 1.8; cutting width 2; differential feed N. The washaway stabiliser was removed once the top was sewn by soaking the flounce in cold water. This seems to have resolved the problem of the rolled hem pulling away from the organza.

Maison Spotted Gingham top

Another sewing pattern provided inspiration for this Maison top version - The Sewing Revival Fantail shirt and sweatshirt. This is a New Zealand pattern company which names its patterns after (New Zealand) birds for a really cool reason. If you are intrigued you can find out why here.

I do have one or two of their patterns but not the Fantail - even though I love the bird. The pattern has raglan sleeves which I find difficult to fit so I used the features that I most liked about the Fantail and adapted the Maison top. The fit proved less than ideal and the elastic has now been removed, with the plan to chop off the shirt tail and hope that there is enough left-over fabric to make a 4" deep pleated flounce. The pleats will be about ½" deep based on another Trelise Cooper top Happiness Blooms.

Creates Sew Slow: How I do love thee The Sewing Workshop Maison top

The pattern alteration for this top was the addition of a shirt tail hem using the shape of the Megan Nielsen Dove blouse back pattern piece. The front bodice was shortened to match the back at the side seams plus a deep enough hem to form the casing for 40mm wide elastic.

This was sewn entirely on the sewing machine in my Wellington hotel room with french seams. The neck was bound with a sparkly pink fold over elastic. For the shirt tail hem a basting stitch (longest stitch length on my Bernina Activa 210) was sewn ⅜" from cut edge. The double fold hem was achieved by folding the cut edge to the basting stitch then folding again over the basting stitch. Once the hem was sewn the basting stitch was removed. This produced a really nice narrow hem with no torquing. Pity I didn't like the finished garment.

This top was originally made using the Maison top sleeve. After wearing the Bonne Chance top and realising it was a bit short I thought altering the sleeve to a set in sleeve would solve the problem, and it did. A modification was needed for the set in sleeve to have the same hem width as the original Maison top sleeve. The pattern piece was slashed from the hem to the armhole seam and the pattern pieces spread apart until the desired hem width was achieved. This resulted in a curved hem and a hem facing pattern piece was drafted wide enough to form the elastic casing. The alterations to the sleeve were necessary to achieve the gathering when the elastic is inserted. With a bit of reverse sewing the original sleeve was removed and provided enough fabric to cut the new set in sleeve. There was enough left over fabric from cutting out the top to cut the sleeve hem facing.

This top was made from fabric left over after cutting out a Merchant and Mills Trapeze dress which makes it a zero cost top apart from all the sewing effort trying to get it to the point where I will wear it!

The pattern

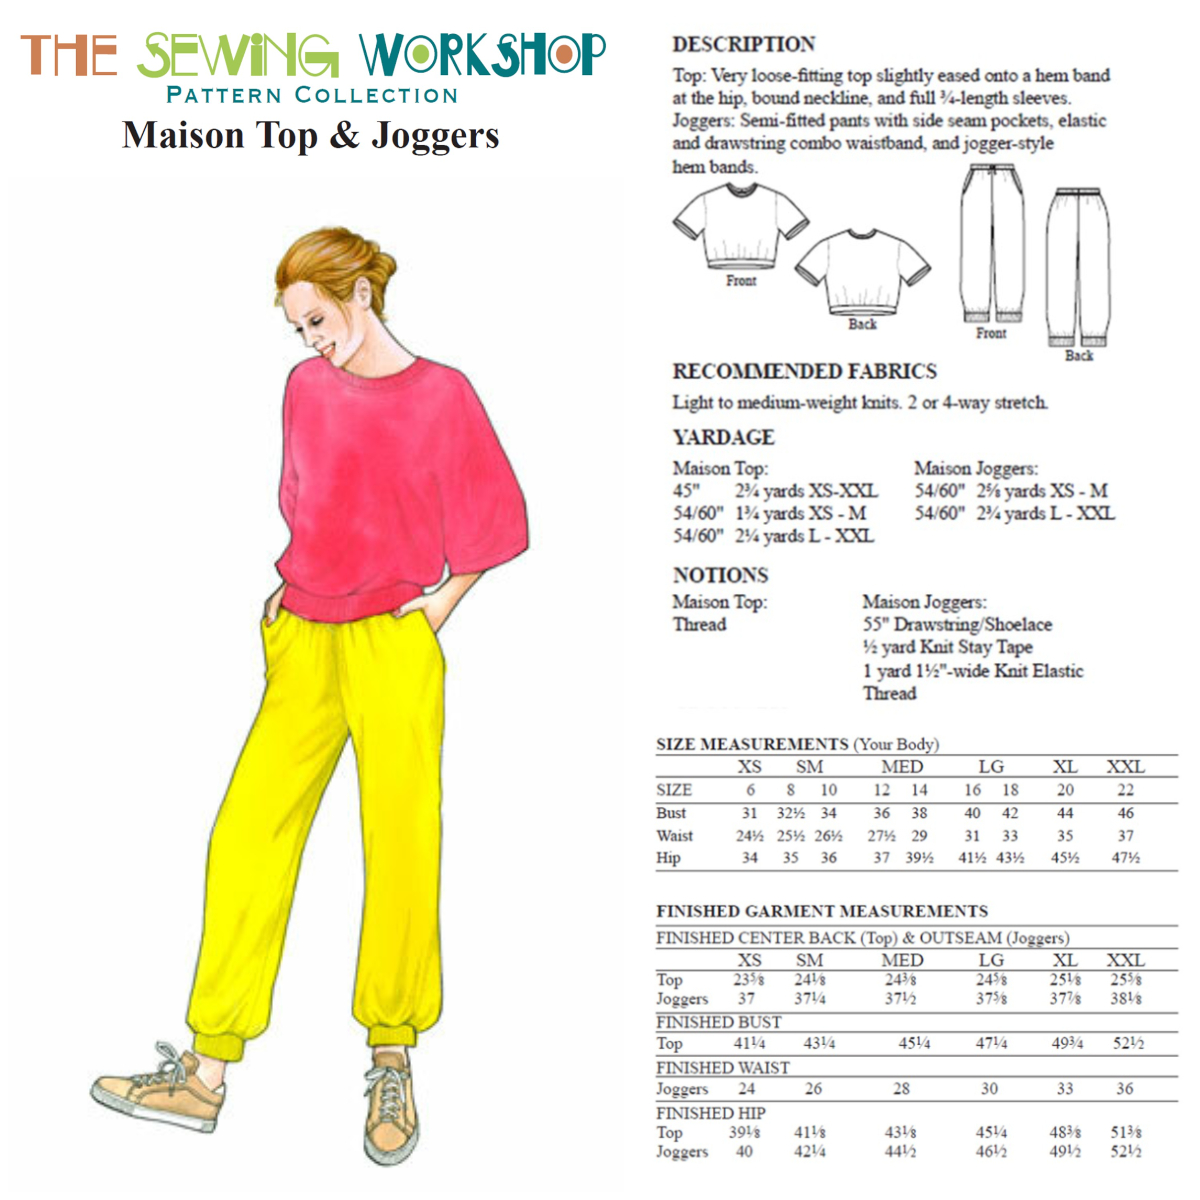
Unlike Sew Confident 2020 where each quarter's pattern was included in the membership, with Sew Confident 2021 the pattern is purchased separately. The Maison top and joggers was the pattern for January and February, with the top made first then the joggers.

The Sewing Workshop describe the pattern for the top as "a very loose fitting top slightly eased onto a hem band at the hip, bound neckline, and full ¾ length sleeves."

Creates Sew Slow: How I do love thee The Sewing Workshop Maison top

I was in two minds about purchasing this pattern as joggers are really not my thing - I have only owned a pair as part of my school sports kit and don't see myself embracing the trend this time round either. The Maison top on the other hand had some interesting features and I decided to bite the bullet and purchase this PDF downloadable pattern. A big thing for me as I really dislike assembling the multiple A4 pages into the pattern. This dislike may be alleviated by Papercut Patterns offering an A0 pattern printing service printed on their signature newsprint for those of us living in New Zealand.

The pattern cards

Creates Sew Slow: How I do love thee The Sewing Workshop Maison top

Outfits of the day

These tops have been on many a trip away over the summer so I found numerous outfit pictures but there is definitely a theme with the trousers. The blue jeans are the Untouched World Pure straight leg jean; the black jeans are the Andrea Moore Boyfriend jean which are much loved and starting to show their age; leading me on to the yellow jeans which are a poor attempt at mimicking the Andrea Moore Boyfriend jean using a highly modified version of the Megan Nielsen Flint trouser pattern.

Even the shoes are not demonstrating much variety. Top left and right, middle left and bottom right are the P448 Skate Pailettes Stroil Sneakers; top middle are the Ernest Wyler Keesha booties in Sunflower; middle right and bottom left are the Camper Right Nina Mary Jane Flat.

Creates Sew Slow: How I do love thee The Sewing Workshop Maison top


Monday, 18 November 2019

The Sewing Workshop Era Floral Faux Fur Coat

Whilst still deep into my sewing theme of the Minnie Mouse red white and black wardrobe I found a fun fabric to make a fabulous winter coat. I admired it for a while and then The Sewing Workshop had a promotion and yay I got 20% off. In all honesty it was a good marketing ploy as whilst I had been hesitant to buy it all full price as soon as the discount came along I had hit the buy button before rational thought had any chance of intervening.

The finished garment

Spring has very much sprung with the fading blossoms on the crab apple tree providing the back drop for my new winter coat. Maybe after a few months resting in the wardrobe I will have got over the initial lack of love for the finished coat. Its redeeming feature is the wonderful lining.

You might notice there are no pictures of it buttoned up. That is because it doesn't have buttons yet. I have the buttons just can't decide how I want to make the closure. Favourite idea at the moment is to have a leather fabric loop rather than a buttonhole. Will wait for next winter before I make my final choice.

Creates Sew Slow: The Sewing Workshop Era Floral Faux Fur Coat
 Worn with Andrea Moore boyfriend jeans and mohair jumper; United Nude Solid Fold shoe in colour mono

Creates Sew Slow: The Sewing Workshop Era Floral Faux Fur Coat

The fabric

This is one of the more expensive fabrics I have ever bought at US$69 per yard and the 20% off basically covered the cost of shipping.

In the pictures it looked completely fabulous. When it arrived I was a bit disappointed with how flimsy the knit backing was and to me not strong enough to support the faux fur with any longevity. There were also a few flaws in the fabric (not that I discovered this until many months later when I was cutting out). Despite this I was still excited to make a winter coat with it. The only demotivating factor was that we weren't having a winter, sure we had more grey days than normal but the crisp blue sky winter days were few and far between. In fact my most worn coat this winter has been the Horizontal Hold trench (albeit with an Ecopossum cardi under it on some occasions) which given it is a cotton/acrylic mix and therefore provides very little warmth despite being a heavyweight jacquard indicates how mild winter has been.

Creates Sew Slow: The Sewing Workshop Era Floral Faux Fur Coat

Creates Sew Slow: The Sewing Workshop Era Floral Faux Fur Coat

Initially I was going to use a plain black warm back coat lining but then I found this perfect polyester satin fabric at a local fabric store. I don't normally like using synthetic fabric but as the faux fur was anything but natural nothing was lost by using this polyester fabric for the lining.

Creates Sew Slow: The Sewing Workshop Era Floral Faux Fur Coat

The fabric alterations

Given my reservations about the strength of the faux fur fabric and the fact that I wanted a warm back lining additions were made to both fabrics.

For the faux fur it was block fused with a tricot interfacing to retain the original fabric hand. It was tricky to fuse this as the faux fur made the fabric quite lumpy and the iron had to be manoeuvred between the fur to make good contact with the fabric.

Creates Sew Slow: The Sewing Workshop Era Floral Faux Fur Coat

For the lining it was block fused with a polyester fusible quilt batting.

Creates Sew Slow: The Sewing Workshop Era Floral Faux Fur Coat

The pattern

The Sewing Workshop Era jacket description a loose-fitting, below-waist jacket has high turn-down collar with deep mitred corners, side vent openings extending above waist, one-piece sleeves with deep hems and vents. Two-button front closure and decorative buttons at vent and sleeve openings. All edges finished with wide hems and mitred corners. Wrong side will show.


Creates Sew Slow: The Sewing Workshop Era Floral Faux Fur Coat


Suggested fabrics are: linen, wool, medium to heavy weight silk, crisp sheers, cotton, boucle, sweater knit, and novelty weaves. Wrong side of fabric will show.


The pattern alterations

The obvious and pretty much the only pattern alteration is that I lengthened the jacket by 23" to create a coat, but keeping the high low hem shape of the original jacket. To determine the extra length needed and the width at the hem edge I measured the Victory Ulysses trench. The side seams have no shaping being a straight line from the underarm to the hem. They would have benefited from some shaping to give more width at the hip.

The pattern is designed with a lot of ease so I chose to use the XS size with a finished bust measurement of 46" (meant for a 31" bust) and I am happy with this choice.

The other addition I made to the pattern was to add a welt pocket. Both the design and position on the coat are based on Vogue 1836 an Issey Miyake pattern I have made before.

Creates Sew Slow: The Sewing Workshop Era Floral Faux Fur Coat
Left: front pattern piece; right: back pattern piece
I used the XS sleeve lengthened by 2¾". This gives a sleeve that is pretty tight on the forearm so I sewed it with a ¼" seam allowance to give me an extra ¾" - not ideal but wearable. Next time I make this (if ever) I will widen the sleeve from the bicep down to the hem by at least ½" on each side.

The lining fabric used the same pattern pieces as the outer garment. The only difference was I omitted the 3⅝" hem around the outer edge of the garment; removed the collar; and added a 2" box pleat at centre back for movement.

The sewing

The first thing sewn was the lining to check that I was happy with the fit including the length. This is when I discovered that the sleeves were too tight at the forearm and reduced the seam allowance.

Creates Sew Slow: The Sewing Workshop Era Floral Faux Fur Coat

Even though the faux fur fabric was block fused to tricot interfacing it had a tendency to fray so all of the fabric piece edges were overlocked before being sewn together on my little Singer Featherweight.

The pattern instructions were good and easy to follow, although I missed steps and adapted others where I had changed the garment design. The one area where I am still perplexed is the collar. In the pattern instructions and pictures the collar is the same height all the way around but mine is definitely higher in the back. I have no idea what I did to get this significant variation in height.

Creates Sew Slow: The Sewing Workshop Era Floral Faux Fur Coat

The welt pocket was sewn using the instructions from V1836, except for two things: (1) I did a double rather than single welt; and (2) I forgot to follow the instructions to enclose the cut edges on one of the pockets and just overlocked the edges of the pocket bags together. It doesn't matter in this coat given it is fully lined but it is a nice touch in V1836 which is unlined.  The welt uses a plain back cotton fabric and the pocket bags are the lining fabric.

Creates Sew Slow: The Sewing Workshop Era Floral Faux Fur Coat

The real feature of this pattern that I absolutely love is the 3⅝" hem. The ⅝" is folded under then the corners are mitred and the 3" hem turned to the inside and top stitched. My lining fabric goes to the point where the hem is turned up and is fully enclosed by the hem.

Creates Sew Slow: The Sewing Workshop Era Floral Faux Fur Coat

Sometimes although I read the description of the garment on the pattern it doesn't actually sink in. Case in point is this coat. The collar is too high at the back which shouldn't be a surprise as the description is "high turned-down collar". Hmm turned down - not what I wanted. So when I finally get around to putting the buttons on I will also undo the collar and reduce the height. Reverse sewing in this fabric is not fun as the stitches pretty much disappear because of the fur and loose fabric weave.

Creates Sew Slow: The Sewing Workshop Era Floral Faux Fur Coat

To be completely truthful until I wrote this blog post the coat was more than likely destined to never be worn just live as is in the wardrobe until it was passed on to a charity shop. Now that I have been reminded just how extravagant I was when I bought this fabric, as well as looking at the photos where it seems more wearable (and not a big furry joke) it may get the necessary changes including buttons and be worn. This coat was sewn in September and it really is amazing how differently we can feel about the clothes we make once a little time has passed. Definitely no love at first sight with this make but I can feel it growing on me.

Monday, 6 May 2019

TSW Ann's Red Letter Ensemble

Two recent purchases came together to make this ensemble. The Sewing Workshop pattern Ann's Cardigan and Tank matched with a recent Marcy Tilton fabric purchase Red Letters viscose knit.

Both the cardigan and the tank journeyed with me to Wellington the week before Easter. Amazingly the tank was finished and the cardigan was complete apart from missing sleeves and unhemmed. In a further burst of enthusiasm I determined to finish them before I started on my Pattern Review mini wardrobe items and they duly accompanied me to Ahipara for our Easter week away. It took me until the Friday after Easter to finally sew the hems on the cardigan sleeves and announce the ensemble finished.

Whilst the cardigan was intended to be part of my travel wardrobe because of its unfinished state another cardigan was packed (V2494 a Donna Karan waist length jacket made many years ago in a charcoal grey felted merino wool which I American smocked). Do they both count as part of the travel wardrobe when the grey jacket was used extensively during our week in Ahipara but went back to Christchurch with my beloved whilst Ann's Red Letter cardigan was part of the four days in Wellington wardrobe?

The finished garments

The finished cardigan is a great shape unfortunately the folded back front band doesn't stay in place causing the double sided nature of the garment to not quite work as imagined. It may be that this fabric is re-made into another cardigan only time will tell. For the tank the length doesn't seem quite right. Once the warmer weather returns next summer I will see how I feel about it and shorten if necessary. So neither garment is a resounding success at this stage but the pattern does have possibilities.

Ann's Cardigan with Moochi Precinct Sweater, Andrea Moore Boyfriend jeans
and United Nude Lev Wrap Lo red shoes
Ann's cardigan letter side out and Ann's tank stripe side out
Cardigan with 1" sway back adjustment and tank without

The cardigan and tank in their various combinations

The fabric

This viscose elastane red letters French jacquard knit from Marcy Tilton is described as a stunning jacquard in red and black with a pleasing jumbled letters design. A variety of knitting patterns make up the design in this gorgeous quality jacquard from a French mill. We've never seen anything like this before! Fabulous. Softly textured with a pliable drape, crosswise stretch with a bit of lengthwise stretch, 9" repeat and just a touch of rolling at the cut edge. The light/mid weight is right for a top, t-shirt, tunic, cardi, dress or skirt.

Pre-treat by machine wash/dry gentle. After sewing, machine wash gentle and air dry.


Creates Sew Slow: TSW Ann's Red Letter Ensemble

Unusually I managed to buy just enough fabric to make these two items with only scraps left over. The little pile on the left was saved for the coat idea that is floating around in my head, whilst the pile on the right was thrown away.


There is however a further purchase of this fabric wending its way to me as the thought of a double sided dress for a future travel wardrobe was too much to resist.

The pattern

This pattern is described as: open cardigan with cascading panels and fold-back front band, front and back waist seams, long sleeves and stitched hems.Wrong side of fabric will show.  Scoop-neck tank with shaped waist, winged side vents, unfinished neck, armhole and hem edges.

Suggested Fabrics are for the cardigan - medium weight knit such as jersey, double knit, ponte, French terry, sweater knit. Novelty knits. Wrong side of fabric will show. For the tank a light to medium weight knit.

Creates Sew Slow: TSW Ann's Red Letter Ensemble

The pattern alterations

My usual pattern alterations were made to the size medium cardigan and tank. For the cardigan I used the size small armhole, narrowed the shoulders 1", with a ½" forward shoulder adjustment, included a 1" sway back adjustment and lengthened 1¾". The finished back length should have been 29" but like the tank top it ended up longer than that but with the cardigan I don't mind the extra length.

For the tank the shoulders were narrowed ¾" with a ½" forward shoulder adjustment and lengthened 4¾". According to the pattern the original back length was 21¼" by adding the 4¾" the top should have finished hip length, instead it finished just below my bottom which would be a 29" finished length. Should measure the pattern to find out why the top is so much longer than expected and adjust it for next time as this length doesn't feel very flattering.

Once the shoulders were narrowed the armhole was re-drawn to maintain the original size. This generally means it ends up being higher at the side seam, as is the case with this armhole.

To lengthen the tank top, the top half of the size medium is traced to the lengthen shorten line (left hand photo below), centre front/centre back length extended the 4¾" of additional length, the traced pattern piece is slid up so the extended centre front/centre back is at the original hem (right hand photo below), size medium hem line is drawn and the two size medium points at the side seam are blended together.


The sewing

Both sides of this jacquard knit are usable so I decided to make both the cardigan and tank reversible. This meant not using the overlocker for the sewing. Instead the cardigan had a faux flat felled seam sewn with the sewing machine. All seams were sewn first with striped sides together at ⅝", one side was trimmed and the other side folded over and top stitched.

For the tank the side seams end in the winged side vents. Striped sides were still sewn together at ⅝" (but only to the marked point) then pressed open with both sides top stitched at ⅜" then trimmed. The winged side vents could then be hemmed easily.

In order for the turned back cardigan front band to be the same side of the fabric as the rest of the cardigan the opposite sides (stripe to alphabet) were sewn together. Originally the whole seam was sewn but that meant the hem couldn't be turned up with the stripe side on the alphabet side of the garment for both the front band and main body of the cardigan. The front band seam was undone, the hem turned and stitched then the front band seam re-stitched as in the photo below.

The re-sewing of the front band to the main body of the cardigan
Perfect mitred corners - shame about the wonky sewing
Both the tank top and the cardigan had four mitred corners each. In the past this would have filled me with dread but the combined wisdom of Gwen Spencer and Louise Cutting ensure perfect mitres every time. Gwen has a fool proof method of marking the fabric to get the perfect mitre and Louise recommends that the fabric is not trimmed. Not trimming the fabric ensures the mitre is plump without any lumpy bits. I have shared Gwen's mitred corner YouTube video before but here is the link again.

The outtake

No outfit of the day as it hasn't really been worn yet, we did however get an arty photo when doing the photo shoot (seems a bit pretentious for what we did with my phone camera) at our Easter holiday bach. The sun was streaming through the slats in the fence I was stood by and created this striped effect.  Love the shell garden ornament which is the point of the picture, we just chose the wrong time of day to take it.