Showing posts with label tops. Show all posts

Sunday, 8 August 2021

How I do love thee The Sewing Workshop Maison top

I have long considered joining The Sewing Workshop's yearly skill building course "Sew Confident".  In 2020 with no in person learning opportunities I finally leapt in. I thoroughly enjoyed the monthly magazine, quarterly new pattern and the focus on adapting that pattern throughout the quarter. Needless to say as with most things last year I leapt in but didn't make a single thing from any of the four patterns just leafed through the pages of the eye candy magazine and enjoyed Linda's Facebook Live shows.

This year is different I feel motivated, unfortunately by sewing not blog writing but I will try to do better. I joined Sew Confident Series 10 and have now sewn month one's pattern (Maison Top) six times. Even though I bought one of the Maison kits (not used yet) none of the versions sewn is as per the pattern. For all of the versions sewn so far I threw caution to the winds and used a woven fabric rather than the recommended knit.

Creates Sew Slow: How I do love thee The Sewing Workshop Maison top

Sew Confident Series 10

The 2021 version of Sew Confident is quite different to previous years. Linda Lee and her team at The Sewing Workshop mastered modern technology during 2020 offering a Facebook Live session every week which whilst a bit of a sales pitch for all things Sewing Workshop I enjoyed. Now that Linda is confident in front of the camera the 2021 membership focuses on a different sewing pattern each month, supported by a Facebook Live sewing class and a question and answer live Zoom session. Both of these can be watched on YouTube after the event.

For the sewing class Linda steps you through all the stages of sewing the pattern successfully, with her tips and tricks. Not always the way I would go about doing things or have been taught in the past but it is always useful to learn new tricks and see alternative approaches.

Month two focused on the Maison joggers - not something I am likely to make anytime soon (although I did see a really nice pair of Trelise Cooper trousers with a rib cuff hem finish so maybe...).

Month three is a new version of the Ikina jacket. I have the old Ikina pattern and maybe I will make it sometime but it didn't happen in March as part of the sew along.

Month four is the Charlie bomber - which has already sparked a number of ideas. Not sewn in April...sigh.   But you never know by the end of the year I may actually truly join in with the whole concept of the sew along. The earmarked fabric is ready and waiting, even ventured out to The Fabric Store to buy the lining fabric so hopefully something to show soon.

Month five is the Whistles shirt which I bought the kit for (Kit A in blue, turquoise and brown) as I just loved the panel print by artist Noelle Phares who paints images contrasting nature with modern structures. I don't like shirts however and haven't worked out how to alter the pattern to keep the placket wedges when there won't be a placket.

Month six is the Hibiscus shirt. Cute but I can't see myself bothering to alter the pattern into a non shirt style.

Month seven is the Gardenia dress and blouse. There was a fabric kit I really fancied which sold out very quickly but I have now bought the pattern so something else you might see by the end of the year.

Month eight is the pieced Eureka top and I immediately leapt in and bought the Havana kit an assortment of six fabrics in tones of teal, bordeaux, black/brown, cream and fuchsia. It was a tough choice between the Havana and Belize colourways. The Havana colourway will be a good match for the black and white striped ponte I am about to make into The Sewing Workshop Pencil pants.

So here we are in month eight and I am just blogging about the January pattern.

Maison Blue Check Linen top

The inspiration for this top came from The Assembly Line Cuff top pattern. I don't have the pattern and am not really interested in purchasing a simple kimono sleeve top pattern however I am constantly attracted to the cuff detailing which I thought would be well suited to controlling the flare of the Maison top sleeve. I have since bought the dress version of the Cuff top, something else to sew this year! With ruffles being all the rage at the moment I replaced the hem band with a pleated flounce which I prefer as a means of creating fullness rather than gathers.

This top is a real favourite. The semi opaque texture achieved with the gingham weave appealed the minute I saw the fabric at Fabric Vision in Christchurch. It has the added bonus of the texture being enhanced when it is not ironed - no worrying about wrinkly linen with this top. Sewing success like this deserves a twirl on the beach on a hot summer's day.

Creates Sew Slow: How I do love thee The Sewing Workshop Maison top

Creates Sew Slow: How I do love thee The Sewing Workshop Maison top

Common wisdom is to sew the first garment as it is straight out of the envelope but that would be too simple. The first thing I did was to make two pattern alterations for fit: a ½" forward shoulder adjustment; and added a French dart. These two fit alterations are common across all my Maison tops. 

On one of the TSW sample garments worn by Erin the diagonal fold of fabric pointing to the bust was clearly visible and this was easily eliminated with the addition of the French dart to provide the necessary depth for my full bust. I chose the size medium tapering from the medium at the waist to the large at the hem.

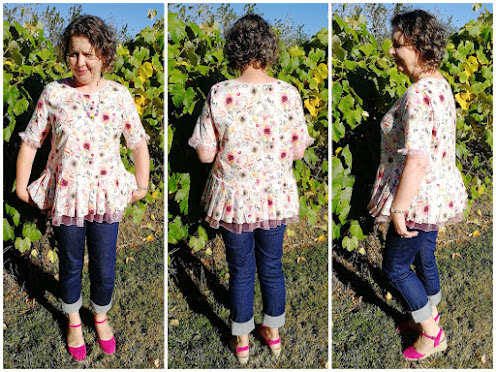
Specific alterations for this version were to remove 6" from the bottom of the bodice and add a 7" pleated flounce with a rolled hem edge. The 1¼" pleats were made using a dinner fork (instructions can be found in the V&A Mary Quant Georgie dress pattern instructions). One inch was added to the sleeve hem to allow for a 2" hem with 1¾" elastic inserted. I measured the hem of a knit sleeve to determine how long to cut the elastic.

This top was constructed on the overlocker, with only the neck binding and sleeve hem sewn on the sewing machine. Fold over elastic was used to bind the neck edge.

Maison Pastel Dots top

The Sewing Workshop describe this semi-sheer chiffon crepe polyester fabric as "soothing colours blend together like tiny fish swimming in a pastel reef. Seafoam green, mustard, and light pink are the foundation for blue and black bubble-like dots floating on the surface. This flowing fabric is suitable for many different garments; shirts, skirts, dresses, and even flowy pants."

Creates Sew Slow: How I do love thee The Sewing Workshop Maison top

This top was just wonderful to make, using exactly the same pattern alterations as the Blue Check linen version. I can wear different camisoles underneath and it gives the fabric a slightly different look.

Maison Bonne Chance top

As soon as I saw this black and white striped lurex ribbing I knew I had to have some. Then all I needed was the fabric and pattern to pair it with.

Creates Sew Slow: How I do love thee The Sewing Workshop Maison top

Both the Bonne Chance cotton sateen (a design by Lisa Congdon for Nerida Hanson Fabrics) and the black and white lurex ribbing came from Miss Maude in Greytown. The ribbing was the icing on the cake for the bright colourful Bonne Chance fabric.

The alterations for this version were to remove 2" from the bottom of the bodice and 2½" from the bottom of the sleeve. The neck edge was lowered at centre front by ⅝" tapering back to the original width at the shoulder seam using a french curve.

Unfortunately the top is a little short. I thought the 7cm ribbing would more than compensate for the 2" removed from the bottom of the bodice but it doesn't have enough length to blouse over the ribbing. It also shows skin if the arms are raised with just normal arm movements. I haven't quite worked out how I'm going to fix this yet or even if it will be fixed. One option is to add the black and white striped cotton jersey I used for the neck binding as a yoke front and back. Or I could change it to a set in sleeve like the Spotted Gingham top version.

The top was sewn with french seams, with the neck binding and ribbing attached using the overlocker. The neck binding was then folded over, stitched in the ditch from the right side and trimmed.

Maison Pink Pastorale Floral Raw Emotion top

This sewing adventure was inspired by Trelise Cooper's Raw Emotion top for AW21. Love the fabric and top design the price not so much. As the Maison top had been twisted and tweaked quite successfully already this was the natural pattern choice to be adapted into the Raw Emotion top style.

Creates Sew Slow: How I do love thee The Sewing Workshop Maison top

The pink pastorale cotton woven fabric from Fabric Vision was irresistible and well matched with the pink nylon organza. In the original Trelise Cooper top the organza is a flat piece under the pleated flounce fabric. For my version I decided to pleat the cotton and organza together for the flounce. The rolled hem on the cotton and organza was done after the pleating when an organised person would have done it before. The rolled hem came away in places on the organza layer and the top is awaiting some remedial work to replace the organza in the bottom frill.

As with the blue check linen version 6" was removed from the bottom of the bodice with a 7" cotton and 8" nylon organza pleated flounce added. The pleats were once again made with the dinner fork and are 1¼" deep.

The sleeves just have the pleated organza added to the hem. I also forgot to roll hem the organza for the sleeve before I pleated it and once it was pleated the organza strip was too narrow to roll hem so a few threads were pulled for a frayed edge. The frayed edge was stopped from unravelling further with the addition of a small amount of fray check.

The inspiration top had set in sleeves and I wanted to replicate this in my version. The set in sleeve was achieved by measuring across the back pattern piece and marking the shoulder point plus seam allowance. Using my favourite woven back armhole template it was matched at the shoulder and swung out to meet the side seam. The back shoulder seam was then matched to the front and the front armhole template used in the same way.

Creates Sew Slow: How I do love thee The Sewing Workshop Maison top

Here is the new front pattern piece overlaying the original Maison top front pattern with the armhole template on top.

Sewing was done on the overlocker with only the fold over elastic used for the neck binding sewn on with the sewing machine.

Maison Daisy Raw Emotion top

I was so pleased with myself and the outcome I achieved for the Pink Pastorale version this black white and mustard daisy fabric was purchased from Fabric Vision with a gold nylon organza to become my second Raw Emotion top, this time more appropriate for the imminent Autumn season (it was sewn back in March).

Creates Sew Slow: How I do love thee The Sewing Workshop Maison top

The original Trelise Cooper Raw Emotion top has a high low hem which I replicated for this top by adding 2" to the length at centre back curved to the original side seam using a french curve. This was after I had shortened the bodice by 6". The flounce rayon layer is 7" deep and 8" with the organza. The organza flounce on the sleeve is 1" with ½" deep pleats.

The top was sewn with french seams. Both the bodice and sleeve flounce were attached using the overlocker. Black velvet fold over elastic finished the neck edge.

Creates Sew Slow: How I do love thee The Sewing Workshop Maison top

With the problem I had with the rolled hem pulling away on the organza of the Pastorale top I added a 1" strip of fusible washaway stabiliser to the hem edge of the organza before sewing the rolled hem. The settings on my Bernina 800DL overlocker for the three-thread rolled hem were: right needle 4; upper looper 5; lower looper 7; stitch length 1.8; cutting width 2; differential feed N. The washaway stabiliser was removed once the top was sewn by soaking the flounce in cold water. This seems to have resolved the problem of the rolled hem pulling away from the organza.

Maison Spotted Gingham top

Another sewing pattern provided inspiration for this Maison top version - The Sewing Revival Fantail shirt and sweatshirt. This is a New Zealand pattern company which names its patterns after (New Zealand) birds for a really cool reason. If you are intrigued you can find out why here.

I do have one or two of their patterns but not the Fantail - even though I love the bird. The pattern has raglan sleeves which I find difficult to fit so I used the features that I most liked about the Fantail and adapted the Maison top. The fit proved less than ideal and the elastic has now been removed, with the plan to chop off the shirt tail and hope that there is enough left-over fabric to make a 4" deep pleated flounce. The pleats will be about ½" deep based on another Trelise Cooper top Happiness Blooms.

Creates Sew Slow: How I do love thee The Sewing Workshop Maison top

The pattern alteration for this top was the addition of a shirt tail hem using the shape of the Megan Nielsen Dove blouse back pattern piece. The front bodice was shortened to match the back at the side seams plus a deep enough hem to form the casing for 40mm wide elastic.

This was sewn entirely on the sewing machine in my Wellington hotel room with french seams. The neck was bound with a sparkly pink fold over elastic. For the shirt tail hem a basting stitch (longest stitch length on my Bernina Activa 210) was sewn ⅜" from cut edge. The double fold hem was achieved by folding the cut edge to the basting stitch then folding again over the basting stitch. Once the hem was sewn the basting stitch was removed. This produced a really nice narrow hem with no torquing. Pity I didn't like the finished garment.

This top was originally made using the Maison top sleeve. After wearing the Bonne Chance top and realising it was a bit short I thought altering the sleeve to a set in sleeve would solve the problem, and it did. A modification was needed for the set in sleeve to have the same hem width as the original Maison top sleeve. The pattern piece was slashed from the hem to the armhole seam and the pattern pieces spread apart until the desired hem width was achieved. This resulted in a curved hem and a hem facing pattern piece was drafted wide enough to form the elastic casing. The alterations to the sleeve were necessary to achieve the gathering when the elastic is inserted. With a bit of reverse sewing the original sleeve was removed and provided enough fabric to cut the new set in sleeve. There was enough left over fabric from cutting out the top to cut the sleeve hem facing.

This top was made from fabric left over after cutting out a Merchant and Mills Trapeze dress which makes it a zero cost top apart from all the sewing effort trying to get it to the point where I will wear it!

The pattern

Unlike Sew Confident 2020 where each quarter's pattern was included in the membership, with Sew Confident 2021 the pattern is purchased separately. The Maison top and joggers was the pattern for January and February, with the top made first then the joggers.

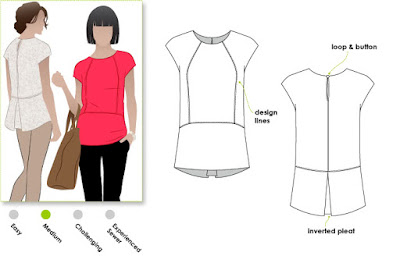
The Sewing Workshop describe the pattern for the top as "a very loose fitting top slightly eased onto a hem band at the hip, bound neckline, and full ¾ length sleeves."

Creates Sew Slow: How I do love thee The Sewing Workshop Maison top

I was in two minds about purchasing this pattern as joggers are really not my thing - I have only owned a pair as part of my school sports kit and don't see myself embracing the trend this time round either. The Maison top on the other hand had some interesting features and I decided to bite the bullet and purchase this PDF downloadable pattern. A big thing for me as I really dislike assembling the multiple A4 pages into the pattern. This dislike may be alleviated by Papercut Patterns offering an A0 pattern printing service printed on their signature newsprint for those of us living in New Zealand.

The pattern cards

Creates Sew Slow: How I do love thee The Sewing Workshop Maison top

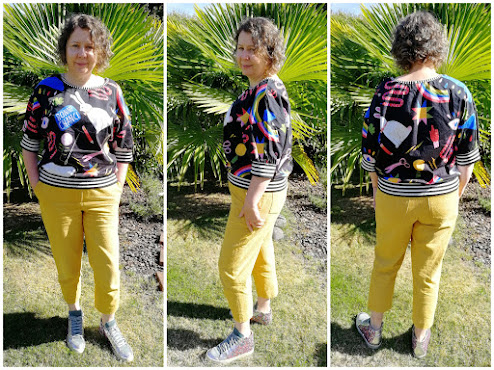
Outfits of the day

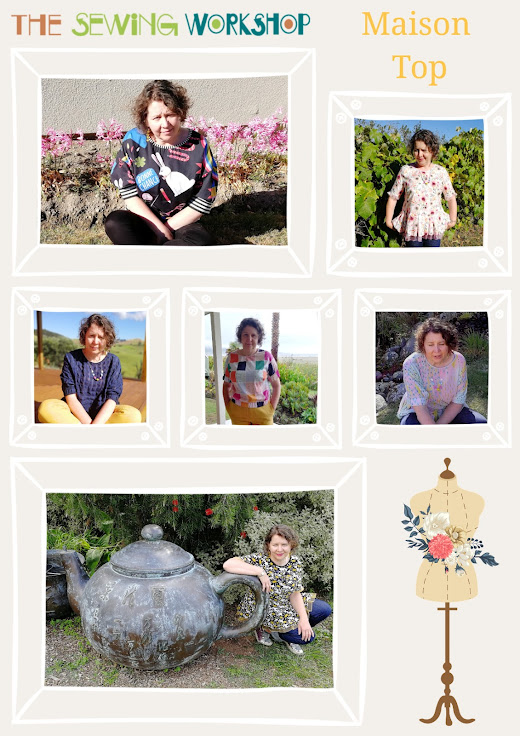
These tops have been on many a trip away over the summer so I found numerous outfit pictures but there is definitely a theme with the trousers. The blue jeans are the Untouched World Pure straight leg jean; the black jeans are the Andrea Moore Boyfriend jean which are much loved and starting to show their age; leading me on to the yellow jeans which are a poor attempt at mimicking the Andrea Moore Boyfriend jean using a highly modified version of the Megan Nielsen Flint trouser pattern.

Even the shoes are not demonstrating much variety. Top left and right, middle left and bottom right are the P448 Skate Pailettes Stroil Sneakers; top middle are the Ernest Wyler Keesha booties in Sunflower; middle right and bottom left are the Camper Right Nina Mary Jane Flat.
Creates Sew Slow: How I do love thee The Sewing Workshop Maison top


Sunday, 16 May 2021

Liesl + Co Rush Hour Lagos Laurel Blouse

Good job no one is hanging out for my every word as despite sewing up a storm so far this year I have not been very productive on the blogging front. Sometimes this is because I am not very proficient at the photography stage other times it is a lack of inclination to write the words. However after a long hiatus (more than three months if anyone is counting) I feel the need to commit my projects to the blog. I enjoy flicking through to see projects of the past so I need to up my blogging game and catch-up with the 2021 sewing. Starting oldest first this top was made in early January (twice - but more about that later) when I was still enjoying the summer Christmas holidays. Now we are enjoying the downward rush to winter.

This knit top was made as part of the therapy to ween myself off Vogue 8710 which I have sewn so many times now it almost sews itself. Two of the things I enjoy most about Vogue 8710 are the slightly flared hemline and the princess seams for fitting the bust. The Rush Hour blouse has an interesting peplum (the reason I bought the pattern) and the princess seams. Sewing it before peplums become passé was another motivator.

The big question is does the Rush Hour blouse have enough similarities with Vogue 8710 to replace it in my affections? I was hopeful the answer was yes and set off on my new pattern adventure.

The finished garment

This is version one which would never have been made like this if I had read the reviews for this pattern on PatternReview. However as I only read them after the event this version saw the light of day. It was worn on an expedition to The Fabric Store. As I stretched to reach or pull various fabric bolts I could feel a definite draft around my kidneys. An undesirable situation according to my grandmother who often exclaimed "you'll catch your death" when as a teenager my tops got too short thus exposing my kidneys to the cold. Wise words I didn't appreciate at the time but I certainly do now! 

Creates Sew Slow: Liesl + Co Rush Hour Lagos Laurel Blouse

A top that is only suitable for quiet moments of contemplation doesn't really suit my lifestyle so after a few pattern alterations a second version was born. I can reach and stretch to my hearts content in this and there are no unwelcome breezes on bare skin.

Creates Sew Slow: Liesl + Co Rush Hour Lagos Laurel Blouse

In all of the photographs I am wearing the Megan Nielsen Flint Peggy Yellow trousers and Arche Ikhini Yellow Sandal.

The fabric

Another Liberty of London fabric from The Fabric Store. This time it is the Lagos Laurel Ganton jersey in colourway B. I also happen to have this fabric in the A and C colourways. Whilst I clearly like this design this is the first of the Lagos Laurel fabric to become a garment. It is also the most recent purchase fitting in with my current yellow obsession, and my imaginary Stitcher's Guild SWAP 2021.

Creates Sew Slow: Liesl + Co Rush Hour Lagos Laurel Blouse

This Liberty jersey doesn't have that much stretch and I took that into account when thinking about the size to sew. 

The pattern

I had long admired this pattern and resisted buying it because I felt the design would be easy enough to adapt from the ever faithful V8710. Eventually I succumbed and the pattern was mine to sit quietly with its friends waiting for its turn on the cutting table. This is the second Liesl + Co pattern to join the collection but the first one to be sewn.

Liesl describes this top as a "lined, fitted peplum blouse. The princess seams on this style allow you to customise the fit easily. View B, the peplum top, features your choice of short or long sleeves and an asymmetrical peplum, with an invisible back zipper. The pattern includes cup sizes, a Dior dart, and instructions for customising the pattern to fit your shape."

Creates Sew Slow: Liesl + Co Rush Hour Lagos Laurel Blouse

The pattern card

Creates Sew Slow: Liesl + Co Rush Hour Lagos Laurel Blouse

The pattern alterations

I can't really detail the pattern alterations for this make because I didn't use the original pattern pieces for the bodice. When I looked at the pattern I discovered that the bodice wasn't a true princess seam as the centre front piece had a Dior (bust) dart, which means it has a shaped side front piece and the centre front piece has a short dart. In fairness the pattern description does highlight the Dior dart it just never entered my consciousness until I started working with the pattern to achieve the fit I wanted.

Even though this pattern comes with B, C and D cup pattern pieces I knew that the front pattern pieces would require alteration to fit when what I really wanted was the cut out and sew simplicity of a TNT pattern. Given the reason I bought this pattern was the peplum the easy answer was to add the peplum to Vogue 8710. This should have given me a perfectly fitting top.

The challenges of version one were because instead of using the length of Vogue 8710 minus the peplum length, I used the length of the Rush Hour blouse. It should be noted that the finished back length of the Rush Hour blouse is not stated.

The starting point for me for any pattern is choosing the size based on the finished garment measurements. For the Rush Hour blouse in a knit fabric I chose size 8 (D cup) at the bust grading out to size 16 at the bottom of the bodice pattern pieces (3, 4 and 5). There would be zero ease at the bust (the ease comes from the stretch fabric) and 2½" of positive ease at the waist. For no logical reason I can remember I chose the length of size 8. For a woven fabric I would choose the size 14 at the bust grading to the size 16 at the bottom of the bodice pattern pieces.

In short the bodice pieces of Vogue 8710 were cut at the size 8 length, shaped at the side seams to match the peplum / bodice seam width, and the original Rush Hour peplum added. This was done by:

  • laying the TNT centre front and back pattern pieces for Vogue 8710 on top of the Rush Hour Blouse bodice (pieces 3 and 5) matching centre front / back, size 8 at the shoulder neck edge and shortening by chopping the pattern off at the size 8 length
  • shortening the Vogue 8710 side front (piece 4) at the hem to match the seam where it joins to the centre front pattern piece
  • removing the ½" centre back seam so pattern piece 5 is cut on the fold and the zipper omitted
  • shaping the side seams on pattern pieces 4 and 5 so that the bodice seam length where it joins the peplum was the same as the size 16 peplum
  • cutting the peplum (pattern pieces 12, 13 and 14) as a size 16 with no alterations.
Other alterations were:
  • lowered the back neck edge ⅜"
  • lowered the front neck edge 1⅜" and altered the shape to more of an elongated U
  • used the sleeve pattern from Silhouette Patterns 195 Sweater Set (my favourite knit sleeve) which is the same sleeve used in my TNT Vogue 8710.

As I said at the beginning of this post this resulted in a top that was too short for anything but quiet contemplation and a few more alterations were made, as follows:

  • bodice lengthened 1½". As I had used my Vogue 8710 TNT pattern pieces I just cut them off 1½" longer than version one. If I had been using the original Rush Hour blouse pattern pieces I think I would simply have added the extra length at the bottom rather than the lengthen shorten line. For reference my lengthened pattern pieces are ⅞" longer than the size 16
  • back bodice side seam increased ½" at peplum seam line tapering back to nothing at the armhole.
  • front peplum (pattern pieces 12 and 13) lengthened ½" at the side seam hem blending back to the original size 16 at centre front
  • back peplum lengthened ½" at the hem and widened ½" at the side seam. I also wanted the back peplum to have more swing so I slashed the pattern piece at the hem up to the bodice seam line and curved out the hem edge until it was 1½" times larger than the bodice seam length
  • ¼" dart made in the curve of the U as the front neckline gaped slightly.
If the original Rush Hour blouse comes in B, C and D cup sizing why would it require fit alterations?
  • the bust dart tip is just over 4" from centre front (size 8 4⅛" and size 16 4½"). For most women this would result in the dart tip being at the bust apex, as generally the distance between the most prominent part of each breast is 8". From a pattern drafting perspective it is not incorrect as the dart can end anywhere within the bust circle. However as Ann Hathaway in that pink Prada dress will attest this is not the most flattering look. For me having a larger bust the dart tip is generally about 2" away from the bust point, as the more the bust is rounded the further away the tip of the dart will be from the bust point, with the dart stopping short of the flat part of the front of the bust
  • the bust point is not marked but measuring down from the shoulder / neck edge point, based on where the dart tip is, it is about 10" (size 8 9⅞" and size 14 10⅜"). I need the bust point to be 11½"
  • other alterations may be required but the reality is I can't ever see me making the Rush Hour blouse with the bodice pattern pieces. I have a good knit version now using my TNT Vogue 8710 and am most likely to make a woven version by adding the peplum to my TNT Silhouette Patterns 400 Traditional blouse.

The sewing

There is nothing interesting about the sewing and I didn't use the pattern sewing instructions. Apart from the hems it was sewn on the overlocker with four threads and a ⅜" seam allowance. The pattern uses ½" seam allowances so I increased the circumference of the peplum by ½" and at the bodice peplum seam line. 

The peplum hem was stay stitched at ⅜" and turned up. The open side of the right front peplum hem was mitred, using the same method as detailed here. The sleeve hem was turned up ½". All hems were sewn with a straight stitch (length 3.0).

The neck binding was a 2" wide strip of fabric folded in half and sewn to the neck edge with a four thread overlock stitch and ⅜" seam allowance to give a finished ½" band (⅛" is taken up by turn of cloth).

Sewing construction was: sew centre and side fronts together; sew front to back at right shoulder seam; attach the neck binding; sew left shoulder seam; sew the sleeve in flat; attach the back peplum to the bodice back; turn up the hems on the two front peplum pieces before attaching to the bodice front; sew up the side seams; hem the bodice and sleeves.

Take two

I wrote a lot of notes about what didn't work in the first version and decided it was unlikely to be worn as I don't want to expose skin when I reach forward or raise my arms. Luckily I had made this top from a relatively recent fabric purchase that was still available at The Fabric Store. Before I rushed off to buy more I got out the left-over fabric to see how much more fabric I would need to purchase. An amazing thing happened and the shapes of the left-over fabric were perfect to cut out a whole new top without the need for a fabric purchase. Think the cup of tea helped.

Creates Sew Slow: Liesl + Co Rush Hour Lagos Laurel Blouse


Outfit of the day

Whilst I was very happy with version two of the Rush Hour blouse it took until April to be worn in real life (for a whole day as opposed to the few minutes it takes for blog photos!)  It was worn for work and the outfit was recreated for these photos as I don't have the photographer with me during the week.

I do think I need to learn how to take timed pictures with my phone as I would like to record my outfits everyday as it gives a lot of useful insight both into what in the wardrobe gets worn as well as the different styling choices.

Creates Sew Slow: Liesl + Co Rush Hour Lagos Laurel Blouse

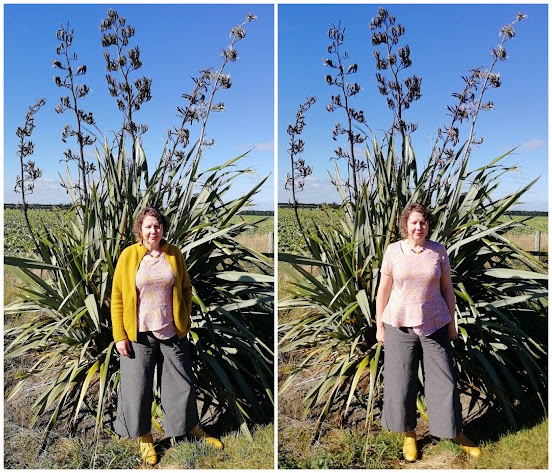
The Rush Hour Lagos Laurel blouse was worn with the Untouched World Weekend jacket in colourway Kowhai; Megan Nielsen Flint mustard check trousers and Ernest Wyler Keesha Sunflower ankle boots.

I preferred it styled with these mustard check Flint trousers rather than the peggy yellow ones. Both of these trousers were sewn for the never entered Pattern Review Endless Combinations 2020 competition.

The photographer found these photographs challenging to take as he kept capturing the moment I had my eyes closed. He also captured the moment I was futzing with the outfit.

Creates Sew Slow: Liesl + Co Rush Hour Lagos Laurel Blouse

Sunday, 22 November 2020

Alabama Don't Give Up Hope Sweater

Don't give up hope could be the anthem for this year. As I typed this I was thinking about the Peter Gabriel song Don't Give Up which suited my mood but...


...in my Google search I found this song Don't Give up Hope by Third Day which whilst not my type of music its lyrics are tailor made for now even though it was released in 2010.


However this is a sewing blog and it is all about a piece of fabric purchased from Gorgeous Fabrics at the beginning of the year in the early days of COVID when my fabric still flew across the Pacific Ocean to arrive swiftly in my collection. Now shipping takes so long the fabric must be swimming here under its own steam which is a positive as I am less tempted to buy it!

The finished garment

This top has been worn quite a bit and goes nicely with my Megan Nielsen Flint mustard boyfriend jeans which hadn't been made when these photographs were taken. These pictures were taken at different times over the two months I spent at home earlier this year and contrary to the evidence I didn't spend the whole two months wearing this pair of Andrea Moore Boyfriend jeans. It is quite revealing that I am wearing different shoes (Trippen Fight boots in the first collage and Clamp Uncut ankle boot in the second) but the same trousers.

Creates Sew Slow: Alabama Don't Give Up Hope Sweater

Creates Sew Slow: Alabama Don't Give Up Hope Sweater

A Gorgeous Fabrics label was used in this top to remind me of where the fabric came from and the photographer even took a picture of the top with the label sticking out to prove it!

The fabric

This fabric is the Don't Give Up Hope Italian rayon jersey knit purchased in February 2020 from Gorgeous Fabrics. A very popular fabric that flew off the shelf and I was lucky to get a piece. I was attracted to the colours and print not realising then how much we would need such a sentiment this year.

Creates Sew Slow: Alabama Don't Give Up Hope Sweater

The pattern

The Alabama Sweater pattern can be made in tunic, top or crop top versions. It features a V-neckline and is loosely fitted through the bust with a generous flare to the hem. The Sweater pattern also includes five sleeve variations (sleeveless, cap, short, three-quarter and long-fluted sleeves). The tunic measures approximately 29", the top 26" and the crop top 23" in length. It was part of the Alabama Chanin 2016 Build a Wardrobe programme.

The PDF download includes the nested pattern and comes in sizes XS to XXL along with instructions for fabric selection, cutting, and garment construction.

Creates Sew Slow: Alabama Don't Give Up Hope Sweater

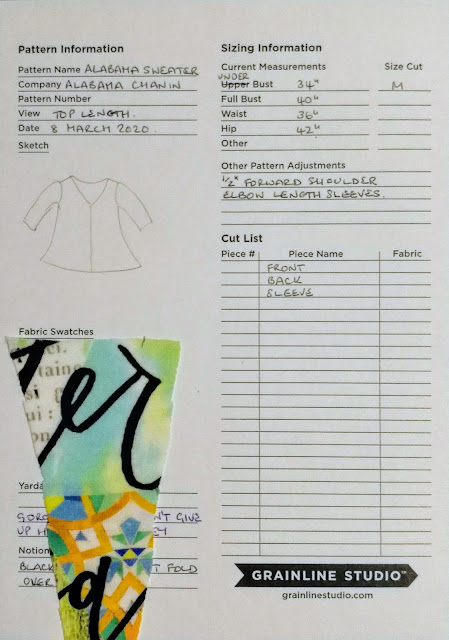
The pattern card

I am loving my pattern cards as they are a great aide memoire. For example I really thought this top was sewn during April whilst we were keeping safe at home (also known as lock down) but apparently it was sewn in early March only a month after the fabric was ordered. This must be the year of sew one of the fabrics purchased immediately. That could almost be considered stash reduction if I only bought my fabrics one at a time!

Creates Sew Slow: Alabama Don't Give Up Hope Sweater

The pattern alterations

This is a previously used pattern and I made no changes to it, sewing the size medium top version with elbow length sleeves and a forward shoulder adjustment.

Until I read my old post I had forgotten that the original pattern came in so many variations and am now tempted by a short sleeve or sleeveless one. Maybe even a tunic version to be worn with leggings.

The sewing

One of the quick and easy to sew tops, which was the sum total of my sewing at the beginning of the year. It didn't really fit into my Sunset SWAP but suited my mood and need for brain optional sewing.

The seams were sewn with the overlocker (a four thread stitch) and the hems on the trusty Singer Featherweight. Fold-over elastic (black with white polka dots) was used to bind the neck edge, sewn on with a straight stitch on the Featherweight.  I even followed the order of construction included in the pattern instructions just not hand sewn in the Alabama Chanin way.

Outfit of the day

There are no pictures of this top being worn in the real world, only garden pictures. An indication of the times we lived in when this top was newly sewn.

There is more venturing out now as New Zealand has managed to stay pretty much COVID free. Even went to a craft fair today which apart from the hand sanitiser and recording the visit on the contact tracing app is how life used to be. 

Monday, 22 June 2020

Vogue 8710 a versatile Katherine Tilton top

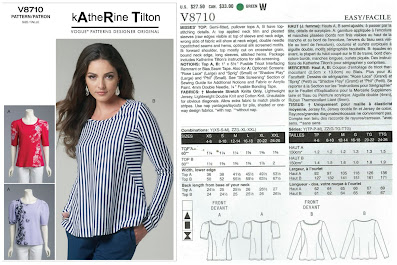
In a search for the perfect top pattern to use with a wonderful Liberty of London jersey knit I rediscovered a Katherine Tilton pattern Vogue 8710. Like many of my Tilton sister's patterns it had never been used. I seem to admire the style lines buy the pattern and store it as a collectors item rather than using it. Don't know why because I usually love the finished garments made from their patterns.

Once it was rediscovered I proceeded to make view B four times, only the second top pattern I have sewn since Christmas. Other top patterns have been selected and the fabric cut out but they haven't made it to the sewing machine. I normally loathe the cutting out stage and can't wait to sew. This year however garments have been cut out and no sewing has followed. There are currently about ten to be sewn items sitting on my sewing table.

The finished garment

All four of these tops have been on constant rotation since they were sewn. Even though it is Winter now I am still wearing them with the addition of a woolly layer.

Creates Sew Slow: Vogue 8710 a versatile Katherine Tilton top
V8710 KT Dreams of Summer top
Creates Sew Slow: Vogue 8710 a versatile Katherine Tilton top
V8710 KT Dreams of Summer top
Creates Sew Slow: Vogue 8710 a versatile Katherine Tilton top
V8710 KT Little Mustard Stripe top
Creates Sew Slow: Vogue 8710 a versatile Katherine Tilton top
V8710 KT Fall Blues top (never to be worn again with these trousers)
Creates Sew Slow: Vogue 8710 a versatile Katherine Tilton top
V8710 KT Busy City Top

The fabric

The journey started with a wonderful Liberty of London jersey (94% modal and 6% elastane, 160gsm) called Dreams of Summer and sadly sold out. It was pretty expensive so I only bought one metre (137cm wide). My first plan had been to combine it with a plain mustard jersey knit but as luck would have it there was enough fabric for Vogue 8710 in size small.

The second version made from the mustard stripe knit fabric (95% cotton and 5% spandex, 190gsm) was chosen because I wanted to emphasise the little cut out by placing the stripes vertical with the rest of the garment having them horizontal like the top on the pattern envelope.  This fabric is extremely wide (175cm) and was bought from Fabric Vision here in Christchurch but is available online from Miss Maude (Torpedo Little Stripe Jersey Knit). There will be more versions of this top as I bought the same fabric in two other colourways duck egg blue and blush pink.
Creates Sew Slow: Vogue 8710 a versatile Katherine Tilton top

Then followed Fall Blues a brushed ITY knit from Silhouette Patterns. This is a light weight fabric originally intended for Vogue 9243 the Twirling dress. I made the mistake of cutting the fabric for the dress double layered creating a hideous pattern join at both the centre front and back seam. It looked so bad that I only sewed the centre front and back seam before throwing it in the bin. The positive side to this was using the left over fabric for V8710.

Finally I used the off-cuts from another dress Giorgio's Busy City Dress made using Silhouette Patterns 312 Giorgio's Top lengthened to the knee. The remains of the Busy City French digital print viscose knit 130gsm also from Silhouette Patterns was intended to be combined with other left-overs for a different Katherine Tilton pattern B6492. As soon as I saw how much fabric remained it inevitably became V8710. Maybe the scraps could be combined with two or three other fabrics to become B6492. I do want to get better at using up the fabric remnants rather than just storing them. If I continue to sew in themes combining the left over fabrics should be easier.

The pattern

The pattern includes two tops. I was attracted to View B for the little cut out piece and if you make it with short sleeves it fits on less than a metre of 137cm wide fabric. View B is described as a semi-fitted pullover top with top stitching details, forward shoulder, mostly cut on crosswise grain, bound neck edge, long sleeves, and stitched hems.

Creates Sew Slow: Vogue 8710 a versatile Katherine Tilton top

The pattern card

Back in March 2020 Grainline Studio wrote a getting organised blog post about pattern cards they specifically designed for home sewers.  Pattern cards are used in the garment industry to accompany a pattern around the sewing facility giving the people working with it the information they need to correctly cut and sew the garment. For me the value is in having notes about what pattern adjustments I made, the pattern pieces and fabric used, my measurements when the garment was sewn and the pattern size cut.

I downloaded the pattern card and have been trying to remember to fill it out as I alter the pattern and cut out the fabric. Not entirely convinced of the value of having one for each garment sewn from a pattern, when they are sewn in quick succession like these, as opposed to one per pattern or one each time the pattern is altered.

Creates Sew Slow: Vogue 8710 a versatile Katherine Tilton top

Storing them is a challenge I haven't quite conquered yet, as I don't keep my patterns on pattern hangers and even reduced to A5 size they are too big to be inserted into many pattern envelopes.

The pattern alterations

As this is a Vogue pattern it has ⅝" seam allowances. I chose to use the size small sewn with ⅜" seam allowances which increased the circumference from 35½ to 37½". This provided me with 2" of negative ease (the right amount for me).

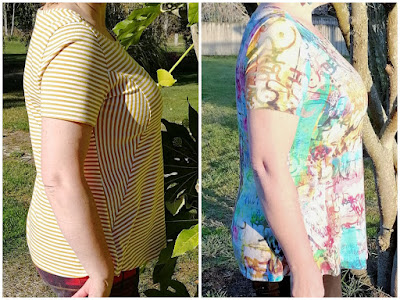
The bust point was lowered by adding a 1½" strip above the bust point in the front pattern piece. For the side front piece I cut across to the side seam and created a wedge 1½" larger where it joined the front pattern piece and nothing at the side seam. I made the alteration in this way to increase the depth for a 1½" FBA.  For the fourth version (the Busy City top) I increased the FBA by an extra 1" as I was still getting a little fold of fabric at the bust which can be seen most clearly on the Little Mustard Stripe version. It is a bit hard to see in the before and after photos below due to the print in the Busy City top but in real life the difference can be clearly seen (if you sew and are attuned to these things).

Creates Sew Slow: Vogue 8710 a versatile Katherine Tilton top

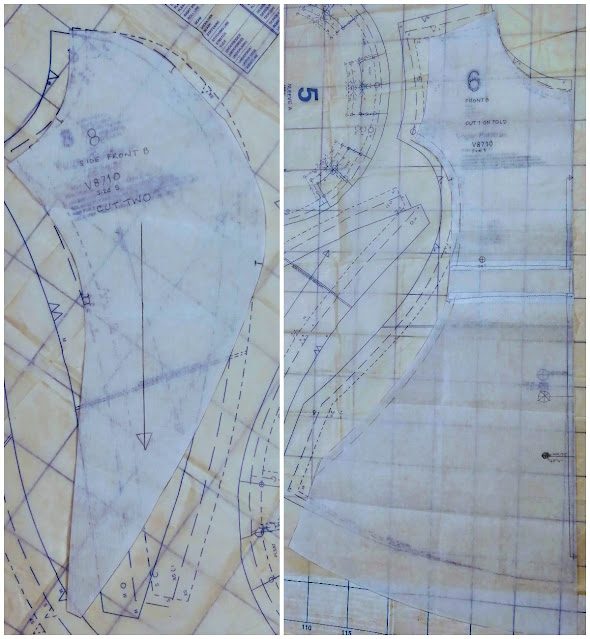
The difference in the pattern pieces after the total 2½" FBA change can be seen in the photo below.

Creates Sew Slow: Vogue 8710 a versatile Katherine Tilton top
Pattern piece 8 (at left) is the side front; fitting into the curve on the left of pattern piece 6 Front

Rather than use the long sleeve intended for view B I altered the armhole to match my preferred sleeve from Silhouette Patterns 195 sweater set and used the short sleeve length.

Writing this blog post highlighted a small faux pas. Reading the pattern envelope and the notes on the pattern card identified I made a forward shoulder adjustment when one was already incorporated into the pattern. This explains why the finished garment sits a bit oddly on the shoulders. However this is preferable to the top always falling backwards strangling me with the neckline as tops without a forward shoulder adjustment do. For the next version of this top I will correct the double forward shoulder by putting my ½" adjustment back on the front pattern piece and removing it from the back.

The sewing

The pattern instructions are good and include some design studio tips. I veered off from the instructions by using the overlocker and not top stitching the seams. Also whilst the neck binding was attached as per the pattern instructions (albeit using the overlocker) I didn't use the neck binding pattern piece cutting a 1½" strip instead. This strip is stretched slightly as it is stitched around the neck to give a nice snug neckline.

The old Singer Featherweight was used for the hemming and stitching the neckband in the ditch.

Outfit of the day

These four tops went with me for a week away by the Okari lagoon near Westport on the west coast of the South Island of New Zealand. This was meant to be our Easter break but we weren't allowed to leave home then so it was deferred until late May.

Creates Sew Slow: Vogue 8710 a versatile Katherine Tilton top
V8710 KT Fall Blues top: Andrea Moore Boyfriend jeans; Ivy Lee Courtney Yellow Faux Python flats
V8710 KT Dreams of Summer top; Andrea Moore True Love orange pant; Birkenstock Arizona Metallic Silver sandals
Untouched World Ecopossum Weekend Kowhai jacket; V8710 KT Busy City top; Andrea Moore Boyfriend jeans; Ernest Wyler Keesha Sunflower bootie
V8710 KT Little Mustard Stripe top; Andrea Moore Boyfriend jeans; Face & Cie glasses

On the way home we stopped at the Maruia Falls. This waterfall was created by the 1929 Murchison earthquake which triggered a landslide in the Maruia Valley diverting the course of the Maruia River westwards and forcing it to cut a new channel over an old river bank. Once the river had eroded the gravel, the bank became the Maruia Falls. Immediately after the earthquake, the falls were only about a metre high, but after a year, the drop was 5 metres, by the early 2000s it was 10 metres.

Creates Sew Slow: Vogue 8710 a versatile Katherine Tilton top
Moochi Puffed Coat; V8710 KT Dreams of Summer top; Andrea Moore Cropped Boyfriend jeans; Ernest Wyler Keesha Sunflower bootie

This outfit was worn to breakfast and for my first haircut in eleven weeks. When I arrived home I took a selfie in the sewing room to record the moment! All of the other pictures in this post were taken at various points during this eleven week period. Is this proof I don't need a haircut every six weeks?

Creates Sew Slow: Vogue 8710 a versatile Katherine Tilton top
Untouched World Ecopossum Weekend Kowhai jacket; V8710 KT Little Mustard Stripe top; Andrea Moore Boyfriend jeans; Ernest Wyler Keesha Sunflower bootie

Sunday, 15 September 2019

Style Arc Rosie Alice Top

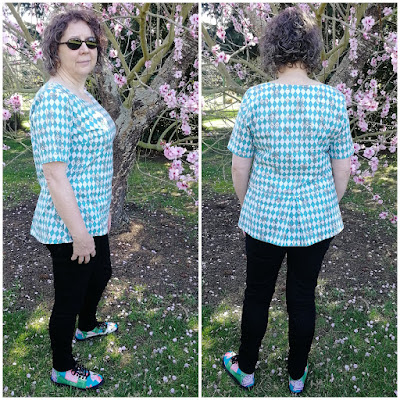
Not all rabbits are created equal. The White Rabbit from Alice in Wonderland (Sir John Tenniel's original illustrations not the Disney version) is my favourite kind of rabbit however when it comes to matching the Alice top to your new Wildwood jeans and Kate Spade Edina ballet flats it just doesn't cut the mustard.

The top on its own wasn't that spectacular initially either but after a bit of reverse engineering I now love the top with a plain pair of trousers.

The finished garment

The finished garment photos were taken before I took it apart for the second time. Since I tweaked the armhole shaping the weather has been horrible and completely unsuited for a cotton top so no photos of the top in its current finished state.

Originally this top was due to be blogged once pictures had been taken of its final state however for the last three weeks I have been trying to write a post about a pair of trousers and can't seem to finish it. Blogging about this top is my palate cleanser which will hopefully encourage the trouser post to emerge from its cocoon or maybe it will continue to be elusive until I have made the second pair.

Creates Sew Slow: Style Arc Rosie Alice Top

Creates Sew Slow: Style Arc Rosie Alice Top
Style Arc Rosie Alice top with Untouched World Pure Skinny black jean and Camper Twins Luis Gordillo Sneakers
Creates Sew Slow: Style Arc Rosie Alice Top

As you can see the top is much less successful with Lana's Wildwood jeans, even with my United Nude Fold Liqorice booties. The patterns really don't go together - can't imagine why I thought they ever would.

The fabric

This is a Lecien quilting cotton from the 2016 collection Girl's Story. A disappointing Japanese cotton much coarser than usual - very much a quilting cotton, purchased from some unknown Etsy source. Do like the print though.

Creates Sew Slow: Style Arc Rosie Alice Top
Lecien Girls Story Alice in Wonderland Harlequin Teal

The pattern

I made the Rosie top for Cath nearly a year ago and have always fancied making it for myself.  Seemed ideal with this Alice in Wonderland fabric.

Creates Sew Slow: Style Arc Rosie Top

Style Arc describe Rosie as a versatile top with interesting back detail. A great top for all occasions. The slight cap sleeve is very flattering and the back inverted pleat give this top a point of difference.

Fabric suggestions are: crepe, washed silk, cotton, any woven with some body and drape. So for once I chose a fabric recommended by the pattern.

The pattern alterations

All of the pattern alterations stemmed from the fact that I don't like cut on sleeves and removed the cap sleeve. To start I used a TNT top pattern with a set-in sleeve lined it up at centre front / centre back matching the two patterns at the neck edge shoulder point and marking where the end of the shoulder seam came. Then using the armhole template for my favourite woven sleeve I drew in the armhole.

For the back I also made a sway back adjustment. For the front having altered the side front piece for a set-in sleeve I decided not to use a princess seamed front as it would distort the fabric's harlequin pattern. Instead I found a top with a French dart and manipulated that to be the front pattern piece, lengthened ½" at centre front, curving to both the same length as the original pattern at the side seam and the same width at the peplum seam.

Creates Sew Slow: Style Arc Rosie Alice Top
Left original back pattern piece (white) overlaid with armhole template; and the new pattern piece (brown) on the right
Creates Sew Slow: Style Arc Rosie Alice Top
Original front pattern piece (white) with new pattern piece (brown) on top. Left photo with armhole template overlaid
The top was sewn up and tried on. It was very unflattering - too long in the back and big in the waist. Pattern was altered to shorten the back and reduce the circumference at the waist and peplum hem, top was un-sewn, fabric pieces re-cut and top re-sewn.

After it was sewn the second time and tried on the length was good but there was extra fabric at centre back and around the armhole (not needed for a set in sleeve but required in the original design to create the cap sleeve). Pattern was altered again to: (1) lower the armhole and bring it in at the side seam blending back to the original waist; (2) increase the sway back by ¾". Top was once again un-sewn, fabric pieces re-cut and the top re-sewn.

The pattern pieces you see in the photographs above are the final version of the pattern, except I think the sway back alteration was too extreme and I will probably lower the centre back by ½". Just can't leave it alone have to be constantly tweaking striving for perfection.

The sewing

As the quality of the fabric was disappointing I didn't bother sewing it with french seams as I normally would. Apart from the hems it was sewn with the overlocker, and there was no hand sewing. Even the neck edge was just folded over twice and machine sewn in place. The hems were overlocked and turned up once.

This was a quick and easy to sew top except for my need to deconstruct it twice.

Monday, 6 May 2019

TSW Ann's Red Letter Ensemble

Two recent purchases came together to make this ensemble. The Sewing Workshop pattern Ann's Cardigan and Tank matched with a recent Marcy Tilton fabric purchase Red Letters viscose knit.

Both the cardigan and the tank journeyed with me to Wellington the week before Easter. Amazingly the tank was finished and the cardigan was complete apart from missing sleeves and unhemmed. In a further burst of enthusiasm I determined to finish them before I started on my Pattern Review mini wardrobe items and they duly accompanied me to Ahipara for our Easter week away. It took me until the Friday after Easter to finally sew the hems on the cardigan sleeves and announce the ensemble finished.

Whilst the cardigan was intended to be part of my travel wardrobe because of its unfinished state another cardigan was packed (V2494 a Donna Karan waist length jacket made many years ago in a charcoal grey felted merino wool which I American smocked). Do they both count as part of the travel wardrobe when the grey jacket was used extensively during our week in Ahipara but went back to Christchurch with my beloved whilst Ann's Red Letter cardigan was part of the four days in Wellington wardrobe?

The finished garments

The finished cardigan is a great shape unfortunately the folded back front band doesn't stay in place causing the double sided nature of the garment to not quite work as imagined. It may be that this fabric is re-made into another cardigan only time will tell. For the tank the length doesn't seem quite right. Once the warmer weather returns next summer I will see how I feel about it and shorten if necessary. So neither garment is a resounding success at this stage but the pattern does have possibilities.

Ann's Cardigan with Moochi Precinct Sweater, Andrea Moore Boyfriend jeans
and United Nude Lev Wrap Lo red shoes
Ann's cardigan letter side out and Ann's tank stripe side out
Cardigan with 1" sway back adjustment and tank without

The cardigan and tank in their various combinations

The fabric

This viscose elastane red letters French jacquard knit from Marcy Tilton is described as a stunning jacquard in red and black with a pleasing jumbled letters design. A variety of knitting patterns make up the design in this gorgeous quality jacquard from a French mill. We've never seen anything like this before! Fabulous. Softly textured with a pliable drape, crosswise stretch with a bit of lengthwise stretch, 9" repeat and just a touch of rolling at the cut edge. The light/mid weight is right for a top, t-shirt, tunic, cardi, dress or skirt.

Pre-treat by machine wash/dry gentle. After sewing, machine wash gentle and air dry.


Creates Sew Slow: TSW Ann's Red Letter Ensemble

Unusually I managed to buy just enough fabric to make these two items with only scraps left over. The little pile on the left was saved for the coat idea that is floating around in my head, whilst the pile on the right was thrown away.


There is however a further purchase of this fabric wending its way to me as the thought of a double sided dress for a future travel wardrobe was too much to resist.

The pattern

This pattern is described as: open cardigan with cascading panels and fold-back front band, front and back waist seams, long sleeves and stitched hems.Wrong side of fabric will show.  Scoop-neck tank with shaped waist, winged side vents, unfinished neck, armhole and hem edges.

Suggested Fabrics are for the cardigan - medium weight knit such as jersey, double knit, ponte, French terry, sweater knit. Novelty knits. Wrong side of fabric will show. For the tank a light to medium weight knit.

Creates Sew Slow: TSW Ann's Red Letter Ensemble

The pattern alterations

My usual pattern alterations were made to the size medium cardigan and tank. For the cardigan I used the size small armhole, narrowed the shoulders 1", with a ½" forward shoulder adjustment, included a 1" sway back adjustment and lengthened 1¾". The finished back length should have been 29" but like the tank top it ended up longer than that but with the cardigan I don't mind the extra length.

For the tank the shoulders were narrowed ¾" with a ½" forward shoulder adjustment and lengthened 4¾". According to the pattern the original back length was 21¼" by adding the 4¾" the top should have finished hip length, instead it finished just below my bottom which would be a 29" finished length. Should measure the pattern to find out why the top is so much longer than expected and adjust it for next time as this length doesn't feel very flattering.

Once the shoulders were narrowed the armhole was re-drawn to maintain the original size. This generally means it ends up being higher at the side seam, as is the case with this armhole.

To lengthen the tank top, the top half of the size medium is traced to the lengthen shorten line (left hand photo below), centre front/centre back length extended the 4¾" of additional length, the traced pattern piece is slid up so the extended centre front/centre back is at the original hem (right hand photo below), size medium hem line is drawn and the two size medium points at the side seam are blended together.


The sewing

Both sides of this jacquard knit are usable so I decided to make both the cardigan and tank reversible. This meant not using the overlocker for the sewing. Instead the cardigan had a faux flat felled seam sewn with the sewing machine. All seams were sewn first with striped sides together at ⅝", one side was trimmed and the other side folded over and top stitched.

For the tank the side seams end in the winged side vents. Striped sides were still sewn together at ⅝" (but only to the marked point) then pressed open with both sides top stitched at ⅜" then trimmed. The winged side vents could then be hemmed easily.

In order for the turned back cardigan front band to be the same side of the fabric as the rest of the cardigan the opposite sides (stripe to alphabet) were sewn together. Originally the whole seam was sewn but that meant the hem couldn't be turned up with the stripe side on the alphabet side of the garment for both the front band and main body of the cardigan. The front band seam was undone, the hem turned and stitched then the front band seam re-stitched as in the photo below.

The re-sewing of the front band to the main body of the cardigan
Perfect mitred corners - shame about the wonky sewing
Both the tank top and the cardigan had four mitred corners each. In the past this would have filled me with dread but the combined wisdom of Gwen Spencer and Louise Cutting ensure perfect mitres every time. Gwen has a fool proof method of marking the fabric to get the perfect mitre and Louise recommends that the fabric is not trimmed. Not trimming the fabric ensures the mitre is plump without any lumpy bits. I have shared Gwen's mitred corner YouTube video before but here is the link again.

The outtake

No outfit of the day as it hasn't really been worn yet, we did however get an arty photo when doing the photo shoot (seems a bit pretentious for what we did with my phone camera) at our Easter holiday bach. The sun was streaming through the slats in the fence I was stood by and created this striped effect.  Love the shell garden ornament which is the point of the picture, we just chose the wrong time of day to take it.