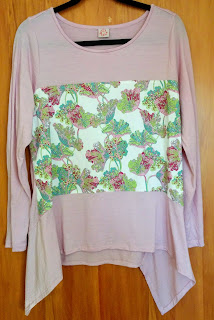
The finished garment
A super top style that is likely to appear many more times on this blog in various incarnations, especially now that I can make it with set in sleeves. |
| Sorry looking even more lopsided than normal |
 |
| Bit of static cling around the bottom |
 |
| And here it is stuck on a coat hanger for the travel wardrobe photograph |
The fabric
 |
| Liberty Kingly Cord in design Vesuvian colourway B |
 |
| The Fabric Store premium merino knit (180gsm) in colourway Ballet Pink |
The pattern
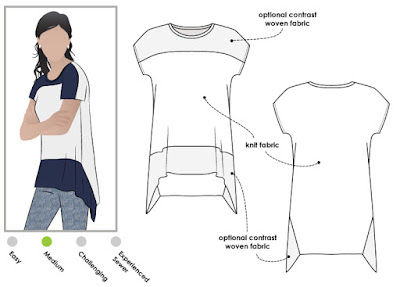
From the StyleArc website "This top has an interesting front hem panel that continues to the back giving a fabulous silhouette. Use your own creative flare, mixing fabrics or colours for your own individual look. We made our sample in Linen but would also work in a knit as well."The pattern alterations
This is a well loved pattern that I have made a few times in its original form. This time however I wanted to use up a bit of Liberty fabric left over from my Megan Nielsen Flint trousers in combination with a merino jersey for a long sleeved top. On other kimono sleeved tops I have created a pattern piece to lengthen the existing short sleeve, for the Maris top I wanted to have set-in sleeves.This is an easy pattern alteration to make with three basics: your measurement from shoulder point to shoulder point across the back plus seam allowance; a favourite armhole template; and the armhole's corresponding sleeve.
If you don't have this information already it can be taken from a favourite top pattern that fits you well:
(1) Measure across the pattern piece from centre back to the shoulder point - take note of seam allowances and adjust the measurement as necessary eg if your favourite top has a centre back seam remove the corresponding seam allowance from your final number.
(2) Trace each armhole shape (front and back) from the pattern onto a piece of card
(3) Trace the sleeve pattern piece so that you can use it for your altered Maris top
Back pattern piece alteration
Using the shoulder width measurement mark where the shoulder seam should be on the Maris top. Then using your back armhole template position it at the shoulder mark and swing out to the side seam and mark the armhole shape on the pattern.
 |
| Back pattern piece: Left new overlaid original; Right with armhole template |
The front and back shoulder seams need to match, so overlay the back pattern piece on the front yoke pattern piece matching the shoulder seam at the neck edge. Mark on the front yoke pattern piece the shoulder point from the back pattern piece.
The front armhole is made up of the yoke and front pattern pieces, so these two pieces need to be overlapped at the seam allowance before you can create the new armhole. Once overlapped using your front armhole template position it at the shoulder mark and swing out to the side seam and mark the armhole shape on the pattern.
On the front pattern piece you can see that the side seam, at the armhole, is slightly narrower than the original pattern piece. This alteration was made after I had sewn this top because I have a bit too much fabric sitting at the armhole in this version. Now the pattern piece has been refined it should prevent this problem in future tops.
 |
| Front pattern pieces: Top adjusted yoke pattern; Bottom contrast front pattern |
 |
| Front pattern piece positioned over the scrap of the Liberty fabric |
The front bottom band for the Maris top is not altered and the original pattern piece can be used.
The sewing
Once the pattern was altered this was an easy knit garment to sew on the overlocker. The hems were sewn on the sewing machine using a straight stitch and a ballpoint needle.
I cut a 1" strip to bind the neckline. It was sewn around the neck edge with the overlocker after only the right shoulder seam had been sewn. Overlock the left shoulder seam and binding. Then fold the binding over and stitch in the ditch, using a straight stitch, from the right side on the main body close to the binding. Trim the binding on the inside of the garment close to the stitching line. This gives a nice narrow ¼ inch binding.
 |
| The stitching in the ditch around the edge of the neck binding can just be seen at centre front |
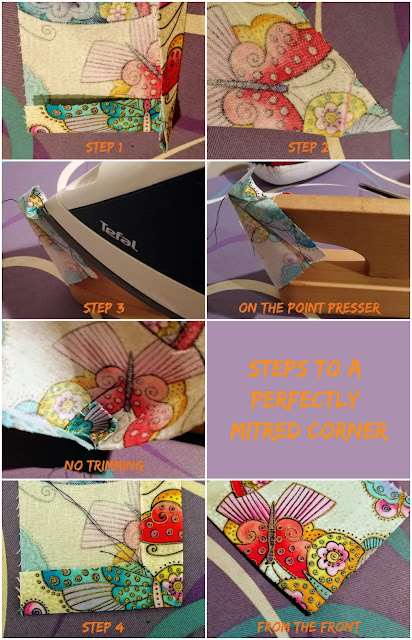
The trickiest part is mitring the corner of the front bottom band. I follow the Gwen Spencer method which she demonstrates in this YouTube video, with Marcy Tilton, and always have success.
My one variation to Gwen's method is that I don't trim away the excess, as I think pressing the seam open with the extra folded into a diamond shape gives a better weight to the mitred corner and helps it sit well. Here are my steps to a perfectly mitred corner which hopefully make sense in conjunction with Gwen's video.
Step 1 - turn up your hem. If I want a double fold hem then it is double folded at this stage.
Step 2 - draw your stitching line from clip to clip through the point and sew.
Step 3 - put the sewn mitre on the point presser and press the seam open. Place one finger at the point of the corner on the inside and another on the outside and turn (you can use a point turner for this bit instead of the finger on the inside). The inside will look like the "no trimming" picture.
Step 4 - press the finished mitred corner.
 |
| Et voila the perfect mitred corner |


No comments:
Post a Comment