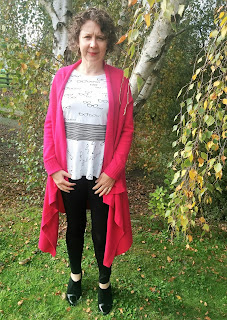
The finished garment
The fabric
The spectacle fabric is an Avalana jersey 95% cotton and 5% elastane by Stof Fabrics. The stripe fabric is also an Avalana but with 94% cotton and 6% elastane, which is just not as nice to the touch as the spectacle fabric nor does it stretch the same. This fabric was purchased from All Things Patchwork on our Easter trip away so once again not a very long maturation period.So why call this the Two Ronnies' top you ask. For anyone familiar with British 1970's comedy the answer is clear and for everyone else there is Wikipedia.
The pattern
Janis is described as a peplum style top with two collar options, both available in short and long sleeves. It's fitted at the shoulders and falls into a relaxed fit below the bust. This is a modified version of view one with the round neckline and 3/4 length sleeves.The pattern alterations
I used the same pattern with changes as per my first version with the neckline lowered that extra 1/4 inch as per my second version. The additional changes made to the front and back pieces were:- Fold up the front and back pieces at the lengthen shorten line to remove the curve. Add 2" to the length
- Taper the side seams to remove 1/4 inch at the base
- Cut a band the width of your front and back pieces x 4 1/8 inches (mine was 39 3/4 x 4 1/8 inches)
For the sleeves a short sleeve was cut using my TNT knit sleeve. This was cut longer than I thought I needed then after one had been basted into the garment to determine length I cut both measuring 11 7/8 inches from the cap. Cut two rectangular strips the width of the short sleeve from both the stripe (4 1/8 inches) and spectacles (3 5/8 inches). Sew these rectangles to the short sleeve and then re-cut to shape using the sleeve pattern.
Given the widening effect of the stripe at the waist I wonder if it would look better with a narrower waist stripe of 2 inches, and the top and peplum both increased by 1 inch to retain the overall length. Or even reduce the waist by tapering in the side seams more. Oh well it is made now but possibly some good thoughts for next time.
The sewing
Yet another simple knit top sewn on the overlocker. Hems (sleeve, peplum and neck edge) turned under and hemmed with a straight stitch and ballpoint needle in my little Singer Featherweight.The only difference to the previous version is sewing together the different fabrics and working out the length of the sleeve so the stripes match up. The sewing order was:
- Overlock the shoulder seams
- Overlock one side seam
- Add the striped band to the bottom of the body
- Baste in the round one short spectacles sleeve to determine the length where it would meet the spectacles on the body. (You can then cut both sleeves accordingly and assemble the three sleeve pieces together)
- Set in the sleeves (one in the round and one flat as normal)
- Overlock the other side seam
- Add the peplum to the bottom of the body
- Hem the sleeve, peplum and neck edge
I really do have some more interesting sewing percolating around in my head. A couple of coats in fact from two late 90's Vogue designer patterns. As usual there is a bit of procrastination at the start due to the effort needed to think through and do the necessary fitting alterations, as well as the waste of fabric fear (will this fabric be as great made into this coat as it is in my head). Another knit top is quite a good delaying tactic and I certainly have enough fabric to feed the machine.
The styling
This week I had a bit of a black and white theme going with my work outfits so I added my pink Sable and Minx wool/cashmere cardigan to brighten things up.Here is my casual Friday outfit. Janis Two Ronnies top worn with black trousers from Witchery, my aforementioned pink cardigan and United Nude Eamz Alexa Black shoes.
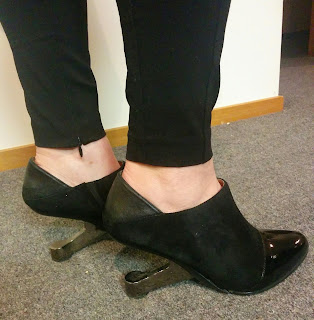
Here is my outfit minus the cardigan and a better picture of the shoes.
So it's goodnight from me and it's goodnight from him.


Another great top and those shoes are a feat of engineering. I wonder who the 3rd pair of glasses is? My first thought was the Class sketch with the 2 Ronnies and John Cleese but they weren't wearing glasses in that one.
ReplyDelete