Saturday, 28 January 2017

To Mend or Not to Mend?

When your dearly beloved asks you to mend his holey trouser pockets do you suggest a shopping expedition or mend them?

My first thought was that the trousers are old enough to surely get some new ones.  My second thought was mending would be less traumatic and my third was I managed to throw away some moth eaten underpants two weeks ago and I better not push my luck!!

Exhibit A the holey pockets...

Creates Sew Slow: Holey trouser pocket 2Creates Sew Slow: Holey trouser pocket 1

No pocket lining fabric to hand but I did have some quilting cotton which whilst not ideal will hopefully outlast the rest of the trousers.

Chop off the offending part of the pockets.  One was worst than the other but I removed the same portion from both.
Creates Sew Slow: Chopping off the offending holey part

Creates Sew Slow: Replacement pocket part

Sew french seams.
Creates Sew Slow: Sewing the french seam

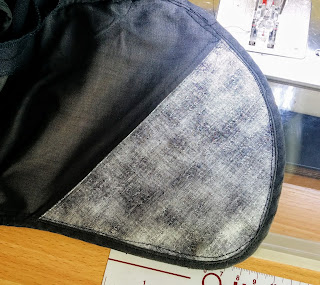
Sew the binding back around the pocket.
Creates Sew Slow: The mended pocket

Job done.

Apparently this was a better job than expected.  I was just supposed to fold up the damaged part and sew over it. Left to his own devices this job would have involved a stapler. Not quite sure how you would have used the pockets afterwards.  Anyway when they enter the next stage of their life I am sure you need pockets in your gardening trousers too.

Saturday, 21 January 2017

Glamourous sewing

In the push and shove of a sales frenzy I bought a super king duvet cover for our king size duvet. Unfortunately the error was not spotted until the point of use (after throwing the packaging away and washing).

Slightly miffed with myself but at least I bought a larger one which as a sewer I can alter. Not immediately of course it had to go back into the linen cupboard for a bit of timeout.

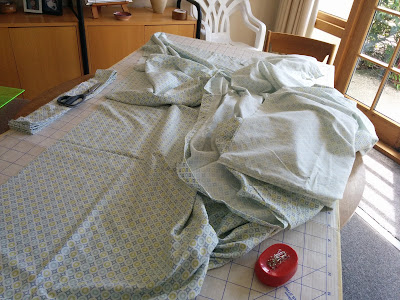
Today the time came to rectify the size discrepancy. 40cm was carefully removed from the width.

Creates Sew Slow: Glamourous Sewing duvet cover alteration

Being a neat freak french seams were the obvious choice. Upon closer inspection I saw the seams had been overlocked. Not wanting to appear Becky homecky I immediately re-threaded the overlocker with white thread  and overlocked the side seams.

Creates Sew Slow: Glamourous Sewing duvet cover overlocking

Pressed the seams using the seam roll and point press.  I even used the Louise Cutting sewing and corner pressing technique before sewing the flange. Isn't this an amazingly square corner -  a true sight to behold.

Creates Sew Slow: Glamourous Sewing duvet cover perfect corner

And there you have it some glamorous sewing for my glamorous lifestyle.

Shouldn't grumble at least it can now be used.

Creates Sew Slow: Glamourous Sewing duvet cover in use

Saturday, 14 January 2017

Vogue 1250 Meandering Chrysanthemums

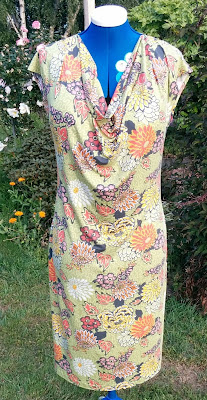
The first garment of 2017 - presenting Vogue 1250, the ubiquitous DKNY knit dress made and loved by sewers around the world. This is a re-make that went together much more easily than the original and without reference to the pattern instructions which seem to have absconded with the pixies. For some reason the bra shows in the photos but it doesn't in real life.

Creates Sew Slow: V1250 Meandering Chrysanthemums Front


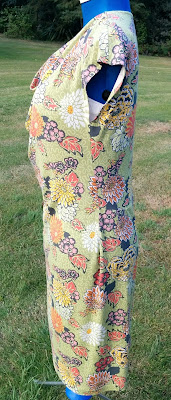
Creates Sew Slow: V1250 Meandering Chrysanthemums SideCreates Sew Slow: V1250 Meandering Chrysanthemums Back

The Fabric
A Liberty of London print this time purchased from Shaukat I think, or maybe Liberty on one of my in-person visits way back in the mists of time. The fabric is a jersey in the print Meandering Chrysanthemum. This is a Liberty print I am very fond of, having this same colourway in silk chiffon and you have already seen the red silk chiffon as the Swirler top from the 2016 retrospective. Then there is the cotton jersey in the blue colourway in my fabric collection, a recent purchase from The Fabric Store.

Do you think anyone will notice that I keep wearing the same fabric print and/or the same sewing pattern?

The Pattern Alterations
The original dress was adjusted to raise the armhole and increase the depth of the cut-on facing for the cowl. Both of these recommendations came from the Sewing Lawyer who I greatly admire and has much better sewing skills than me. However the length was as per the pattern and it is a bit too long plus there is an obvious (for a sewer) pool of fabric in the centre back.  For this version I shortened the length by 4½" so it fell just below the knee cap (my preferred length) made a sway back adjustment and my usual forward shoulder adjustment. The upper back is in two pieces because I didn't have enough fabric to cut it, as Donna intended, in one piece. Also due to fabric limitations there is no pattern matching.

The Sewing
For the back neckband, the armholes and the hem the fabric was turned under and stitched down using the sewing machine. The rest of the dress was made on the overlocker.  I used a ballpoint needle (size 80) in the sewing machine with a universal (size 70) in the overlocker. For the back neckband and armholes I stay-stitch them 3/8" from the edge then use this stay stitching as a guide to turn and press under.

For the hem I use the Linda Lee trick, from one of her Craftsy classes, using the file folder with marked lines at desired intervals from one long edge.  You put the file folder on top of the fabric turn up the hem to the marked line at the depth you want, in this instance 1", make sure the file folder is right into the fold of the fabric and press. This gives you a really sharp crease at a uniform distance from the edge with no burnt fingers. If you do this before you sew the centre back seam it is an even quicker and easier way to mark the hem as you are working with an essentially flat piece of fabric. Most fabrics retain the crease through the sewing and pressing of the seam and once this is done you can fold the hem back up and stitch.

The Previous Version
Here is my original Vogue 1250 dress in an ITY knit fabric from Silhouette Patterns made many years ago but still in the wardrobe and worn relatively regularly.

Creates Sew Slow: V1250 ITY knit

Saturday, 7 January 2017

2016 sewing retrospective - woven tops

In doing these sewing retrospective posts as well as being surprised by how much I managed to sew last year I also noticed just how little sewing from years past is visible in my wardrobe. But those garments that are still in my wardrobe have been repeated or will be repeated in 2017.

So on to the woven tops...

Swirl top by Starfish

This top is a modification to the Starfish Swirler dress from the book Home Sewn by the New Zealand Fashion Museum. Garments from the Home Sewn exhibition (not the book) can be seen here. I did make the dress which had a short life in my wardrobe as it really wasn't my style.


For the first version of the top, the pattern was shortened a uniform amount which resulted in quite short side seams which can be problematic if you raise your arms too high or if it's windy. The neck is also quite wide so it is hard to keep on your shoulders. It was made in a silk chiffon, with cuffs and neck binding in navy silk left over from the Maris top.  All fabrics were from The Fabric Store. Whilst still in my wardrobe it has only been worn in public once.


Having learnt from my mistakes I lengthened the side seams and reduced the size of the head opening.  The sleeve width was reduced and the sleeves lengthened. This version is much loved. The fabric is a Liberty silk chiffon in the meandering chrysanthemum print from The Fabric Store.


Silhouette Patterns #400 Traditional Blouse

Silhouette Patterns are fabulous they helped the penny drop with regards to ease and they come with cup sizing so no FBA. Now I can take any pattern look at the finished garment measurements and decide how much ease I want and therefore the pattern size to start with. Since I learnt this lesson after 30 years of sewing I have a much better finished garment fit success rate - it still doesn't overcome my innate ability to choose patterns that don't suit me. Need better 3D visualisation skills.

For these garments I lowered the neckline and made a forward should adjustment. I used the view without the button placket but retained the shirt tail which looks great. The blue is a cotton shirting fabric from The Fabric Store with silk embroidery thread for the running stitch and felt flowers in colours to go with a floral pair of RTW pants. The green is a Japanese double gauze from Marcy Tilton purchased in 2014.


Butterick Tunic B6172 View B

All of these have an FBA and forward shoulder adjustment.

The green roses are a Liberty Tana Lawn (rainbow rose colourway C) purchased from Liberty of London a few years ago. The red is a linen from The Fabric Store.


This MacCulloch and Wallis  London border print has already featured in an earlier blog post with the headless selfie. I took some more pictures so you could see a 360° view to show the mix of fabrics.  Having only bought one metre print matching was impossible - I just focused on matching the fence!


Style Arc Maris Top

Love both of these tops made in a size 10 with no pattern alterations. The red/blue square version uses a Milly silk (the back is on the bias) from Elliot Berman Textiles with the contrasting navy silk from The Fabric Store. The orange is a silk linen blend from The Fabric Store.


Sewing Workshop Bristol Tunic

The Bristol top was lengthened as I wanted a tunic to wear over leggings. I made a forward shoulder adjustment but didn't do an FBA. It has only been worn once with skinny pants and the jury is still out as to whether it will have a long term future. The print is an Italian viscose/rayon challis panel from Marcy Tilton paired with a rayon knit from Silhouette Patterns. If it lives it will be because I love the print or I finished the leggings and the two work better together than the top did with skinny pants.


Tuesday, 3 January 2017

2016 sewing retrospective - dresses

I am just discovering dresses as an alternative to a skirt and top.  The proportions of my tops are very rarely right for my skirt so a dress is an easier option. Most of my tops are bought or made to go with trousers so are often too long to wear with a knee length skirt.

First is a knit dress using a self-assembled pattern from Silhouette Patterns #2010 Three-Piece Yoga Skirt and #195 Sweater Set Top. The original version is made from a viscose/lycra fabric purchased from Designer Fabrics Australia in 2014.


The second dress from the same pattern is made from an ITY knit from Silhouette Patterns. The neckband is influenced by the Tilton sister's Artful t-shirt Craftsy Class.


There was also a woven dress in my 2016 sewing repertoire from Vogue Patterns V1410 by Lynn Mizono. Not quite per the pattern as I wasn't keen on the drawstring so made the top of the dress more fitted plus I haven't quite managed to make the buttonholes yet to form the three adjustable lengths. The first version is a stretch cotton from The Fabric Store.


The second version is a Liberty Lantana 80/20 cotton-wool blend and the pattern is a huge favourite of mine called Jack and Charlie. This fabric also came from The Fabric Store and had almost no stash maturation time.


I predict more dresses in my 2017 future.

Sunday, 1 January 2017

2016 sewing retrospective - knit tops

Well 2016 has certainly been memorable but I  won't dwell on the bigger context focusing instead on the simple art of sewing.  When I went to gather the 2016 garments there were more than expected.  So this post will feature the knit tops of 2016. These are all hits because they are still in my wardrobe any misses are long gone or deep in the "for charity" bag and I am certainly not going digging to find them.

Some of these were made for our trip back to the UK in May and I had the foolish idea that pictures could be taken of them out in the wild but it never happened.  Others went to the States in October but still no pictures.

I was surprised by how many of the knit tops are from the same pattern - the WORLD Cut, Make and Trim Tee from the book Home Sewn by the New Zealand Fashion Museum.  The book contains patterns from 10 of New Zealand's leading designers.


Here it is in a Gorgeous Fabric's knit - no scraps left from this one.  You may see this fabric again soon as it was intended for a cardigan and I cut out the Sewing Workshop Opal jacket for my trip to the States in October but didn't have time to sew it up. Typically sewed the left overs t-shirt first.
Shirt tail hem variation


 And here are the other versions...
Long sleeve pattern variation

Original pattern in a Liberty cotton jersey


Not enough fabric - add a sleeve cuff
Left over red ponte with sleeve cuff
Another favourite pattern is Giorgio's top by Silhouette Patterns but I only made one in 2016.  It has a neckline variation from the Tilton sisters' Artful t-shirt Craftsy class.


Trying to be trendy with this Style Arc Sunny knit top using three different fabrics: a cotton knit for the top half of the body; a laser cut goat skin for the bottom half and slinky knit sleeves.  Slinky is an ideal knit for these sleeves as you really do need that stretch for this to be wearable. The trendy bit is mixing leather into the garment which required a bit of pattern fudging to go around the hips without the benefit of a knit fabric. Not sure it is entirely successful but for now it is still in the wardrobe.


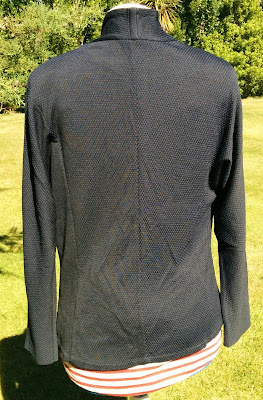
And a couple of knit cardigans using the Sewing Workshop Opal jacket. First a blue merino knit made up as per the pattern that was made for our trip to the UK (excuse the creases it has been folded up for a few months).  I wore this one whilst on holiday but it has not been a wardrobe favourite and for once I stopped to wonder why.

Here is the second version in a black wool cashmere bought when we were on holiday in the UK in 2012 from Misan Fabrics in Berwick Street.  For this version I reduced the fall of the curve in the front and I like it much better. It doesn't have any buttons either as it appealed more without fastenings.

I still have dresses and woven tops to show but will save them for another day.

Happy new year may your sewing be fruitful and energising.