Saturday, 25 February 2017

Ready to Wear Remodelled

Do you ever buy ready-to-wear which isn't?

Sometimes I like a fabric (or combination of fabrics) or a style and purchase a garment knowing that I am going to alter it before I wear it. Or sometimes I wear a garment which confirms all my prejudices against it and has to be remodelled before it can be worn again.

Moochi Revel Tank
Loved the pattern on this silk fabric and the style. The small issue was the gaping around the armhole which was so bad you could almost see through to the other side.  Gaping around the armhole is a pet hate. I bought the top thinking it would be easy enough to purchase a plain white silk fabric and add sleeves to it.
Creates Sew Slow: Moochi top front before
Original Moochi Revel tank
Creates Sew Slow: Moochi top side before
Original top - side view


For this remake The Fabric Store excelled itself.  Whilst it was cotton and not silk the colour and weight of the fabric was perfect.

It was a very simple job to: remove the binding from the armhole; check the armhole size against my favourite woven armhole; and remove the excess across the shoulders (the set-in sleeve wasn't really suited to a drop shoulder look). I didn't need to remove depth from the armhole. Then I just cut two sleeves using my favourite woven sleeve pattern (and matches the armhole) from the cotton fabric.
Creates Sew Slow: Moochi top remodelled - front
Modified Moochi Revel top
Creates Sew Slow: Moochi top remodelled - back
Modified top - V back
Creates Sew Slow: Moochi top remodelled - side front
Modified top - side front


Andrea Moore Lavish Shirt
I don't really like shirts.  The collar around my neck irritates me but I did love the colours and style of this shirt. I finally bought the shirt in the sale thinking the things I loved about it would outweigh it being a shirt.

This turned out not to be true and I spent much of the day tugging on the collar, even though I didn't fasten the top two buttons.
Andrea Moore Lavish Shirt
Lavish Shirt from AM website
I didn't think to take a picture of the shirt before remodelling but found a picture of the other colour-way on the Andrea Moore website.

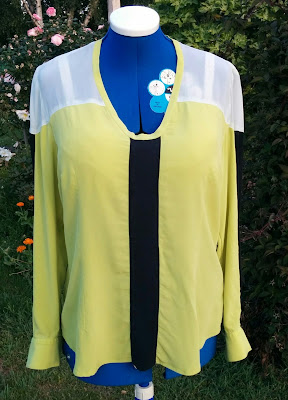
The remodelling involved the: removal of the collar, under collar and button band, which were all in the chartreuse colour; re-shaping the neckline; removal of some width from the centre front; replacing the button band with a slightly wider long strip of black silk (already in the fabric collection). The black strip was folded in half and sewn onto each of the front pieces using the burrito method to get a clean finish inside and out. The non-interfaced sides of the under collar and collar were formed into a strip for the neck binding.
Creates Sew Slow: AM Lavish Shirt - front
Remodelled Lavish shirt - front

Creates Sew Slow: AM Lavish Shirt - back
Original / remodelled shirt back
Creates Sew Slow: AM Lavish Shirt - sleeve


The button band didn't go to waste either I used it on the back of a Sewing Workshop Olive top made from black merino.

Creates Sew Slow: Sewing Workshop Olive Top
Sewing Workshop Olive Top Line Drawing

Saturday, 18 February 2017

Vogue 1203 Tracy Reese Tops

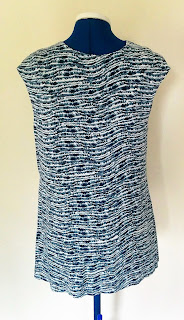
This Tracy Reese pattern is designed for woven fabrics and my first version of this top was made with a Liberty tana lawn.  The fit and style of this top are really great for me. The additional benefit is it can be made with a yard of fabric.


The Finished Garments


Creates Sew Slow: V1203 Zebra knit back
Creates Sew Slow: V1203 Zebra knit

Creates Sew Slow: V1203 Blue wavy stripe knitCreates Sew Slow: V1203 Blue wavy stripe knit back

Creates Sew Slow: V1203 Blue wavy stripe knit side

The Fabric
Both of these versions use a knit fabric.  The zebra print was from Stonemountain and Daughter and the blue wavy stripe was from Marcy Tilton. Neither of these fabrics spent very long maturing in the stash. The zebra was bought in September 2016 and the blue wavy stripe was a post Christmas 2016 purchase.

The pattern
A Tracy Reese pattern from 2010. Described on the pattern envelope as a loose-fitting sleeveless top has neckline drape, extended shoulder, front gathers, darts, back opening with neck binding and invisible zipper, lined shoulder pads and optional ribbon belt.

Creates Sew Slow: V1203 Tracy Reece

The Pattern Alterations
For both of these knit versions I used the same pattern alterations as the original Liberty version because I didn't want the top to be close fitting, just wanted the drape from the knit.  The only thing I did differently was to narrow the back ¾ of an inch and cut centre back on the fold as I knew I wouldn't need the back opening.

For the original Liberty version I made a few alterations:

  • Started from the size 10 which has a finished garment measurement of 40½ inches at the bust and tapered out from the underarm seam to a 16 at the waist (36½ inches). Giving me 2 inches of ease at the bust and 4 at the waist.
  • Added 5 inches of additional depth to the cowl facing curving down at the sides so that where the cowl wrapped around the shoulder seam it ended at the notch.
  • Modified the shoulders at the shoulder edge by adding ¼ inch for the back and removing ¾ inch from the front, tapering to nothing at the neck edge.  This effectively removed the ¼ inch both front and back of additional height for the should pads I wasn't going to use and made a ½ inch forward shoulder adjustment (remove ½ inch from the front and add to the back at the shoulder edge tapering to nothing at the neck edge).
  • Raised the armhole ½ inch, post shoulder adjustments, based on the armhole size I prefer for a sleeveless garment.
  • No FBA required for this pattern. Unusually for me the bust point didn't need to be lowered either.
  • I could also get the top over my head without the back opening so I omitted the invisible zipper.

The Sewing
These were a fast simple make on the overlocker for the shoulder and side seams.

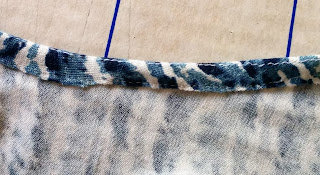
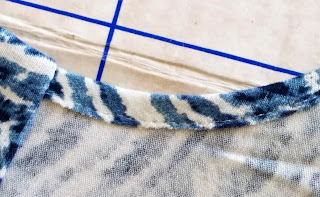
The neck edge, and armholes were pressed and hemmed using the same technique. A basting stitch was stitched 3/8 inch from the edge (use the edge of the presser foot as a guide because most standard presser feet are 3/8 inch from needle point to the foot edge). The hem allowance was pressed over with the basting stitch slightly on the inside of the folded edge (photo 1). The hem was then stitched down from the right side and the basting stitch removed (photo 2).

Creates Sew Slow: V1203 Blue wavy stripe knit neck binding

Creates Sew Slow: V1203 Blue wavy stripe knit neck binding

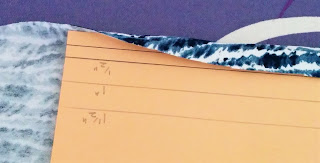
For the hem the edge was turned up the desired amount using the markings on the file folder and pressed in place then stitched from the right side.

Creates Sew Slow: V1203 Blue wavy stripe knit hemming

The zebra version needs some remedial attention.  For some reason the under bust gathers and seam are nowhere near the under bust. The photo here is worse than in real life but even in real life it is noticeable.  The shoulder seam will be undone and ½ inch removed.  I will remove garment length at the shoulder seam because the armhole is too low displaying a bit of bra which I hate. (There is no bra on display with the blue knit even though it looks like there is in the photos above.) I will also undo the under bust seam and remove about an inch from the centre front tapering to nothing at the side seams of the top half only.

The Original Version
For this version I used french seams at the shoulder, centre back and side seams.  The back neck edge and hem used purchased cream satin bias binding sewn right sides together then turned to the wrong side and catch-stitched in place.  The armholes were bound with the same cream satin bias binding, sewn right sides together then folded over to the wrong side and stitched in the ditch from the right side.

Creates Sew Slow: V1203 Liberty backCreates Sew Slow: V1203 Liberty

Creates Sew Slow: V1203 Liberty hem

Creates Sew Slow: V1203 Liberty bound armhole

Saturday, 11 February 2017

A fabriholic

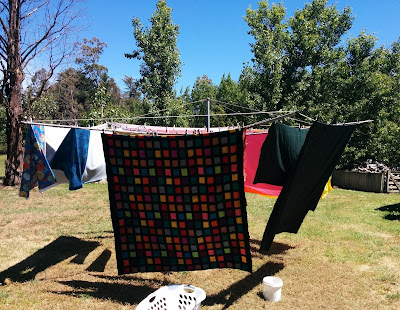
I was struck by my fabric buying habits with the contents of the washing line today.

Creates Sew Slow: Fabricaholic washing line

As it was to quote my gran "a good washing day" I decided to pre-wash some of the fabric accumulated over the last four months. Some of this fabric is a holiday memento from my trip to America in October from Britex Fabrics. Other bits are moments of internet shopping weakness from Stonemountain and Daughter and Silhouette Patterns. The majority is from in-person shopping at The Fabric Store including quite a bit of Liberty fabric.

When you see it all out on display like this you realise that perhaps you are a candidate for SABLE* not just curating your retirement fabric collection. But fabric is so tempting when you don't have time to sew you can dream about the garments you'll make and pet the fabric. And of course in your dreams every garment is a huge success and none of your beautiful fabric ends up a wadder.

Creates Sew Slow: Fabricaholic wash pile
And here it is neatly (ish) folded at the end of the day
I understand having cleared Mum's fabric collection out of the attic (and used some of it) that fabric can have a life beyond yours but I do still love it all and hope to sew it up one day. (Even the plastic box of fabric that came with us from England twenty odd years ago.)

A trip to Storage Box is now required - another three under-bed 60 litre plastic boxes should be about enough for the fabric resting on the spare bed. Then I am on a fabric diet - until I am visited by temptation again - I can resist anything but temptation (Oscar Wilde).

Creates Sew Slow: Fabricaholic spare bed

*stash accumulation beyond life expectancy

Saturday, 4 February 2017

Style Arc Hedy Liberty Dress

The Style Arc Hedy Designer dress was an immediate digital purchase via Gumroad when I saw the version made by Thornberry.  It then took me eleven months to tape the pattern together and use it.

The finished garment

We did try some pictures of me in the garden wearing the dress which were less than successful for two reasons. (1) Apparently I have the habit of closing my eyes as soon as a camera is pointed at me and as I was facing the sun my face was all screwed up too. (2) My dearly beloved isn't sure what he should be photographing. When I asked him to take side and back views they are a bit off and you can't see the detail. So back to Dorothy who doesn't have a problem with the sun, isn't camera shy and the camera operator has more of an idea of what she wants in the picture. I did manage one selfie but these are definitely not a strong point either.

Creates Sew Slow: Style Arc Hedy Liberty Dress

The fabric

Yet another Liberty cotton jersey, which I have to confess to being a bit meh about. After I had decided to use this fabric, as I didn't mind sacrificing it to an unsuccessful garment, I discovered that there was only 1.5 metres.  This means that the fabric must have come from Shaukat because Liberty only sell their fabric by the whole metre.

The sewing pattern

StyleArc describe this pattern as an easy to wear, simple, unstructured dress that has cleverly constructed design lines. The asymmetrical neck pleat drapes to the side seam and creates the hidden pockets and the fabulous cocoon shape.  The Hedy pattern comes in 2 lengths – knee-length and mid-calf with side splits.

Style Arc Hedy Designer Dress


The pattern alterations

Not surprisingly given the huge amount of ease in this dress no pattern alterations were made.  Unless you consider me making a straight size eight versus my normal size ten/twelve in Style Arc an alteration.  Oh and knee length for me given I like to cover the knee rather than have it above the knee meant I cut it two inches longer than the designated knee length. I used the calf length dress and cut it shorter so the hem is about 4" wider than if I had used the knee length version. This extra 4" of width at the hem provides the appropriate amount of walking ease for me.

Style Arc provide you with the finished garment measurements for the size 10 and the useful information that there is a two inch grade between sizes in the circumference.  Knowing that the size 10 had a bust measurement of 61" and a hip measurement of 46.5" meant that I could use the size 8 with confidence.

Due to the aforementioned fabric shortage I did cut the centre back piece with a seam and I think it would look better on the fold as the seam chops the pattern up too much. Other than this I easily cut it out of 1.5 metres.

The sewing

This was a pretty straight forward sew and given Style Arc's reputation for minimalist instructions they actually provide pictures for the tricky bits. My neck pleat is left over right due to a bit of brain fade - I followed the pattern instructions of right over left but with the right side of the garment facing me - oops.

The main sewing was done on the overlocker.  A small portion of the pocket seam and pocket bags used the sewing machine to ensure the placement was correct and then I used the overlocker to sew the seam and around the pocket bags. I also bar tacked the pocket edge to limit the strain on the fabric.
Creates Sew Slow: Style Arc Hedy Liberty Dress - pocket

The neck binding, sleeve hem and dress hems were also done with the sewing machine.  I understitched the neck binding then hand stitched it to the garment as I felt sewing it by machine would spoil the look of the neck pleat.

Creates Sew Slow: Style Arc Hedy Liberty Dress - neck binding

Outfit of the day

When I first put this dress on the feeling was very meh. So I had a bit of a play around to see if I could become a bit more enthusiastic about the finished garment.  My navy Trippen Mandarin sandals looked better than the grey pair. Then I had the bright idea to add the little cream flower - better with this bit of whimsy. When I ventured out in my dress with these sandals a passing stranger thought it was cute!

Creates Sew Slow: Navy Trippen Mandarin Sandals

I certainly like it a lot more with my Untouched World silver Queen Bee jacket thrown over it. If in doubt cover it up seems to work.

Creates Sew Slow: Style Arc Hedy Liberty Dress

As I am so ambivalent about the fabric not sure if the problem is with the dress design or the fabric so might make it again in a fabric that I like before I consign the pattern to the been there done better pile.