Sunday, 30 July 2017

Home Sewing Windswept Swirl Top

Here is the third iteration of the Swirl top, which develops a bit more from its dress base every time I make it.

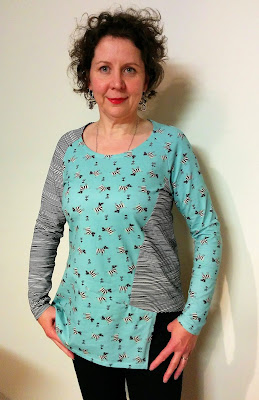
The finished garment

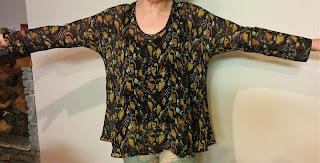
Another great version of the Swirl top. I still prefer the Meandering Chrysanthemum version best because of the fabric but I think this one has finally cracked the dress to top conversion. I wore it all day and it stayed on my shoulders no falling to the back and the neckline doesn't expose my underwear or fall off my shoulder.

Creates Sew Slow: Home Sewing Windswept Swirl Top

Creates Sew Slow: Home Sewing Windswept Swirl Top

Creates Sew Slow: Home Sewing Windswept Swirl Top

Creates Sew Slow: Home Sewing Windswept Swirl Top


The fabric

This fabric is described as A Liberty of London silk from the Lisson Georgette range - A bold abstract digital print in autumnal shades of amber, green and aubergine. The fabric design is called Windswept, in the amber colourway. A nice light drapey fabric weighing 35 GSM and 140 cm wide. Once again from The Fabric Store.  A sale purchase with zero time in the stash bought on Saturday, washed on Sunday, made on Friday and worn on Saturday.

Creates Sew Slow: Liberty of London Lisson Georgette, Windswept

The pattern

This top is a modification of the Starfish Swirler dress from the book Home Sewn by the New Zealand Fashion Museum. I liked the idea of the versatility of the dress but it looked horrible on so I will stick to making my Swirl top version.


Creates Sew Slow: Home Sewn book

Creates Sew Slow: Home Sewn book Swirler dress


The pattern alterations

The second time I sewed this it morphed a bit more from the dress pattern with lengthened side seams and sleeves, a narrower sleeve plus a smaller head opening.  It should be noted that in the original Swirler dress the head opening is sufficiently large to be the waist opening if the dress is worn as a skirt.  For this version I made a few more tweaks which you can see in the pattern below.

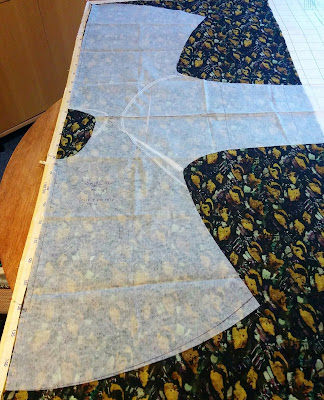
I altered the shape of the neck to more of a scoop than a boat neck. I also altered the shape of the kimono sleeve again so that I wouldn't have as much excess fabric under my arms. A tiny dart was made in the pattern at the shoulder seam tapering to nothing at the sleeve hem - this seems to have been enough to keep the top in place for my forward shoulder and I don't need a dart in the actual garment.

Creates Sew Slow: Swirl Top

This pattern is great for a floaty difficult to handle fabric because there is only one pattern piece to cut on the fold. Plus the floaty fabric drapes well and stops the top looking like a tent.

I fold the fabric in half matching the selvedge then anchor it onto my cardboard mat with pins along the folded edge and one end using the grid on the mat to ensure it is on grain. By sticking the pins in at an angle the pattern can be laid on the fabric with the pins still in place. The pattern is anchored to the fabric using pattern weights and I use my micro serrated Kai scissors to cut out.  I find that this enables me to cut the garment out without the fabric slipping around and I don't need to use tissue paper.

Creates Sew Slow: Swirl Top

How long the sleeves are depends on the width of the fabric and the selvedge. With this 140 cm wide silk fabric I have bracelet length sleeves. I also couldn't use the selvedge as the finished edge of the sleeves because it was white but I did use it as the finished edge of my hem so only turned the hem up 1/4 inch.

The sewing

This version was made entirely with the sewing machine (my vintage Singer Featherweight) with french seams, self-bias binding for the neck edge and double folded hem. I did want to use my adjustable hemmer foot for the hem but I just don't seem able to hold the fabric so that it stitches consistently.  I have the same problem with the hemmer foot for my modern Bernina, so more practice is needed.  By the time I finally sewed the hem I had stretched the fabric so I stretched it more as I sewed to get more of a fluted edge.

The bias binding is sewn to the right side of the neck edge then folded over to the back and hand-stitched in place. The hand stitching was the last step in the making process finished just after midnight.

Outfit of the day

I finished my Windswept top early this morning just so I could wear it today! It is worn with a very favourite pair of trousers from World, which were even made in New Zealand.  Love it when I can support local manufacturing. 

My boots are from Mi Piaci - the Martha ankle boot. Which can't have been very popular as they are only just over a month old and already on sale.

Creates Sew Slow: Home Sewing Windswept Swirl Top

Creates Sew Slow: Mi Piaci Martha Ankle Boot

Because I was feeling so self-satisfied having made my new top in an evening (albeit a long evening) I paired it with my Singer Featherweight silver necklace from the Singer Featherweight Shop.  The detail on this necklace is amazing, it even has a little black motor drive belt. To give you an idea of scale the pendant is 1 1/8 inch long, 1/2 inch wide and 5/8 inch tall.

There are matching earrings which I have bought in the past for a gift, as they are perfect for anyone who loves their sewing machine. I don't have a pair myself as that just seems a bit too matchy matchy.

Creates Sew Slow: Singer Featherweight necklace

Creates Sew Slow: Singer Featherweight necklace


Saturday, 22 July 2017

Threadworks 2017

This year Canterbury Embroiderers' Guild celebrates its 50th anniversary and also hosted its biennial exhibition. A small but beautifully formed exhibition.

Creates Sew Slow: Threadworks 2017

Julie Clemett won Selectors' Choice with her beautiful stumpwork / goldwork piece Chinese Imperial Dragon (pictured next to the exhibition banner). Unfortunately it is a hopeless picture of the piece but it really was spectacular. Julie describes her piece as "a five-toed dragon, a symbol of the Chinese Imperial family, given life by the iridescent scales and the three dimensional effects of the stumpwork technique. Highlighted on a celestial background of starlight beads on navy velvet"

Julie had a second piece in the show, a gorgeous goldwork picture, which I didn't get a photo of called Golden Bouquet. This won the First Time Exhibitor prize.

Creates Sew Slow: Burst of Colour

Lynne Hill's piece of cross stitch Burst of Colour is described as "a crewel pattern design depicting the bright colours of spring".

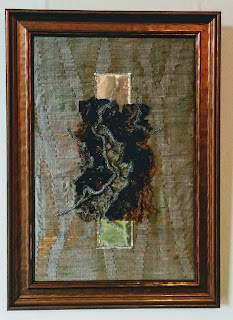
Creates Sew Slow: Tree Bark

I really liked Laureen Pedersen's piece called Tree Bark, which she described as "I have used metal fabric which was burned, stretched and manipulated onto a painted and stitched silk background. Hand and machine embroidered".

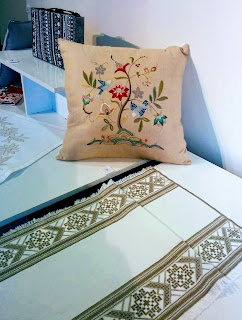
Creates Sew Slow: Crewel Cushion

In the background is a blue bag made by Diane Wilson entitled Gosh What a Bag. One of the pieces submitted by the Guild's Past Presidents.

The crewel cushion is by Dawn Chivers and described as "early traditional crewel pattern using single strand DMC" thread.

The table runner in the foreground is by Judy Evans and is a piece of Ukranian embroidery.

Another stand out piece on display was the Canterbury Embroiderers' Guild 50th anniversary hussif designed by Ann Bradley.  This hussif was available as a pattern for all Guild members to stitch and included the specially designed Guild logo fabric.  I did think about joining in but as I haven't done any actual embroidery for years I didn't progress much past the thinking stage.

Creates Sew Slow: CEG 50th Anniversary Hussif

Creates Sew Slow: CEG 50th Anniversary Hussif

All in all a wonderful way to spend an extremely wet Saturday afternoon (complete with flood warnings and local states of emergency).  Chatting with other embroiderers' and admiring thirty-seven great pieces of embroidery.

The exhibition is on at the Canterbury Museum until 30 July.  The museum has free entry although they do welcome a gold coin donation. So if you are in the Christchurch area over the next week I recommend a visit, it will feed your creative spirit.  It may even get me to pick up a none clothes sewing needle and thread.

If you want to find out more about the Canterbury Embroiderers' Guild they have a public Facebook page.

Saturday, 15 July 2017

Style Arc Maris Moon Top

This top was made for my friend Kathy's birthday and whilst it caused some angst I am really pleased with how the pattern and fabric worked together to produce a great finished garment. It has now been wrapped in its pretty paper and is winging its way across the ocean to England hopefully in time for her birthday.  Fingers crossed that it fits and Kathy likes it.

The finished garment

Kathy is very petite so how this top looks on my body double Dorothy is hopefully not how it will look in real life.  As a point of reference there is 5 inches of negative ease at the bust and hips and about 10 inches at the waist.

Without Kathy to model it showing it on Dorothy was the best alternative I could come up with. Photographing it on a hanger or flat produced very uninspiring images.

Creates Sew Slow: Style Arc Maris Moon Top

Creates Sew Slow: Style Arc Maris Moon Top

Creates Sew Slow: Style Arc Maris Moon Top

The fabric

Creates Sew Slow: AGF Moon Stories Spark

Another Art Gallery Fabrics knit called Moon Stories in colourway Spark purchased from Hawthorne Threads in April this year specifically with my friend Kathy in mind. Kathy loves rabbits and this was such a cute fabric I couldn't resist it.

This is a 95% cotton 5% spandex fabric. Described by AGF as the day fades into the darker shades of the sky, friendly creatures appear through the pine trees. The moon shines in its different phases and reveals the winged fauna and playful bunnies in the colours of a luminous nightfall.

When I purchased the Moon Stories knit I also bought another AGF knit that I thought I could use as a coordinate but the colour match was poor when I saw the two fabrics together in real life.  So off to The Fabric Store I went on my quest to find a coordinating knit.  I couldn't find a cotton knit but I did find a merino that coordinates really well.

The pattern

Just love the Style Arc Maris top but it wasn't my first choice for this garment as I only had my size 10 version and Kathy is considerably smaller in circumference than I am.  However I decided that I had the skills to alter the pattern appropriately and I am really pleased I took the chance.

Creates Sew Slow: Style Arc Maris Top

Style Arc description is: has an interesting front hem panel that continues to the back giving a fabulous silhouette.  Use your own creative flare, mixing fabrics or colours for your own individual look.  We made our sample in linen but would also work in a knit as well.

The pattern alterations

The pattern measurements for the size 10 are: bust 41 inches; waist 30.5 inches and hip 43.25 inches. Guestimating my petite friend's size was a leap of faith but hopefully both the knit fabric and the shape gave me some room for error.  I didn't want to alter the look of the finished garment too much despite using a knit.  Definitely don't want it to be as fitted (tight) as it is on Dorothy.  So whilst I don't know yet if this top actually fits Kathy it looks as though it could!!

For the pattern alteration I decided to remove 10 inches from the circumference of the garment and 1.5 inches from the length.  How I removed the width was a bit unorthodox.  I marked 2.5 inches from centre front / back and put the pieces on the fold of the fabric at that mark point.  I cut around the pattern apart from at the neck edge.  I then repositioned the pattern piece for the neck edge so that only 1.25 inches was removed from the width.  The neck is quite wide in this garment and I worried that if I cut the neck the original size it would just look odd and be irritating on my petite friend.  For the length I just folded it out of the main body piece for front and back. The neck and hem panels in the plain merino fabric are unchanged length wise.

The sewing

Nothing very exciting here that I haven't described before.  It was sewn on the overlocker with the hems folded over and stitched with my Featherweight.  I did mitre the corners at the points of the front hem panel. I am happy with the overall finish I achieved and my work colleagues thought it looked very RTW.

Saturday, 8 July 2017

TSW Odette Zebra Top

This is my second version of The Sewing Workshop Odette top.  I am not entirely sure that second time's a charm with this pattern from a fit perspective or that I really want to pursue perfection with a third garment. So another could do better version of the Odette top. Certainly good enough for a weekend wear knit top and in a fun print.

The finished garment

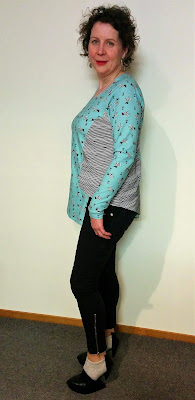
Love the zebras and the colour. Even like the combination of zebras and stripe from the front and back.

Creates Sew Slow: TSW Odette Zebra Top

Creates Sew Slow: TSW Odette Zebra Top

Creates Sew Slow: TSW Odette Zebra Top

The fabric

The zebra fabric is an Avalana jersey 95% cotton and 5% elastane by Stof Fabrics.  The stripe fabric is also an Avalana but with 94% cotton and 6% elastane. This fabric was purchased from All Things Patchwork on our Easter trip away at the same time as the spectacle fabric for the Two Ronnies top.

I seem to be choosing to sew the newer shinier fabric rather than the old stuff.  However the new is arriving faster than my sewing. So either I need to build a new house for the fabric stash or recognise that the world will not run out of fabric any time soon and buying when you need it is not taking a huge risk. In my defence I do buy the fabric with a project in mind it just doesn't eventuate before the next piece of fabric arrives. Plus if I order it from overseas I need fabric in stock for a few projects otherwise I wouldn't be able to sew whilst waiting for my order to arrive!!!

Creates Sew Slow: Stof stripe fabric

Creates Sew Slow: Stof stripe fabric

The pattern

The Sewing Workshop Odette top (the line drawing and top in yellow).  I was never that taken with the other pattern - Ivy in red on the right.  However I think I might give it a try as the set-in sleeve will give a better fitting result. It may also give more of a swingy look top which I seem quite attracted too at the moment. Or maybe I copy the style lines of the Odette top onto my TNT set-in sleeve knit top (Silhouette Patterns Sweater Set #195) - a seemingly daft idea worth considering.

Creates Sew Slow: The Sewing Workshop Odette TopCreates Sew Slow: The Sewing Workshop Odette Top

The pattern alterations

Numerous pattern alterations were made in fact I wrote a separate post so that I could illustrate the changes with photos. I will update my pattern alteration post to add the zebra top photos so that you can see the before and after tops side by side.

I do think that this version fits better than my original but I am still not completely satisfied. Areas of dissatisfaction are:
  • Bit of gapping at the armhole albeit smaller than in the original which means enlarging the bust dart helped. But now the diagonal drag lines from under bust to hip are more noticeable.
  • Generally looks a bit tight around the hips.
  • Too much fabric across the back or maybe I need to make a bigger sway back adjustment as there is a noticeable bubble of fabric between shoulder blades and lower back. I don't normally have to make a large sway back adjustment so am wondering if the fix should be something else. Back to needing more room in the hip area maybe.
  • The neck is possibly a bit open so I should probably have added back at the top of the front half of the sleeve (and taper out correspondingly at the neck edge) the 1 inch I removed for the bust dart / gapping fix.
  • Not a fitting issue but one of poor fabric placement created by using the stripe for the side front and back which creates a large expense of stripe on one side. This results in an unflattering extra wide appearance. I didn't think about the impact of the stripe on how wide it made me look I was just focused on having two different sleeves to create stripes with zebras and vice versa.
  • Love the longer length in the back just think it would be good to start it closer to the side seam on the side back piece to have more of a shirt tail look on that left side.

The sewing

Nothing new about the sewing of this top from my original version. Just a quick knit sewn on the overlocker. Really spent far longer thinking about and making the pattern alterations than cutting out and sewing the actual top.

The styling

Not really styled but I did pair it with my black Andrea Moore cropped zip leg pants and United Nude Edge ankle booties. Love the booties but they are a bit higher than I was expecting and I have needed some practice outings in them.

Creates Sew Slow: TSW Odette Zebra Top

Creates Sew Slow: United Nude Edge ankle booties

Saturday, 1 July 2017

Yay for Team New Zealand

Being a parochial lot (think you have to be when there are only 4.5 million of you in a country) we are all hugely excited that Team New Zealand managed to bring the Auld Mug back to New Zealand. Once again the "America's Cup is New Zealand's Cup"  Peter Montgomery sailing commentator.

For the uninitiated the America's Cup is a sailing competition with a history that arouses strong feelings of rivalry and sometimes acrimonious relations between the teams.

So congratulations to Team New Zealand who demonstrated good old kiwi ingenuity, and  proved that having the biggest cheque book doesn't guarantee success.

Just in case you are wondering there is a sewing point to this post - albeit a bit of a retrospective.

Back in 2000 when Team New Zealand made its first successful defence of the title under the guidance of legendary yachtsman Sir Peter Blake I was lucky enough to attend one of the races in Auckland.  We even followed the race from a boat out on the Hauraki Gulf.  To commemorate the event I made myself a waistcoat.

Unfortunately it is such a long time ago and the memory is a bit worn out so I can't remember what pattern I used for the waistcoat.  It may actually be a waistcoat that was traced from a tutor's pattern at an embroidery workshop back in the late 1990's.

The front of the waistcoat features the two boats which competed for the America's Cup back in 2000: Team New Zealand's NZL 60 and the Prada Challenge's Luna Rossa.

Creates Sew Slow: Yay for Team New Zealand

Creates Sew Slow: Yay for Team New ZealandCreates Sew Slow: Yay for Team New Zealand

On the back is one (cut in half) of a pair of red socks sold as a fundraiser for Team New Zealand in 2000, alongside the America's Cup trophy.  Sir Peter Blake famously wore a pair of red socks given to him by his wife as his talisman for the 1995 America's Cup campaign.

Creates Sew Slow: Yay for Team New Zealand

Creates Sew Slow: Yay for Team New Zealand

I even embroidered a label to sign and date my creation. If you look carefully you can see my little red sock pin bought as a souvenir from Auckland.

Creates Sew Slow: Yay for Team New Zealand

I don't have any pictures of the actual racing as I was too frightened of dropping my camera in the water to take it. It was a truly magical event with huge numbers of boats out on the water watching the race and large crowds (by New Zealand standards) cheering them on from the shore. So even though the waistcoat is quite a bit larger than I am now I still keep it safe in my wardrobe as a memento of an amazing event.