Wednesday, 21 March 2018

Vogue 2056 Issey Miyake Poppy's Patchwork Jacket

My progress has not been stellar in making the pieces for the Pattern Review wardrobe contest in fact the deadline has been and gone with only three garments made. I had such high hopes of making six garments in six weeks. Oh well there is clearly more in my life than just sewing.

I finished a top the first week of the contest whilst away for the weekend in Westport. Must dig it out of the wardrobe, iron it and take a picture - maybe even produce a blog post as it was a new to me pattern company. Then the last weekend of February I made another pair of Megan Nielsen Flint trousers (also not blogged - maybe next week). Then my Issey Miyake jacket took me two weekends to finish (and as long to produce a blog post).  That left two blouses and a pair of trousers to make in a week. This was never going to happen as on average I can make a garment per week and the trousers needed to be made in a less precious trial fabric before I made the "good pair".

As the pieces of the six in six wardrobe came from my 2018 travel wardrobe plans (apart from this jacket and the Megan Nielsen Flint trousers) I will finish the garments and maybe even do a post in the spirit of the wardrobe contest. I am normally quite motivated by a deadline but neither the wardrobe contest nor the match your shoes contest provided enough deadline incentive for me to finish on time to enter.

I was slightly distracted last weekend by new fabric purchases. As well as finishing the buttons and buttonholes on my IM jacket I also made two tops but with the newly purchased fabric not part of the travel wardrobe. Oops - so much for sewing with a plan.  Although tenuous I could possibly incorporate one or both of these tops into my travel wardrobe!

The finished garment

I did think that this would be a good Summer garment but as we are starting to head into Autumn I paired it with more trans-seasonal clothing.

Creates Sew Slow: Vogue 2056 Issey Miyake Poppy's Patchwork Jacket
Preparing to fly away
Creates Sew Slow: Vogue 2056 Issey Miyake Poppy's Patchwork Jacket
Ok when unbuttoned
Creates Sew Slow: Vogue 2056 Issey Miyake Poppy's Patchwork Jacket
Not sure about the extra fabric folds when buttoned
Creates Sew Slow: Vogue 2056 Issey Miyake Poppy's Patchwork Jacket
The back with the little sticky out bit at the bottom of the centre back seam
Creates Sew Slow: Vogue 2056 Issey Miyake Poppy's Patchwork JacketCreates Sew Slow: Vogue 2056 Issey Miyake Poppy's Patchwork Jacket
How fortuitous the jacket goes with a dress from my travel wardrobe.

The fabric

This is a Liberty Murray loopback sweatshirting in design Poppy's Patchwork colourway B from The Fabric Store.

Creates Sew Slow: Vogue 2056 Issey Miyake Poppy's Patchwork Jacket

The fabric was bought last year and I really loved the colours but now it is made into a garment I am a bit ho hum about it.  Will let the jacket have a rest in the wardrobe and see if the love comes back.

The sewing pattern

Vogue 2056 is a single sized (14) old Issey Miyake pattern copyrighted 1988. The pattern is for a skirt, shorts and top. I felt, in 2018, the top had more of an outerwear look to it than something I would put under a jacket. The top is described as very loose fitting with front, back, long sleeves and collar cut-in-one and stitched hems.

Creates Sew Slow: Vogue 2056 Issey Miyake Poppy's Patchwork JacketCreates Sew Slow: Vogue 2056 Issey Miyake Poppy's Patchwork Jacket

The Sewing Workshop also produced a version of this top as the Origami Blouse which I also have in my pattern stash. This pattern has the added advantage of being multi-sized but I wanted to make the original Miyake version so persevered with a few alterations.

The pattern alterations

There is plenty of room in the body of this jacket (54" at the bust) so the changes I made were for style.

First off I traced the single pattern piece which is the back, front and sleeve onto a light non woven sew-in interfacing, with the seam allowance also marked.  Then I pinned the pattern together to make it easier to visualise the garment to make the changes I wanted.

Creates Sew Slow: Vogue 2056 Issey Miyake Poppy's Patchwork Jacket
Dorothy modelling the pinned pattern piece
I did the pattern tracing and pinning many months before the alterations were made but I had written myself an aide memoire which was pinned to Dorothy for safe keeping.

Creates Sew Slow: Vogue 2056 Issey Miyake Poppy's Patchwork Jacket
How to alter the pattern to remove the 1980's shoulders and get more room at the hip
Creates Sew Slow: Vogue 2056 Issey Miyake Poppy's Patchwork Jacket
The altered pattern
I have annotated the altered pattern piece with the changes made and these can be more easily read if the photo is enlarged.

First off the shoulders - unsurprising for a 1980's pattern the shoulder dart stuck out way past my actual shoulders.  As a soft jacket I didn't want to wear shoulder pads and a dart sagging over the top of my arm is not a good look.  Also whilst the extreme shoulder trend seems to be starting to make a comeback it really isn't my style. To combat the excess I removed 2" of width from the shoulders, using a dart down the back and a tuck in the upper half of the jacket front (photo left side).  These are changes (1) and (2) on the pattern piece.

The lower half of the jacket front needs the same 2" inches removed as the top half otherwise the seam lines won't match.  However extra width at the garment hem is of benefit rather than loosing the 2". So at roughly bust level the 2" was removed with a dart and at garment hem (hip level) the dart opened up to add width. This was achieved by cutting down from the seam line and up from the hem creating a pivot point just above waist level. So closing up the dart at the top automatically opened up the dart at the bottom. This is change (3) on the photo of the pattern piece.

The sleeves were narrowed by removing 1" at the hem, from each side, blended back to nothing at the notch (about where the lengthen/shorten line is).

Once I finished the garment and took it for an outing it became obvious that the sleeves were too short.  It is less apparent when your arms are by your side but when moving about the sleeves slide to three quarter length up my arms. I think this is related to the way the top of the jacket front is stitched to the front facing to create the tuck/pleat of fabric out of the sleeve as well. To combat this I added a 2" cuff and lengthened the pattern piece for the future by adding at the hem rather than the lengthen/shorten line. This is change (5) on the pattern piece.

When I added length to the sleeves I also reduced the width at the hem by continuing the angle of the seam to the new hem length. The photos of the finished garment make it look as though the sleeves are too long now but I am not conscious of this when wearing the jacket.

All of the seam lines had to be trued up once the pattern alterations had been made.

The seam allowance was changed from 5/8" to 3/8".  This is my preferred seam allowance and was fortunate because with the removal of 2" in the shoulder dart the back neck band (sticking out rectangular shape in the middle of the photo on the left hand side) interferes with the back neck edge.

So what would I do differently?  The only thing I can't change in the finished garment and doesn't work unless you wear the jacket buttoned all the time is the centre back seam. As can be seen from the pattern piece the centre back seam has a significant change of direction at the waist. When the top is buttoned this angle is pulled out as the garment sits close to the body but when unbuttoned it sticks out in a strange and unattractive way. I haven't worked out what the solution is to this problem and will need to leave myself a note on the pattern piece in case I make the garment again.

I have also added 1.5" at the hem at centre back tapering to nothing towards centre front as I think the back length is a bit short.  Change (4) on the pattern piece. This new length is for the benefit of any future makes and not something I did for this jacket.

If I ever wore this as a blouse I would need to do something to raise the neckline. Unless I wanted to display my bra to the world and I feel quite strongly that no matter how attractive a bra is they are called under garments for a reason.

The sewing

All seams were sewn first with a 3/8" seam allowance, then overlocked for a neat inside and then top stitched.  For once I actually followed the pattern instructions, in fact you can see them close at hand as I am pinning the garment pieces together in the photo below.

The actual mechanics of the sewing is pretty straight forward. It is the origami folding that requires some mental gymnastics. The sleeve seam is also the seam across the bodice front to join the top and bottom of the front together.  You need to concentrate and make sure you match up the appropriate tailors tacks. Don't skimp on the transference of the patterns markings to the fabric or you will be lost. Even with careful marking I am not sure I stitched the front to the facing as intended to make the folds as my version does not fall as attractively as the pattern envelope suggests.

Creates Sew Slow: Vogue 2056 Issey Miyake Poppy's Patchwork Jacket
Origami folding the jacket to match the sleeve and front bodice seam
Creates Sew Slow: Vogue 2056 Issey Miyake Poppy's Patchwork Jacket
A closer view of the sleeve pinned together
Creates Sew Slow: Vogue 2056 Issey Miyake Poppy's Patchwork Jacket
The front bodice pinned and the mind bending clip to turn the angle into a straight line
I started off using my Bernina 830 but it decided to have one too many mental breakdowns so I put it in the naughty corner and then trecked it into town to the Bernina dealer.  There is enough wrong with it that they shipped it back to head office in Wellington who are apparently downloading its log and sending it back to Switzerland for analysis. So out came the trusty 1953 Singer Featherweight, which has never had a mental breakdown, it just sews along through thick fabric and thin.

My trusty Featherweight has the buttonhole attachment which everyone raves about but I had never used. With the absence of my 830 and the need to finish the garment I got it out of hiding and pressed it into service.  A few practice buttonholes were needed to get the hang of how the buttonholer worked but once again it worked perfectly.  Every buttonhole the same.  No tantrums because some bits of the jacket are thicker than others. It was easy to go around each buttonhole twice (or as many times as I wanted). The nerves were more present at the point of cutting the buttonholes open (I was good and used my buttonhole cutter rather than the quick unpick).

Creates Sew Slow: Vogue 2056 Issey Miyake Poppy's Patchwork Jacket
Three perfect buttonholes
Given the colours in the jacket I choose to use three different (in size and colour) buttons.  This seemed like a really good idea at the time but now I am not so sure. Why does it look so different when the buttons are sewn on? They looked great when I was playing with options.

Creates Sew Slow: Vogue 2056 Issey Miyake Poppy's Patchwork Jacket

The only interfacing used is a 3" strip applied to the front facings to support the buttons and button holes.

I enjoyed a meditative bit of hand stitching to finish the hems and hold the front facing to the garment front.  The pattern instructions have you machine stitch these but I didn't want the line around the garment.

The outfit of the day

Not an outfit of the day but I did think I should take a picture of my Issey Miyake jacket with my Issey Miyake Rock Sandals. When thinking about which outfit I should pair this jacket with I immediately thought of the AGF Bloom Montage knit dress used in the original Rock sandal post. From the distance of memory the colours in this dress seemed ideal.  When put together the colours of the dress are just that little bit off so they really clash. Even my beloved thought this was a less than stellar outfit and his colour choices can be decidedly iffy. Here is the photographic evidence of my never to be worn together again outfit.
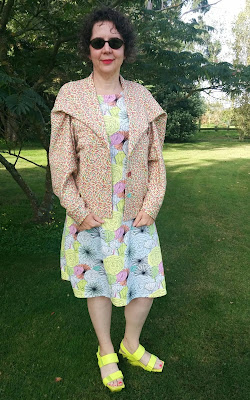
Creates Sew Slow: Vogue 2056 Issey Miyake Poppy's Patchwork Jacket

Sunday, 25 February 2018

Outfit of the Day Megan Nielsen Flint Trousers

In New Zealand we have a holiday to celebrate Waitangi Day on 6 February so we took an extra long weekend over to Westport on the West Coast of the South Island.

On 1 February Westport was hit by ex-cyclone Fehi which coincided with a king tide.  The warmer than normal weather raised sea level by about a metre. It affected much of the west coast washing away parts of the main highway that runs along the coast. In Westport itself 32 homes were assessed as uninhabitable (or red stickered) another 21 homes were yellow stickered (they are damaged but habitable).  For a population of 3,900 this is a lot of damage. As if that wasn't enough they were battered again this week by ex-cyclone Gita with winds up to 118km/hour which removed house roofs.

Over the last couple of years Westport has suffered a number of set-backs with the down-sizing of many of the coal mines and the closure of the Holcim cement plant in 2016. They do farm a lot of dairy cows which provides some economic support to the region, as well as tourism.

We love Westport and visit their regularly. It is surrounded by native rainforest and the Southern alps.  Sometimes we make a day trip from Christchurch (four-hour drive each way) to have dinner at The Bay House in Tauranga Bay at the other end of the beach from the Cape Foulwind seal colony.

The outfit

Here I am posing by the railway in Westport in a mixture of me-made and RTW.  The Megan Nielsen Flint trousers in a Liberty print with an Untouched World merino knit singlet and Lofty merino cardigan both in colourway scuba. Worn with my Eos Metro white shoes, which are more than 10-years old and newly discovered from the back reaches of the wardrobe.

The railway is unused but was a good venue for pictures, especially given the theme of my shoes.

Creates Sew Slow: Outfit of the Day Megan Nielsen Flint Trousers

Creates Sew Slow: Outfit of the Day Megan Nielsen Flint Trousers
Cement carrying carriages from a bygone era
Creates Sew Slow: Outfit of the Day Megan Nielsen Flint Trousers
Eos Metro shoes

Westport and the West Coast

I felt a bit ghoulish taking photos of the storm damage, knowing how I felt about the "disaster tourists" who came to Christchurch to experience the earthquake, so these pictures focus on the wild beauty of the West Coast.

Creates Sew Slow: Westport

Creates Sew Slow: Westport
Unit 13 at our motel
Creates Sew Slow: Tauranga Bay
Tauranga Bay from the Seal Colony
Creates Sew Slow: Tauranga Bay
Sculpture of Tauranga Bay's main attraction
Creates Sew Slow: Tauranga Bay
Bay House Cafe, Tauranga Bay
Creates Sew Slow: Carter's Beach
Evidence of the storm at Carter's Beach
Creates Sew Slow: Granity
Granity Community Library
Creates Sew Slow: Waimangaroa
Woodcarver's studio at Waimangaroa
Creates Sew Slow: Waimangaroa
And the carvings
Creates Sew Slow: Waimangaroa
And more carvings
Denniston plateau was home to one of the richest, high quality coal seams in New Zealand. From October 1879 to August 1967 it was the country's largest producing coal mine, with an estimated 13 million tonnes carried down the incline during its life. Denniston existed purely for the mine with a less than hospitable climate. Today only two of the houses have permanent residents from a population of 1,500 when it was a mining town.  A little ditty by anonymous:

Damn Denniston
Damn the track
Damn the way both there and back
Damn the wind and damn the weather
God damn Denniston altogether

The Dennsiton Incline was an amazing feat of engineering taking the coal 1.7 kilometers over a 510 metre drop, with some grades as steep as 80%. The coal wagons (Q wagons) started their journey downhill at the Breakhead.

Creates Sew Slow: Denniston
Denniston tracks with the breakhead top centre
Creates Sew Slow: Denniston
Site of the engine boiler house
Creates Sew Slow: Denniston
View from Deniston Plateau, of the coastal plains of the Karamea Bight
Creates Sew Slow: Punakaiki
Walk through the bush to the Pancake Rocks at Punakaiki
Creates Sew Slow: Westport
Coastal view on the drive to Greymouth
Creates Sew Slow: Greymouth
Greymouth harbour wall
Creates Sew Slow: Westport
A typical West Coast sunset
On the way home via Arthur's Pass is the Otira Viaduct, officially opened in 1999.  It was built because of the major rockfall hazard from both above and below the existing road (the zigzag) which threatened to destroy it, or damage it to a point where it was unrepairable.

The Otira Viaduct is deceptively steep with a 12% incline over its 440m span.


Creates Sew Slow: Otira Viaduct
Rock protection shelter and water bridge over the Reid Falls
Creates Sew Slow: Otira Viaduct
Otira Viaduct
Creates Sew Slow: Otira Viaduct
A bit of the old zigzag road, which now takes you to the Death's Corner lookout
The Kea is a common sight at the look-out points by the Viaduct, although their conservation status is nationally endangered.  They are very curious birds, attracted to people and fond of shiny objects. They can do great damage to cars left unattended in their habitat including removing the rubber around the windscreen.
Creates Sew Slow: Otira Viaduct
Kea, the New Zealand alpine parrot

The making

This is the muslin for my travel wardrobe Megan Nielsen Flint trousers.  I couldn't use the fabric picked out for the travel wardrobe in case they were a disaster so I chose another Liberty cotton corduroy for my first version.  Whilst I will tweak the pattern next time I make them these are very wearable and have been worn a lot this summer.

Creates Sew Slow: Outfit of the Day Megan Nielsen Flint Trousers
Liberty of London Kingly Cord in design Vesuvian colourway B 
Creates Sew Slow: Outfit of the Day Megan Nielsen Flint TrousersCreates Sew Slow: Outfit of the Day Megan Nielsen Flint Trousers

I cut the medium size based on the finished garment measurements. My waist is bigger than the medium so I cut the large waistband and made smaller front darts (instead of a pleat).  I should have just stuck to the medium throughout as they are a bit baggy at the waist.  The pattern also uses a straight waistband and I will change to a curved one next time I sew these.  I am wondering about raising the top of the pants 1/2" and doing a facing instead of a waistband as I prefer a facing and the trousers are pretty high-waisted as is.  The back crotch length is also too long and I will remove at least 1.25" when I make them again.  Having worn skinny pants for many years now I was worried these would be too wide so I reduced the width by making the legs straight no extra flair down from the hip.

Some of the reviews complain about the opening pocket not being useful for anything so I continued sewing round the pocket bag about an 1" more than the pattern recommends.  There is still more than enough room to get the trousers on and off. As I only keep a handkerchief in my pockets the size is fine for me.

A small brain fade moment found me trying to make a buttonhole using the straight stitch plate on my sewing machine.  My Bernina 830 has a safety feature that stops you doing zigzag stitches (and breaking the needle) when you are using the straight stitch plate but it took me a while to realise why it wouldn't sew a buttonhole.

Creates Sew Slow: Outfit of the Day Megan Nielsen Flint Trousers

The only other thing I did slightly differently was I bound the inside edge of the waistband to make the inside pretty.  I am really pleased with myself because I trimmed 3/8" from the inner edge of the waistband and bound the edge with 1/4" of bias tape showing.  This meant when I stitched in the ditch of the seam on the right side it came to the edge of the binding on the wrong side.

Outfit two

You have already seen this outfit last week but I do love it and thought it was worth repeating! Megan Nielsen Flint trousers with Untouched World merino knit singlet and my United Nude Issey Miyake Rock sandals.

Creates Sew Slow: Outfit of the Day Megan Nielsen Flint Trousers

Outfit three

Still on the railway theme, standing by coal carriages at Granity, with my Metro shoes here is a different outfit. This dress is an adaptation of my Home Sewn World Cut, Make and Trim tee. The tee was extended to dress length using Silhouette Patterns #2010 three piece Yoga skirt. It is worn with my Untouched World Lofty merino cardigan, both of which are part of my 2018 travel wardrobe.

Creates Sew Slow: Outfit of the Day Megan Nielsen Flint trousers

Sunday, 18 February 2018

Match Your Shoes - United Nude Issey Miyake Rock

Being a matchy matchy girl having shoes that go with my outfit is essential. I did go through a phase of just trying to have black shoes and wearing them regardless of my outfit colour, which didn't last long due to my inner shoe fanatic and love of colour. When I discovered United Nude the shoe wardrobe increased significantly.

I intended to enter the Pattern Review 2018 Match Your Shoes Contest. That didn't quite work out due to a small technical difficulty with the dress and only having the photographer available at weekends. Or rather me only being available to the photographer at weekends. Having started down the road of thinking about matching shoes and outfit a blog post seemed the natural conclusion.

The shoes

United Nude Issey Miyake Rock Sandal in colour lime. I had ogled these for many months before finally making the online purchase and they are fabulous. Different to look at but so well balanced and comfortable to wear. Being a platform you get the added height without tottering around on 4" heels (although I do that too).  The shoes give me 3.5" of added height with a less than 2" incline front to back - easy peasy to walk in. Added bonus is that the straps across and around your foot are fastened with velcro so you can alter them to be comfortable for you (and secure so you don't fall off your high heels). I am extra careful walking down the aircraft steps in these as they look like the sort of shoes you break your neck in!

Creates Sew Slow: Match Your Shoes - United Nude Issey Miyake Rock

Outfit one - Silhouette Patterns #4000 Swing Dress

Creates Sew Slow: Match Your Shoes - United Nude Issey Miyake Rock

Creates Sew Slow: Match Your Shoes - United Nude Issey Miyake RockCreates Sew Slow: Match Your Shoes - United Nude Issey Miyake Rock

So when I thought about making an outfit to go with my Rock sandals this AGF knit (Bloom Montage Light designed by Sew Caroline) was an immediate contender, using Silhouette Patterns #4000 Swing Dress.


First hurdle was I thought I bought 2 yards of this fabric to make a dress, yet when I came to lay out the pattern I discovered I only had 47". This is less than the 1.5 yards I usually buy for a top. Luckily the fabric was long enough for the dress but not wide enough and there was nothing left for the sleeves. So I altered the width of the skirt to maximise the available fabric and thought I would change from set in sleeves to a cut on cap sleeve.

Any sensible person would have stopped there and used a different pattern.  The TNT Home Sewing World Cut, Make and Trim tee extended to dress length would have been ideal. But no as is typical for a Yorkshireman I stubbornly pursued my original plan with the Swing Dress and drafted some cap sleeves.  I didn't even have the nous to use the aforementioned TNT tee pattern for the cut on sleeve. When I came to sew the side seams it was obvious that sewing the hem on the cap sleeve would be impossible. So I chopped the extra off and found another fabric to use for the set-in sleeves. This simple knit dress took me all day Sunday to sew due to the faffing around, with no time left for photographs.

But it does look good with my sandals.

Outfit two - Megan Nielsen Flint trousers with Untouched World merino knit singlet

Creates Sew Slow: Match Your Shoes - United Nude Issey Miyake Rock

The Flint trousers have been great in this year's hot summer weather and the colours in the print make them very versatile - a great addition to my wardrobe.

The Untouched World merino singlet has had a rather unfortunate life. The first time I wore it I dripped a single drop of coffee on it and permanently dyed it.  I tried numerous stain removal remedies to no avail. The first time it was washed it also acquired a slight black tinge (it was washed on a 30℃ wash but with a pair of black trousers).  Luckily I prefer the colour it is now to the bright citrus colour it was. To hide my coffee drip I added a few felt flowers.  I am not entirely happy with the placement of the flowers but as each flower is only attached with three colonial knots they are easily removed and positioned differently.

Outfit three - Home Sewing World Cut, Make and Trim t-dress

Creates Sew Slow: Match Your Shoes - United Nude Issey Miyake Rock

This fabric is interesting - in real life there are lots of different colours in the zigzag stripes one of which is greeny yellow, yet the photograph really emphasises the mint/turquoise colour. This dress has been worn to work with the little jacket and Rock sandals.

The photography venue

I thought it would be fun to take the photos in our paddock using the grape vine as a backdrop.  There are still some grapes that the birds haven't eaten but even close up you can't see them for all of the foliage.

Creates Sew Slow: Match Your Shoes - United Nude Issey Miyake Rock

Creates Sew Slow: Match Your Shoes - United Nude Issey Miyake Rock

And here is the photographer having fun on his own whilst waiting for me to change outfit.

Creates Sew Slow: Match Your Shoes - United Nude Issey Miyake Rock

Saturday, 10 February 2018

The 2018 Travel Wardrobe - a tale of packing and wardrobe planning

In the past I have been a hopeless packer. For my first trip to New Zealand back in 1993 my other half had hopes of getting me into tramping so I had a rucksack which I carefully over-packed.  My other half then came along and emptied it out and cross examined me on the whys and wherefores of each item - some I was allowed to keep and others not.  Even with this judicious examination of my rucksack packing I could hardly stand up with it on my back, and as soon as I stood up anywhere near straight I toppled over!

As an aside his hopes of tramping were further dashed when we had a day walk up Mount Arthur along the Flora and Arthur hut tracks. This is a very easy walk except I had trouble standing up, especially walking down hill, even wearing a good pair of walking boots. Plus I was carrying nothing more than a handkerchief, he carried the day pack. I do walk a lot but I don't tramp.

From this history of abysmal packer I have become hugely more organised. The turning point was in 2001 with an emergency trip back to the UK, where basically I went to work in the morning received a phone call, rushed around to hand over my job, dashed home to pack and flew to the UK that evening. My packing was not exactly focused but I survived a month in the UK with a suitcase that weighed so little I nearly fell over when I yanked it off the luggage carousel.  This taught me the valuable lesson that the kitchen sink is not necessary when you pack for a trip away. But I do like choices and variety.

Having commuted by air to my job(s) for the last ten years it has really honed my packing skills. I typically pack for four days away - two bottoms and four tops with one pair of shoes, a top layer (cardigan or jacket) and a coat. Sometimes I will substitute a top and bottom for a dress.

Enter the concept of wardrobe planning. I just love wardrobe planning - choosing fabrics and clothes that go together.  The Vivienne Files is a blog I enjoy immensely. I have used the 4x4 wardrobe template from the Vivienne Files to plan a 2018 travel wardrobe and you will see the resulting garments over the coming weeks.

Here is a sneak peak of two of the outfits from a recent weekend away.

Creates Sew Slow: The 2018 Travel Wardrobe
Megan Nielsen Flint trousers and UW Lofty merino cardi & merino singlet
Creates Sew Slow: The 2018 Travel Wardrobe
UW Lofty merino cardi & Tact Summer knit tee with AM True Love trousers
Here is the 4x4 wardrobe (the first four rows) and a little bit extra. Having chosen my neutral - a lovely mint colour which Untouched World call "scuba", I went through my fabric stash and it is amazing how many pieces of fabric I found to go with my neutral. Hence the two extra rows to give a 6x4 wardrobe! The Home Sewing World t-dress is in the wardrobe and worn a few times already.

Creates Sew Slow: The 2018 Travel Wardrobe Ideas 1
2018 4x4 (+ extras) travel wardobe...
Creates Sew Slow: The 2018 Travel Wardrobe Ideas 1
...and what the garments are (or will be!)
Actually two extra rows are not enough I had another eight fabrics pulled out as possibles so have included them below.  Two of these garments have already been made - Megan Nielsen Flint trousers and Oki Style Madrid top.

Creates Sew Slow: The 2018 Travel Wardrobe Ideas 2
When you have too much fabric the choices never end
Not shown here because I don't have a pattern sorted or the fabric is the idea I have to make a coat that will look good and have a hood to protect me from the rain. A rain coat is nearly always needed just in case for the places we go and it would be good to be a bit stylish and not limited to the Goretex.

Developing a wardrobe of possibilities to choose from for my 2018 travels led me to the Pattern Review Wardrobe contest and then I was sucked into the thought of the Match your Shoes contest.  Both of which I may enter time permitting.

For the shoe contest I have two ideas.  Idea 2 is made and I could make idea 1 this weekend so both could be within the deadline.

Creates Sew Slow - PR Match Your Shoes Contest Ideas

Then for the Pattern Review 6x6 (six garments in six weeks) Wardrobe contest this is a possible combination:

Creates Sew Slow: PR 6x6 Wardrobe Contest Idea

Some of the 6x6 garments are part of my 2018 travel wardrobe but I had to make changes as my jacket for the travel wardrobe will be too complicated to do in the six week deadline.  So far one garment has been made.

Lets see how much of this comes to fruition, as I may have bitten off just a tiny bit more than I can chew.