The gestation period for this blog post has been long and hard. It has taken over three weeks from start to finish. Firstly because I didn't have any pictures of the coat apart from those we took at the Hilton Americas, Houston. So the coat travelled to the West Coast for photographs but we didn't have WiFi at our rented bach. I know some people write blog posts on their phone but I have no idea how they do it the screen is too small and how do you sort out the photographs? Anyway here I am trying to remember how this coat was made and write a useful blog post. You might want to read this over a cup of tea because it has turned out rather long.
This coat was part of my recent
travel wardrobe. The original coat in the
Houston Travel Wardrobe plan was quite different. The Liberty sequin fabric proved too precious to use so I bought another sequin fabric in the Liberty sale to use for a trial run. I did start the pattern alterations for the longline bomber jacket but got distracted and unfortunately the trial garment hasn't made it on to the production schedule yet. This made room for the Victory Patterns Ulysses Trench. A pattern that spoke to me the moment I set eyes on it.
The finished garment
I should have flashed the lining in this carpet photo as coincidentally the Liberty silk design is called "Hilton".
 |
| Ms Matchy Matchy and the amazing carpet in the Hiltom Americas Houston inspired by Paula Nadelstern designs |
 |
| Should have arranged the collar before having my photo taken! |
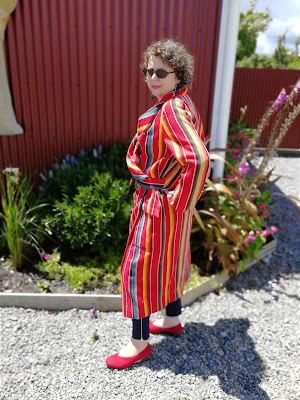 |
| Does it look like my bath robe? |
 |
| Storm flap cut on the bias so the stripes form a chevron |
And because its so pretty here is the coat on inside out to show the front facing and lining.
 |
| Front facing |
 |
| Liberty silk satin lining in design Hilton |
The fabric
I knew I could purchase the Ulysses trench pattern from
Stonemountain and Daughter but as every sewer knows there needs to be a thorough investigation of what other offerings a website has just in case you do the unthinkable and miss some unmissable item.
 |
| Stonemountain and Daughter yarn dyed rainbow stripe ikat |
Luckily I didn't miss this yarn dyed rainbow stripe ikat a 100% cotton fabric from India. The recommendation is to hand wash separately and line dry. I don't do hand washing so this was put in the front loader washing machine on the silk cycle (a gentle 30° wash). This is a heavier weight fabric than the one currently available at
Stonemountain and Daughter (yarn dyed rainbow stripe II).
 |
| The Fabric Store Liberty Hilton silk satin in colourway A |
The pattern
Victory Patterns describe the coat as "Ulysses mixes trench coat styling with a modern look. This relaxed, straight-cut jacket features draped elements such as a shawl collar and a clean-lined, curved back "rain guard" overlay. Notched-out holes along the sides seam of the overlay allow the jacket's belt to exit through from the back to the front. Other features include shoulder epaulettes, clean-lined, angled patch pockets with an upper flap, a centre-back vent, and a gently angled hemline at the front.
The body of the coat is unlined, making this a perfect, cool style for the warmer months. Instructions are given for finishing seams with binding, which creates a beautiful interior finish to the garment."
The pattern alterations
I sewed the size medium which gives me more than enough room for layering underneath. Not that I would necessarily wear this cotton coat with a thick woolly jumper but I could. In the photos below the medium size is the middle line (third in or out) of the multi-sized pattern.
Only two pattern alteration were made for fit: a sway back adjustment which I really should remember to make on every pattern but don't; and a forward shoulder adjustment. All other pattern alterations were for style. As whilst I wanted to stay relatively true to the pattern the coat had to be one I would love wearing.
Looking at the pictures on the
Victory Patterns website and the pattern pieces the shoulder width results in a slight dropped shoulder. The shoulder was definitely too wide for my taste so I narrowed it by 1½". As well as making a ½" forward shoulder adjustment and redrawing the armhole. I have to confess that I didn't use the Ulysses trench sleeve (or corresponding armhole) but used my much loved two-piece sleeve which I think originally came from Vogue 8865. For coats I really dislike a one piece sleeve, they feel and hang much better with the gentle curve around the elbow from the shaping in a two piece sleeve.
 |
| Front shoulder narrowed plus forward shoulder adjustment |
 |
| Back shoulder narrowed plus forward shoulder adjustment |
The Ulysses trench is quite long at 41" but I wanted it longer than my long tunics so lengthened it by 5". It was worn 46" long in Houston but when I came home I shortened it by 1" by increasing the hem from 1½" to 2½". I am happy with it at 45" long but have to be careful walking up stairs when it is hanging open because it is easy to stand on the front. I like the 2½" hem better as well so success all round.
 |
| Extended length |
Given that this coat has no closures apart from the belt having a walking vent seemed pointless so I omitted it and cut the back pattern piece on the fold so that the stripes wouldn't be interrupted.
 |
| Back pattern piece minus the walking vent |
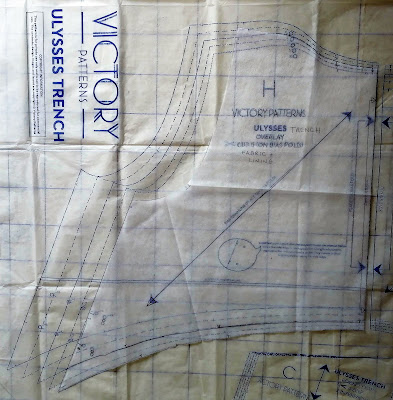
The storm flap is quite a bit bigger than the coat back. After placing the coat back pattern piece over the storm flap piece I decided to make the extra small size. The neckline, shoulder and armhole are as per the back with the width and length the extra small size. The storm flap is still bigger than the back and drapes nicely as it is cut on the bias. The storm flap comes with two pattern pieces: one for the outer fabric and the other for the lining. I used the same pattern piece for both outer fabric and lining.
The Ulysses trench is unlined but I prefer lined coats so a front facing was created, as well as front and back lining pieces. For the sleeves I used the same pattern piece as the outer fabric and cut the sleeve lining ¾" shorter. More detail on how to draft a lining for an unlined coat can be found in good sewing books like Claire Shaeffer's High Fashion Sewing Secrets or online like this
Seamwork tutorial.
Note I didn't alter my sleeve lining pieces as recommended by Claire or the Seamwork tutorial as the shoulder pad wasn't very thick and neither was my outer fabric. If my fabric had been thicker or I had used even a ½" shoulder pad I would have made the adjustments to the sleeve lining.
 |
| Front facing and front lining pieces |
 |
| Back lining piece, with a 2" extension which is cut on the fold to give a 2" pleat. |
The sewing
First of all I underlined all of the ikat fabric pieces with silk organza. I didn't want to change the hand which can happen with interfacing but felt the fabric needed a bit more body and support. The silk organza and ikat were basted and then overlocked together before any of the other sewing was done. This had the added advantage of stopping the ikat from unravelling at the cut edge which it was quite keen to do. For the belt and pocket flaps I underlined both fabric pieces with organza.
The pattern comes with a 22 page A5 instruction booklet which I sort of read but also ignored when it suited me or the pattern alterations I had made. Below are the major areas where I deviated from the pattern instructions.
For the pocket I largely did as instructed except I never clip my corners and I overlocked the lining to the ikat as well as sewing the seam allowance. The pocket flap was sewn right sides together around all four sides with a small gap left to turn the flap back right sides out. The instructions have you only sew three sides leaving the long edge which will be sewn to the coat open. This was a personal preference to have all of the seams enclosed, partly due to the ravelly nature of the ikat. I then edge stitched and top stitched the flaps to the coat, this had the added advantage of giving me better control over the stripe matching.
 |
| A bit of obsessive stripe matching |
The epaulettes were omitted (a fussy affectation I am not fond of) but I did add a shoulder pad to the coat.
The belt has a button loop to secure it to a small hidden belt carrier. This is a feature used in Vogue 1836 (the
Issey Miyake Gorgeous Raincoat) which I used again for this trench as it secures the belt to the carriers. The trench can now be worn unbelted without fear of loosing the belt, or having to tie it at the back. The idea of the smaller belt carriers was not a feature of Vogue 1836 but a variation made because I didn't like the button loop being on the public side of the belt. The button loop uses a 6mm press stud fastener instead of a button. The button loop and hidden belt carriers were made from the Liberty lining fabric. I hand stitched them as it was easier and involved less swearing than sewing by machine and turning them. They were attached to the belt/coat by machine.
The buckle was omitted as I couldn't find one I liked and am quite happy tying the belt to secure it.
 |
| Button loop on the belt wrong side |
 |
| Hidden belt carrier for use with the button loop |
 |
| Smaller belt carrier hidden under the storm flap, visible through the cut-out |
I also added a belt carrier at centre back so the weight of the belt was not held just by the storm flap cut-outs. It also means the belt is held at centre back so it can't catch on door handles or more importantly the handrail on aircraft stairs.
The observant may notice that the belt carrier stripe doesn't quite match the garment. That is because after overlocking the edges I carefully folded it into thirds with the wrong side of the fabric on the public side. I didn't notice this mistake until it had been sewn to the coat so wrong side out is how it will always be.
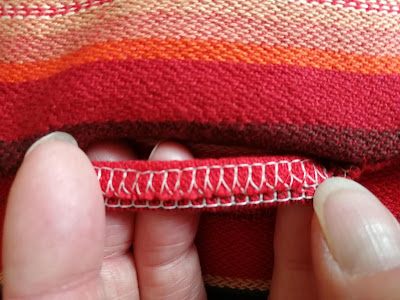 |
| Centre back belt carrier |
 |
| Belt carrier matched to the stripe sort of |
When I make a coat I like to be sure my seams will always lay flat so I use a catch stitch (herringbone stitch if you are an embroiderer) to sew the seam to the underlining. I do this for the hems as well. I prefer catch stitch to slip stitch because it allows for more movement, it doesn't hold the edge as firmly in place.
 |
| Hand sewn catch stitch to anchor all seam allowances |
I won't explain how I sewed the lining and outer coat together as there is plenty of information in good sewing books, examples are: Professional Sewing Techniques for Designers by Sharon Czachor and Julie Cole (chapter 16 in the 2008 first edition); or Readers Digest Complete Guide to Sewing; or Tailoring the classic guide to sewing the perfect jacket by the editors of Creative Publishing. The first book is my go to place for sewing advice but it is pricey the second edition on Amazon sells for US$108. The latter two explain how to create lining pattern pieces as well as sew the lining itself and into the jacket.
Alternatively there are plenty of places online to provide advice and instruction. For example my technique is pretty much as described in this
Threads article.
A difference between what I did and the Threads article is the 2" pleat at centre back. The pleat was stitched closed at the neck edge and below the hip of centre back. The pleat is for mobility across the upper back but is not needed below the waist. Apparently the pleat is pressed to the left for a woman and right for a man. To be contrary I pressed mine open (half on the left, half on the right).
Also once the facing was stitched to the outer coat I paused with the machine stitching and caught the facing to the underlining with a catch stitch. I don't normally do this but I was worried about the facing not staying in place given how big it is with the waterfall collar. Czachor and Cole recommend this for heavier fabrics where pressing alone may be insufficient to hold the fabric in place.
Outfit of the day
 |
Moochi Level Layer Neon Yellow tunic; Milk Dot Leggings;
United Nude Zink Patch Mid Pop Mix booties
At International Quilt Festival on the walkway between
the George R Brown Convention Centre and the Hilton Americas |
 |
| Just a fabulous amazing carpet - Paula Nadelstern inspired design in the Hilton Americas |
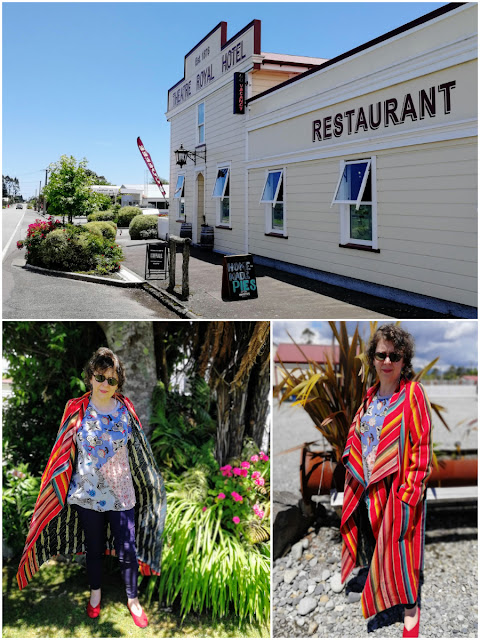 |
Ketz-ke Wildcard tee; Andrea Moore Endless Love trousers;
United Nude Lev Wrap Lo red shoes
Closer to home at the Theatre Royal Hotel, Kumara |
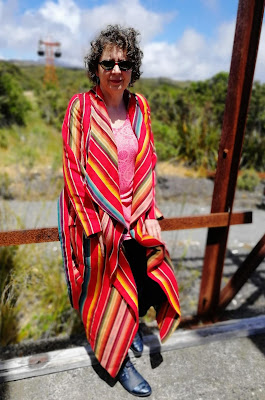 |
Silhouette Patterns Marie's Sweater top;
Andrea Moore Endless Love trousers; Trippen Klee Navy Lace-ups
At the old Denniston coalmine |
 |
The Denniston Incline
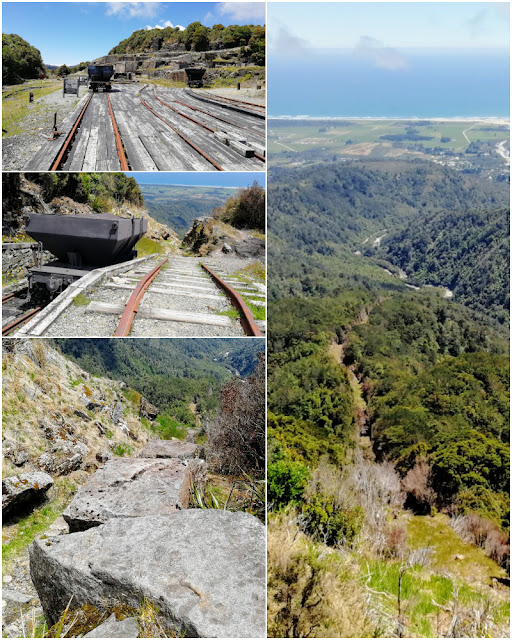
Photos top to bottom, left to right: the marshalling yard on the Denniston plateau;
"Q" wagon at the start of the incline; over the top and on the way down;
gash in the landscape where the track used to be |
The Denniston incline was a railway track used to move the coal from the mines on the Denniston plateau to the railhead at sea level. The incline plunged 548m in a distance of just 1670m, with some grades as steep as 1 in 1.25 (80%). Now the regenerating bush is reclaiming the incline - the gash in the landscape evidence of where the railway used to be.
The Stonemountain and Daughter visit
As both the pattern and the yarn dyed ikat came from Stonemountain and Daughter (S&D) I took the coat back for a visit on my recent trip to the States. I only had one night in San Francisco on the way up to Portland and normally I make the trip to Britex Fabrics but this time I braved public transport to journey out to Berkeley.
I am absolutely sure I took photos of both the inside and outside of the shop but none exist now. So either I dreamt taking photos or they were somehow deleted.
My shopping at S&D was extremely restrained and mostly either for my class with Peggy Sagers in Portland or Houston IQF classes. Only one yard of fabric came home with me a velvet devore which I thought would pair well with another one yard piece in my collection. Of course now that I have the two fabrics together I am not so sure. The colour works relatively well but the print in the new fabric (on the left) is too heavy for the fans and cranes fabric.
 |
Devore Velvet: left - recent acquisition from Stonemountain & Daughter;
right - long ago purchase from eQuilter which has always been too precious to use |
Maybe I should use both pieces independently as the overlay for either Silhouette Patterns #197 Kendosa's top or
#105 De la Renta's Top. Hmm food for thought.
Anyway back to S&D. If I do a similar trip again I will stick to visiting Britex. For me Britex is the candy store so much wonderfulness to touch and drool over. Yes the fabric is expensive but as a souvenir from a trip that doesn't matter. On the other hand I would love S&D as my local fabric shop they have so many fabrics that I would sew with everyday - AGF knits, kantha, ikat, Japanese linen, cotton etc. In choosing where to visit in person the big difference is I feel comfortable shopping for fabric on-line at S&D. I am very rarely disappointed by what arrives in my parcel. Conversely I love visiting Britex in person but would never order anything on-line (well I did once I ordered more of the lining I had just bought in-store). In modern sewing parlance (for me) Britex is the frosting, S&D the cake.




It's not surprising this coat received so many compliments when you wore at the Houston Quilt Festival. Love that photo with the Paula Nadelstern carpet - even the waterfall effect from the open front echoes the carpet. Looking forward to see what you do with the Devore velvet and cranes fabric.
ReplyDeleteThis is an absolute favourite coat and I don't feel a bit like a deck chair (comment upon seeing the fabric from a beloved but at times unhelpful person). Loved the pattern, fabric and lining on first sight which always helps for a successful finished item. Devore may have to rest a while longer, hasn't quite decided what it wants to be.
Delete