Saturday 27 May 2017

Ready to Sew Janis Two Ronnies Top

This is my third version of the Janis top view one by Ready to Sew. All of them have the basic style lines but only the first version is entirely true to the pattern. This version whilst it achieved my vision is less successful on the body. It won't stop me from wearing it as I really like the fabric.

The finished garment

So sleeves as a statement have made a comeback but in a way that is a bit too close to the Eighties for me. All those ruffles to dip into the gravy - quelle horreur. Still with statement sleeves in mind and as usual a shortage of The Two Ronnies' fabric I thought a stripe was the answer. The statement part being that the stripe in the sleeves match the one in the body. Not a very smart idea to have a visibly widening effect at the waist - live and learn, maybe.

Creates Sew Slow: Ready to Sew Janis Two Ronnies Top

Creates Sew Slow: Ready to Sew Janis Two Ronnies Top

Creates Sew Slow: Ready to Sew Janis Two Ronnies TopCreates Sew Slow: Ready to Sew Janis Two Ronnies Top

The fabric

The spectacle fabric is an Avalana jersey 95% cotton and 5% elastane by Stof Fabrics.  The stripe fabric is also an Avalana but with 94% cotton and 6% elastane, which is just not as nice to the touch as the spectacle fabric nor does it stretch the same. This fabric was purchased from All Things Patchwork on our Easter trip away so once again not a very long maturation period.

Creates Sew Slow: Stof Avalana Spectacles

Creates Sew Slow: Stof Avalana Stripes

So why call this the Two Ronnies' top you ask. For anyone familiar with British 1970's comedy the answer is clear and for everyone else there is Wikipedia.

The pattern

Janis is described as a peplum style top with two collar options, both available in short and long sleeves.  It's fitted at the shoulders and falls into a relaxed fit below the bust. This is a modified version of view one with the round neckline and 3/4 length sleeves.


Creates Sew Slow: Ready to Sew Janis Top

The pattern alterations

I used the same pattern with changes as per my first version with the neckline lowered that extra 1/4 inch as per my second version. The additional changes made to the front and back pieces were:
  • Fold up the front and back pieces at the lengthen shorten line to remove the curve. Add 2" to the length
  • Taper the side seams to remove 1/4 inch at the base
  • Cut a band the width of your front and back pieces x 4 1/8 inches (mine was 39 3/4 x 4 1/8 inches)

For the sleeves a short sleeve was cut using my TNT knit sleeve. This was cut longer than I thought I needed then after one had been basted into the garment to determine length I cut both measuring 11 7/8 inches from the cap. Cut two rectangular strips the width of the short sleeve from both the stripe (4 1/8 inches) and spectacles (3 5/8 inches). Sew these rectangles to the short sleeve and then re-cut to shape using the sleeve pattern.

Given the widening effect of the stripe at the waist I wonder if it would look better with a narrower waist stripe of 2 inches, and the top and peplum both increased by 1 inch to retain the overall length. Or even reduce the waist by tapering in the side seams more. Oh well it is made now but possibly some good thoughts for next time.

The sewing

Yet another simple knit top sewn on the overlocker.  Hems (sleeve, peplum and neck edge) turned under and hemmed with a straight stitch and ballpoint needle in my little Singer Featherweight.

The only difference to the previous version is sewing together the different fabrics and working out the length of the sleeve so the stripes match up.  The sewing order was:
  • Overlock the shoulder seams
  • Overlock one side seam
  • Add the striped band to the bottom of the body
  • Baste in the round one short spectacles sleeve to determine the length where it would meet the spectacles on the body. (You can then cut both sleeves accordingly and assemble the three sleeve pieces together)
  • Set in the sleeves (one in the round and one flat as normal)
  • Overlock the other side seam
  • Add the peplum to the bottom of the body
  • Hem the sleeve, peplum and neck edge

I really do have some more interesting sewing percolating around in my head. A couple of coats in fact from two late 90's Vogue designer patterns. As usual there is a bit of procrastination at the start due to the effort needed to think through and do the necessary fitting alterations, as well as the waste of fabric fear (will this fabric be as great made into this coat as it is in my head). Another knit top is quite a good delaying tactic and I certainly have enough fabric to feed the machine.


The styling

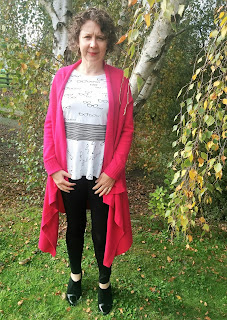
This week I had a bit of a black and white theme going with my work outfits so I added my pink Sable and Minx wool/cashmere cardigan to brighten things up.

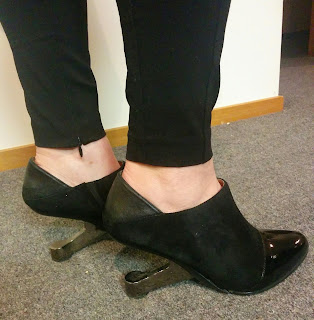
Here is my casual Friday outfit. Janis Two Ronnies top worn with black trousers from Witchery, my aforementioned pink cardigan and United Nude Eamz Alexa Black shoes.

Creates Sew Slow: Ready to Sew Janis Two Ronnies Top

Here is my outfit minus the cardigan and a better picture of the shoes.

Creates Sew Slow: Ready to Sew Janis Two Ronnies Top

Creates Sew Slow: United Nude Eamz Alexa

So it's goodnight from me and it's goodnight from him.

Saturday 20 May 2017

Vogue 1250 Elevenses Dress

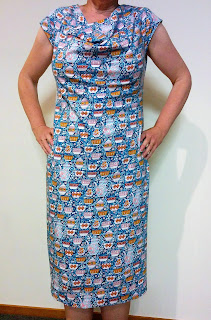
I wasn't jealous that my crafting partner in crime Cath was having a textile adventure in Japan without me.  It was pure coincidence that when I went into The Fabric Store a fabric which made me think of Japan came home with me.  Obviously it was really the tea theme and the colour that influenced the buying decision, not to mention that it was a lovely cotton jersey.


The finished garment

I think of this as my Japanese tea dress. The fabric was absolutely desperate to become this dress, there was no maturing in stash it was bought on Saturday, washed on Sunday and made on Tuesday (ANZAC day so a holiday in New Zealand). And I instinctively reached for Vogue 1250, no dithering about which pattern to use. Really not a typical Creates Sew Slow make. I didn't even use the seam ripper during construction.

Creates Sew Slow: Vogue 1250 Elevenses Dress

Creates Sew Slow: Vogue 1250 Elevenses DressCreates Sew Slow: Vogue 1250 Elevenses Dress

Wearing this dress to work made me feel good.  Another successful iteration of Vogue 1250.

Creates Sew Slow: Vogue 1250 Elevenses Dress

The fabric

Another Liberty of London Ganton 100% cotton jersey, from The Fabric Store, this time a pattern called Elevenses in the azure colourway. Described by the Fabric Store as a bold and bright china teapot and teacup print in azure blue, crimson and sunflower yellow on a crisp white base.

Creates Sew Slow: Fabric Store Liberty Elevenses in Azure

There is enough fabric left over that it could be combined with something else to become a creative top of some sort. Or maybe this is when it sits in the stash for the next 20 years.


The pattern

My third version of Vogue 1250, a DKNY pattern simply described as a close fitting dress.

Creates Sew Slow: Vogue 1250


The pattern alterations

This is a TNT pattern with alterations that allow it to be used straight out of the envelope. From memory my version has a deeper cowl facing; forward shoulder adjustment; raised armholes (to eliminate bra exposure) and 3/8 inch seam allowances.

The sewing

As usual pretty straight forward on the overlocker.  The back neck seam allowance is pressed under and stitched down on the sewing machine with a straight stitch - no back neck facing for me.

The armhole hem allowance is pressed under, but not stitched down, before the shoulder and side seams are sewn. The back armhole hem is sewn turned under when the side seam is overlocked.  Once the side and shoulder seams are overlocked the whole armhole edge is turned under and straight stitched in place. This makes the finished armhole edge much neater.


The major change to how I normally sew this dress is that I actually hand stitched the hem. Just didn't want that line of stitching marring the fabric pattern.


The styling

No styling just an outtake from the photo shoot. The photographer was making fun of my toy soldier pose so I started being stupid and he captured it for posterity. That pose looked much better in my head, in reality it's more akin to the dance from the Morecambe and Wise show.

Creates Sew Slow: Vogue 1250 Elevenses Dress

Saturday 13 May 2017

Self-drafted Tessuti Leggings

So I finally used my self-drafted leggings pattern to make actual leggings, as opposed to the samples made in class back in July 2016.  The class was excellent, ably taught by Audsley Jones at The Make Company. There were only two of us and it was a very pleasant way to while away a Saturday afternoon.

The finished garment

Love these leggings - not surprisingly they fit well and the fabric makes a difference from the usual boring black.

Creates Sew Slow: Self-drafted Tessuti LeggingsCreates Sew Slow: Self-drafted Tessuti Leggings

The fabric

This fabric came from Tessuti Fabrics within the last couple of years. It is a lovely soft knit but I have no idea of its composition. Not sure it is entirely suitable for leggings and it is possible they won't wear that well.

Creates Sew Slow: Tessuti knit fabric

The fabric does have two-way stretch which is probably essential for leggings. In order to fit the pattern on the fabric the maximum stretch goes up and down the body rather than around.  There is still enough stretch around the body to make these leggings comfortable.


The pattern

I took my measurements according to the instructions and made the pattern last year in class.  For some reason both myself and my classmate ended up with leggings that were way too long. So when I got home I re-measured myself and adjusted the pattern.  These leggings only have an inseam (no seam on the outer leg) which makes the knee area baggy if you don't have enough negative ease but this is easy enough to adjust when you sew them. Being self drafted you can decide how high you want the waistband to come - for me it is just slightly below my belly button.

Creates Sew Slow: Self-drafted leggings pattern

Creates Sew Slow: Self-drafted leggings pattern

If you want to make your own self-drafted leggings the Live Free Creative Co has a good how to guide for both the drafting and sewing. The drafting is simple - a great project if you have never drafted a garment before from scratch.


The sewing

Couldn't be easier. The drafting instructions advise you to use 1" or 3/8" seam allowances depending on the stretchiness of your fabric.  Despite using the crosswise grain with less stretch I still needed to use 1" seam allowances to get the appropriate negative ease.

The inseam of both legs is sewn on the overlocker, then one leg is put inside the other right sides together matching the inseams and the crotch curve overlocked. The hem is turned up on both legs and stitched with a straight stitch on the sewing machine using a ballpoint needle.

For the waistband I used 2" elastic purchased from Silhouette Patterns in a 50 yard roll, which will probably have perished before I use it all. My personal preference is to use wider elastic for waistbands as I find it more comfortable and it helps hold in the tummy. The elastic was cut the same size as my waist then overlapped 1.25" and a large cross sewn to hold the overlapped edges together. The elastic circle was quartered and matched at quarter points on the leggings. The overlapped elastic was placed at the centre back seam. The elastic was overlocked onto the leggings waistband, the fabric / elastic were then turned under and straight stitched in place once again using a ballpoint needle in the sewing machine.

Creates Sew Slow: Self-drafted Tessuti Leggings

It really helps having your garment label in these leggings as it identifies centre back, which despite being higher than centre front I struggled to find when I tried them on pre-label.

The styling

Here are my leggings worn with The Sewing Workshop Bristol Top I made last year, and United Nude Step Mobius ankle booties which you can't really see.

Creates Sew Slow: Self-drafted Tessuti Leggings

And worn with a Storm Well Covered Poncho and my Arche Tykado ankle booties, out in the late afternoon sun.


Arty angle shot photos courtesy of my beloved, who is finding this blogging lark a bit tedious and is worried about my escalating narcissism - hence no head.

Saturday 6 May 2017

Silhouette Traditional Ahipara Dress

This dress was made at Easter during our long weekend away in the Far North at Ahipara. The weather was supposed to be rubbish thanks to Cyclone Cook, with high winds and lots of rain so I decided to take my Singer Featherweight with me - better than a good book. As it happens the weather was good, just the occasional short heavy rain shower typical for Northland, but I still managed to fit in some sewing.

The finished garment
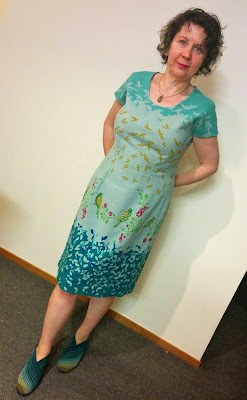
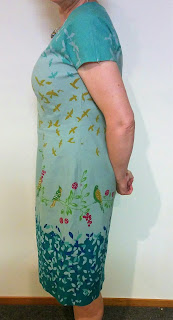
This is the unhemmed version of the garment taken in the garden at Beach Abode on the morning we headed home.

Creates Sew Slow: Silhouette Traditional Ahipara Dress

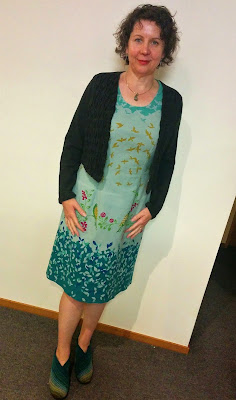
And here is the finished hemmed version, with less picturesque scenery.

Creates Sew Slow: Silhouette Traditional Ahipara Dress

Creates Sew Slow: Silhouette Traditional Ahipara DressCreates Sew Slow: Silhouette Traditional Ahipara Dress

It has been worn successfully to work. Successful because it fits well and is really comfortable to wear all day - no issues with the neckline sliding backwards thanks to the forward shoulder adjustment. It also garnered a number of compliments and some incredulity that I made it myself.

Although the weather is now cooler the capped sleeve style suits my new frequent inner boil temperature.

The fabric
This is a wonderful border print linen from Echino purchased at Nancy's Stitch Studio in Wellington many years ago. It was bought to be a skirt but never made because I loved the full width of the fabric and couldn't bear to chop it up. With my new found affinity for dresses it was finally destined to become a finished garment, although it took six months from cutting out to being sewn.

I am so pleased I procrastinated with the skirt idea because I love my finished dress and feel a great deal of satisfaction from using the whole pattern.

To prove I used the whole fabric width the hem is placed along the selvedge and I had to add a piece in at the front shoulder neck edge. The leftover fabric really was scraps and could be thrown away, maybe.

Creates Sew Slow: Silhouette Traditional Ahipara Dress

Creates Sew Slow: Silhouette Traditional Ahipara Dress

Creates Sew Slow: Silhouette Traditional Ahipara Dress

The lining fabric is completely unknown, purchased I suspect for its colour rather than the fabric composition.  I bought it soon after the Echino fabric so I could line the skirt and luckily there was enough for a dress lining.

The pattern
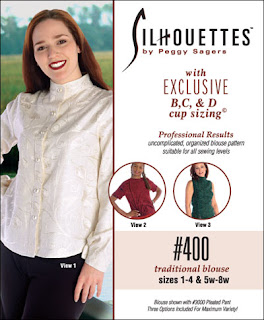
The dress is Silhouette Patterns Traditional blouse, number 400 view 2 extended to knee length. It is a favourite blouse pattern for woven fabrics used many times.

The pattern is described as offering a variety of optional looks with basic results.  Mandarin, jewel neck or turtleneck collars are available with woven or knit fabrics.  Long or short sleeves are also options for each view.  These blouses are the greatest basic to any wardrobe!

Creates Sew Slow: SP Traditional Blouse

The pattern alterations
The dress is based on the size 2 D-cup pattern; graded down to the size 1 at the waist and hips; wider waist darts in the front to provide more shape; shoulders narrowed slightly; and a 1/2 inch forward shoulder adjustment. The length was extended to 43 inches at centre back, allowing a 2 inch hem.

I measured a favourite slightly A-line skirt to determine the circumference at the hem (46 inches). I did wonder about making a straight skirt but wasn't keen on having the split for sufficient walking ease.  Recently I learnt (from a Peggy Sagers webcast possibly the one on Amy's skirt) that a true straight skirt is the width of the hips minus 4 inches and I really don't think I would have been able to stride along without a split in a skirt with a 36 inch hem circumference.

Because of the fabric pattern I decided to use cap sleeves instead of a set-in sleeve. I also had quite limited fabric for a dress having only purchased 1.5 metres.

Not really an alteration but I cut the dress twice once each from the fashion and lining fabrics.

The sewing
For the lining I folded out the bust dart at the side seam but otherwise left the bust and waist darts unstitched. Just stitched the darts in the fashion fabric.

The centre back seam was sewn in the fashion fabric leaving the top 8 inches open for the zip. I used an ancient zip purchased during my sewing days in England probably nearly 30 years ago. Despite being shorter than the usual length for a dress zip it does the job and is an amazing colour match considering it came out of the stash.  I even managed to remember how to do a lapped zipper although I had to do a hand prick stitch to keep it in place. (I only machine stitched the zip to the centre back seam as I didn't want the stitches to show on the garment right side and the prick stitch is practically invisible.)

Creates Sew Slow: Silhouette Traditional Ahipara Dress

Creates Sew Slow: Silhouette Traditional Ahipara Dress

The dress and lining were constructed separately, nothing fancy the seams were just sewn and pressed open, with the shoulder seams left open.  The two were then joined at the neck and armhole edges.  The neckline and armholes were under-stitched and lie nice and flat. The lining was machine sewn to the dress centre back seam at the zip opening.

Creates Sew Slow: Silhouette Traditional Ahipara Dress

Creates Sew Slow: Silhouette Traditional Ahipara Dress

A french seam was used for the shoulder seam with the dress and lining fabrics sewn as one.

The fashion fabric and lining were hemmed separately, the lining by machine and the fashion fabric by hand.

The temporary sewing spot
On Easter Sunday afternoon I set the sewing machine up on the table in the dining nook with the ironing board nearby and cup of tea close at hand.

Creates Sew Slow: Sewing at Beach Abode

Creates Sew Slow: Sewing at Beach Abode

Creates Sew Slow: Sewing at Beach Abode

Just for fun here is a sepia-ish version of the sewing almost in action.

Creates Sew Slow: Sewing at Beach Abode

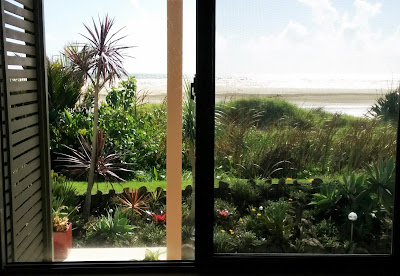
The view from the temporary sewing spot.

Creates Sew Slow: Sewing at Beach Abode

The travelling Featherweight
My beloved Featherweight flew safely, as carry-on, packaged in its little black padded bag (the original hard case stays safely at home). The two sewing projects and other associated paraphernalia carefully packed around it. According to the bathroom scales it weighed 7.6 kg.  Of its three flights it was only stopped once by security to check that what it seemed to be it actually was.

Creates Sew Slow: Travelling Featherweight

Creates Sew Slow: Travelling Featherweight

The styling
Keeping it simple with my charcoal grey me-made jacket and United Nude Fold shoes in colourway Horizon.

Creates Sew Slow: Silhouette Traditional Ahipara Dress

Here is a close-up of the little jacket made many years ago from a 1990 Donna Karan pattern V2494 using a felted piece of merino jersey, with a simple American smocking design to jazz up the fronts.

Creates Sew Slow: V2494 Donna Karan JacketCreates Sew Slow: V2494 Donna Karan American Smocked Jacket